In this we will walk through the process of deploying separate frontend and backend applications, and then exposing the frontend to be accessible. We'll be using fundamental Kubernetes objects like Deployments to manage our application pods and Services to provide stable network access.
Prerequisites
- A running Kubernetes cluster (like the one you set up with
kubeadm or yoou can also use minikube that spins up the cluster by itself). kubectl command-line tool configured to communicate with your cluster.- Basic understanding of Docker containers and images.
1. Overview of the Deployment Workflow
The deployment of a distributed application in a cloud-native ecosystem involves two primary stages.
- The first is containerization, where the application and its dependencies are packaged into a lightweight, standalone, executable unit known as a container image. This ensures environmental consistency and portability.
- The second stage is orchestration, where these containers are deployed, scaled, and managed at scale.
Let us understand workflow through the example of a "Notes" application, comprising a web-based frontend and a Python-based API backend.
2. Phase 1: Application Containerization with Docker
The foundational step is to containerize each tier of the application. Docker is utilized for this purpose, with a Dockerfile for each component defining the build instructions.
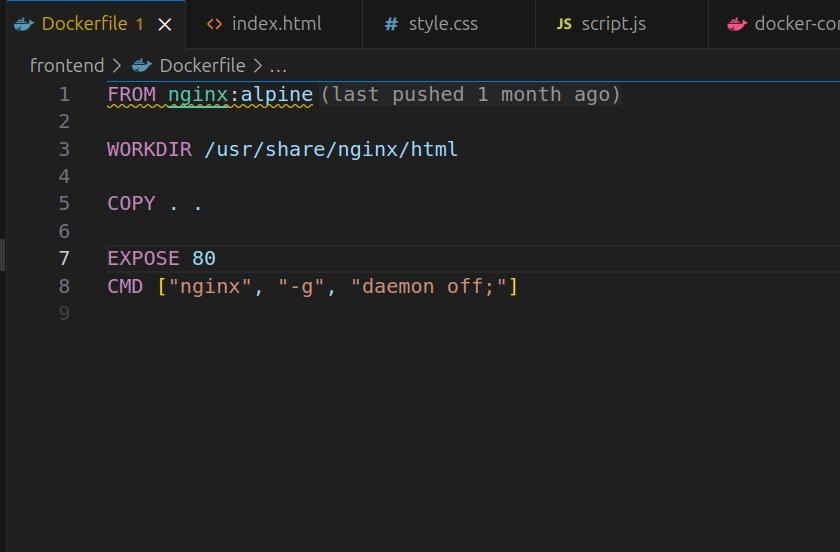
2.1. Containerizing the Frontend
2.2. Containerizing the Backend
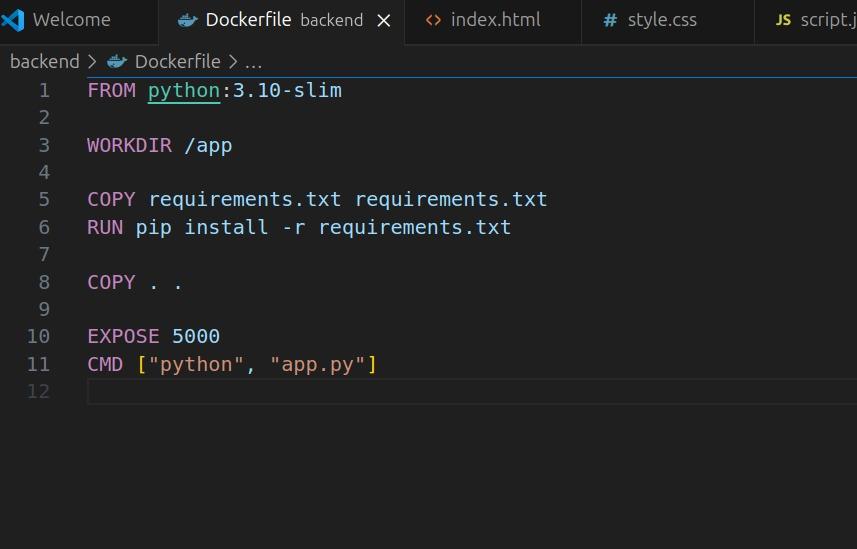
The backend, a Python-based Flask application, is containerized to package the application code and its library dependencies into a single portable image.
Dockerfile Analysis: The Dockerfile for the backend is structured to create an optimized and reproducible environment for the Python application.
FROM python:3.10-slim: It begins with a slim official Python base image to reduce the overall size.COPY requirements.txt .: The dependencies file is copied into the image first.RUN pip install -r requirements.txt: Leveraging Docker's layer caching, dependencies (which change infrequently) are installed in a separate step. This step is only re-run if requirements.txt changes.COPY . .: The application source code (app.py) is copied into the image.CMD ["python", "app.py"]: This defines the default command to execute when a container is started from this image, launching the Flask application.
The Backend Dockerfile:
# Use a slim Python image as the base
FROM python:3.10-slim

# Set the working directory inside the container
WORKDIR /app

# Copy the requirements file and install dependencies
COPY requirements.txt .
RUN pip install --no-cache-dir -r requirements.txt

# Copy the application code into the container
COPY . .

# Expose the port the app runs on
EXPOSE 5000

# Define the command to run the application
CMD ["python", "app.py"]
Once both Dockerfiles are created, the images are built using docker build and subsequently pushed to a container registry, such as Docker Hub, making them accessible to the Kubernetes cluster.
# Build and push the frontend image
docker build -t your-username/notes-frontend:latest .
docker push your-username/notes-frontend:latest

# Build and push the backend image
docker build -t your-username/notes-backend:latest .
docker push your-username/notes-backend:latest
On Successful Push you will be able to see it on your Dockerhub:

3. Phase 2: Orchestration with Kubernetes
With the container images available in a registry, the next phase is to deploy them in a Kubernetes cluster.
You can also set alias for a command. I have set the alias for kubectl as k. For this you can use the command :
alias k=kubectl
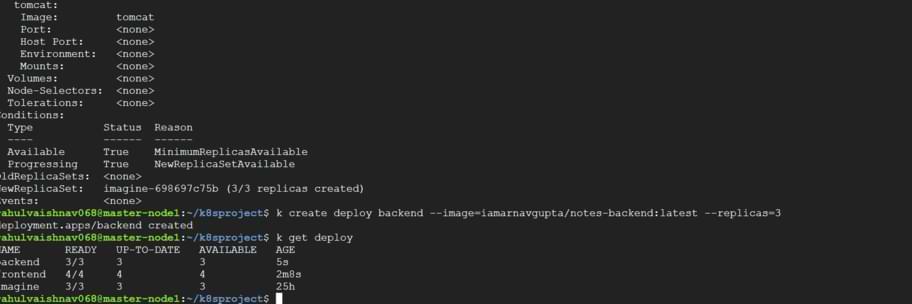
Step 1: Deploying the Backend Application
First, we'll create the backend of our application. A Kubernetes Deployment is the perfect tool for this. It ensures that a specified number of replica Pods are always running. If a Pod crashes, the Deployment controller replaces it automatically.
We will create a deployment named backend using a pre-built Docker image, with three replicas for high availability.
Execute the following command:
kubectl create deployment backend --image=iamarnavgupta/notes-backend:latest --replicas=3
This command tells Kubernetes to:
- Create a new object of type
deployment. - Name it
backend. - Use the Docker image
iamarnavgupta/notes-backend:latest for the containers. - Maintain
3 running replicas of the pod.
To verify that the deployment was successful, let's check the status of our deployments and pods.
kubectl get deploy
You should see your newly created backend deployment, along with any others you might have.
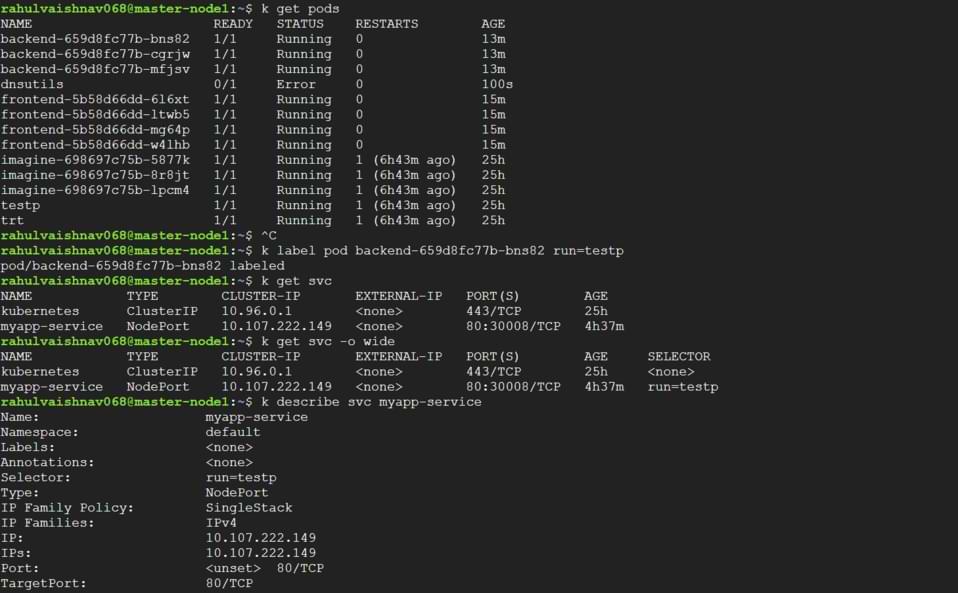
Now, let's check the pods created by this deployment. Kubernetes automatically adds a label app=backend to these pods, which we can use as a selector.
kubectl get pods --show-labels
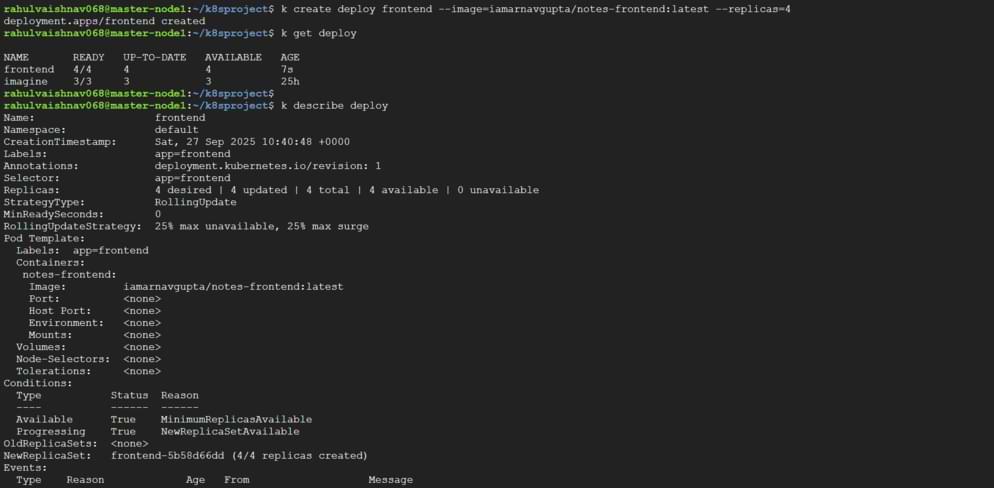
Step 2: Deploying the Frontend Application
Next, we'll deploy our frontend application in the same way. This time, we'll create a deployment named frontend with four replicas.
kubectl create deployment frontend --image=iamarnavgupta/notes-frontend:latest --replicas=4
Verify the Frontend Deployment:
kubectl get deploy frontend
And describe it to see more details:
kubectl describe deploy frontend
Step 3: Exposing the Frontend with a Service
Our pods are running, but they are not accessible from outside the cluster. Pods have their own internal IP addresses, which are ephemeral—they can change if a pod is recreated. To provide a stable network endpoint for our frontend, we need to create a Kubernetes Service.
We will use a NodePort service type, which exposes the service on a static port on each of the cluster's nodes.
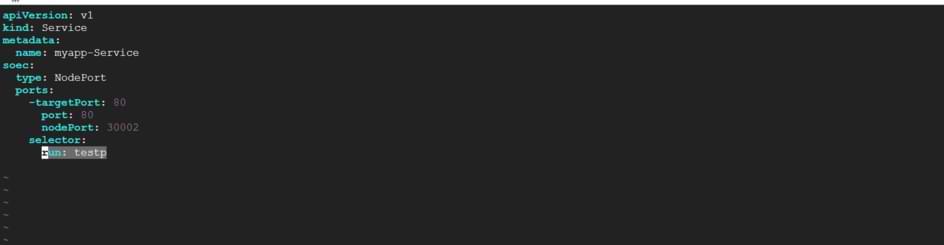
Here is the YAML manifest for our service, let's call it node.yaml:
apiVersion: v1
kind: Service
metadata:
  name: myapp-service
spec:
  type: NodePort
  ports:
  - targetPort: 80
    port: 80
    nodePort: 30002
  selector:
    run: testp
kind: Service: Defines the object as a Service.name: myapp-service: The name of our service.type: NodePort: The type of service.port: 80: The port the service will be available on within the cluster.targetPort: 80: The port on the pods that the service will forward traffic to.nodePort: 30002: The static port on the worker node where this service will be exposed.selector: {run: testp}: This is the most crucial part. The service will automatically find all pods that have the label run=testp and send traffic to them.
Apply this configuration to your cluster:
kubectl apply -f node.yaml

Step 4: Connecting the Service to the Pods with Labels
If you inspect the service now, you'll notice it doesn't have any endpoints. That's because no pods currently have the run=testp label. The power of Kubernetes is this loose coupling: a Service finds its Pods using labels, and we can add or remove these labels at any time.
Let's label one of our frontend pods so that our service can forward traffic to it.
First, get the name of a frontend pod:
kubectl get pods --show labels

Now, apply the label:
kubectl label pod frontend-5b58d66dd-mg64p run=testp
Step 5: Verifying Connectivity
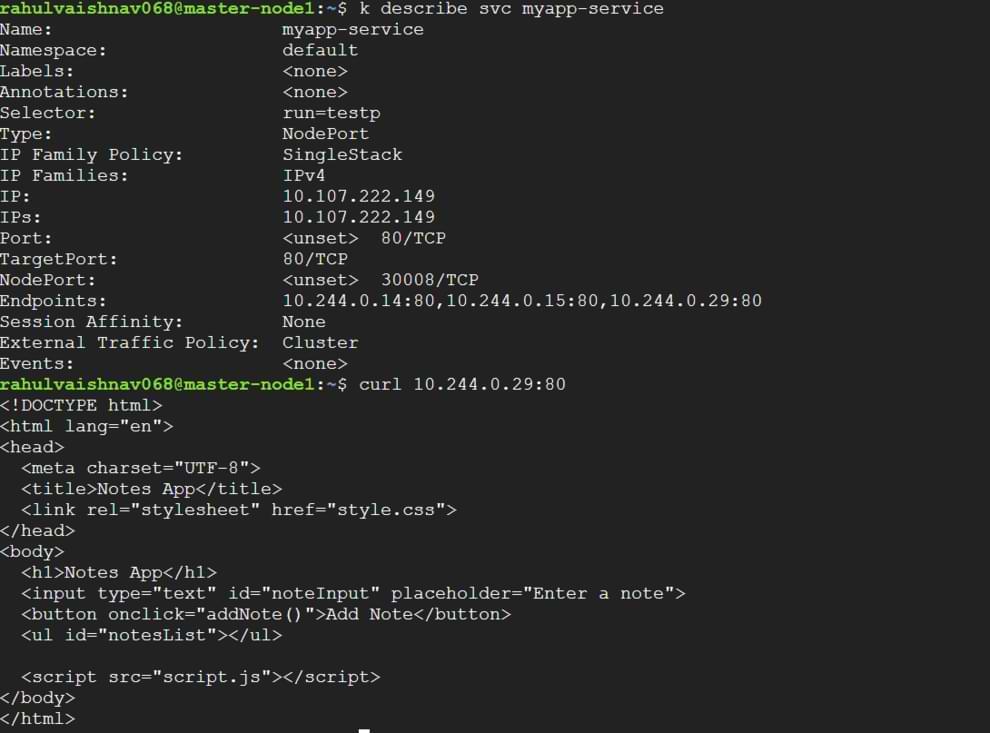
Now that our service is linked to a frontend pod, let's verify everything is working. First, describe the service to see its details and, most importantly, its Endpoints.
kubectl describe svc myapp-service
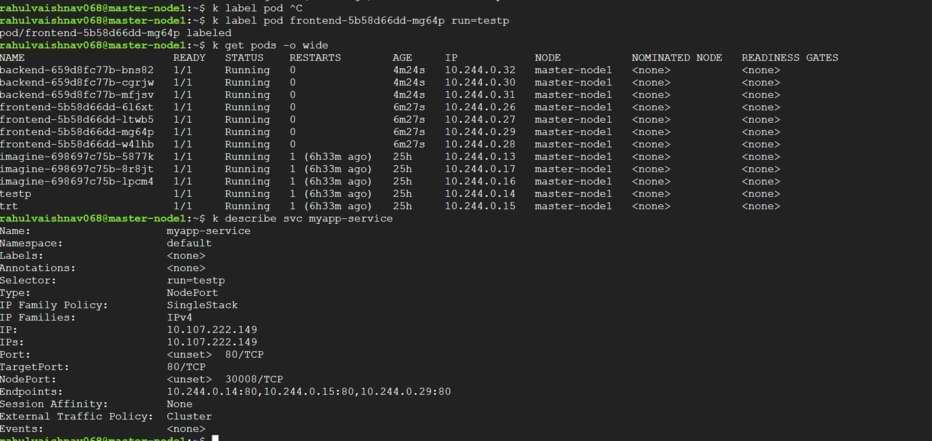
Notice the Endpoints field now lists the IP address and port of the frontend pod we labeled (10.244.0.29:80). This confirms the connection is made!
Finally, let's test the connection by sending a request directly to that pod's IP address from within the master node.
curl 10.244.0.29:80
The HTML output from the "Notes App" is returned, confirming that our Deployment is running and our Service is correctly routing traffic to it. You can also access this application from outside the cluster by navigating to <your-node-ip>:30002.
Explore
DevOps Basics
Version Control
CI & CD
Containerization
Orchestration
Infrastructure as Code (IaC)
Monitoring and Logging
Security in DevOps