How to Create and Add Data to SQLite Database in Android?
Last Updated :
06 Jan, 2025
SQLite is another data storage available in Android where we can store data in the user's device and can use it any time when required. In this article, we will take a look at creating an SQLite database in the Android app and adding data to that database in the Android app. This is a series of 4 articles in which we are going to perform the basic CRUD (Create, Read, Update, and Delete) operation with SQLite Database in Android. We are going to cover the following 4 articles in this series:
- How to Create and Add Data to SQLite Database in Android?
- How to Read Data from SQLite Database in Android?
- How to Update Data to SQLite Database in Android?
- How to Delete Data in SQLite Database in Android?
What is SQLite Database?
Android SQLite Database is an open-source database provided in Android that is used to store data inside the user's device in the form of a Text file. We can perform many operations on this data such as adding new data, updating, reading, and deleting this data. SQLite is an offline database that is locally stored in the user's device and we do not have to create any connection to connect to this database.
How Data is Being Stored in the SQLite Database?
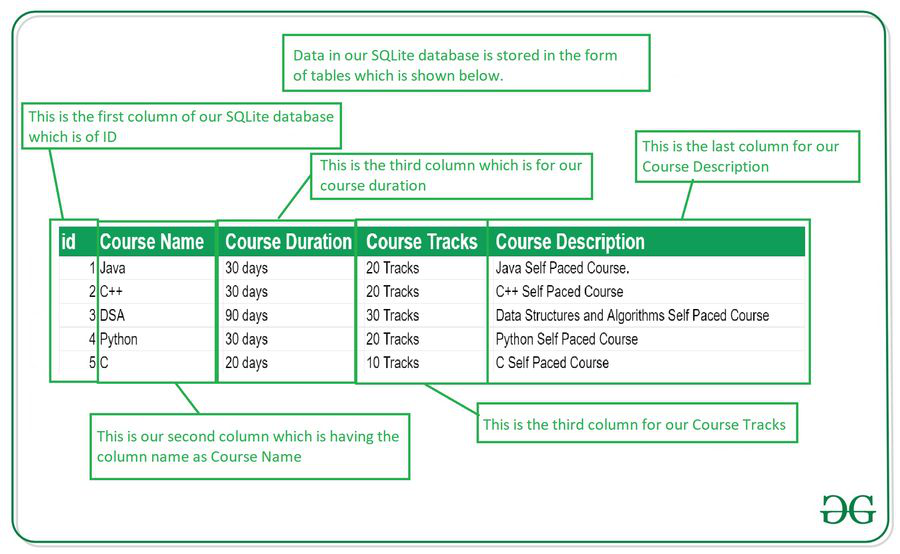
Data is stored in the Android SQLite database in the form of tables. When we store this data in our SQLite database it is arranged in the form of tables that are similar to that of an Excel sheet. Below is the representation of our SQLite database which we are storing in our SQLite database.
Important Methods in SQLite Database
Below are the several important methods that we will be using in this SQLite database integration in Android.
Method | Description |
|---|
| getColumnNames() | This method is used to get the Array of column names of our SQLite table. |
| getCount() | This method will return the number of rows in the cursor. |
| isClosed() | This method returns a Boolean value when our cursor is closed. |
| getColumnCount() | This method returns the total number of columns present in our table. |
| getColumnName(int columnIndex) | This method will return the name of the column when we passed the index of our column in it. |
| getColumnIndex(String columnName) | This method will return the index of our column from the name of the column. |
| getPosition() | This method will return the current position of our cursor in our table. |
What we are going to build in this article?
We will be building a simple application in which we will be adding data to the Android SQLite database. We will be creating a database for adding course name, course description, course duration, and course tracks. We will be saving all this data in our Android SQLite database. A sample video is given below to get an idea about what we are going to do in this article. Note that we are going to implement this project using the Java language.
Step by Step Implementation
Step 1: Create a New Project
To create a new project in Android Studio please refer to How to Create/Start a New Project in Android Studio. Note that select Java as the programming language.
Step 2: Adding permissions to access the storage in the AndroidManifest.xml file
Navigate to the app > AndroidManifest.xml and add the below code to it.
<uses-permission android:name="android.permission.READ_EXTERNAL_STORAGE" />
Step 3: Working with the activity_main.xml file
Navigate to the app > res > layout > activity_main.xml and add the below code to that file.
Below is the code for the activity_main.xml file.
activity_main.xml
<?xml version="1.0" encoding="utf-8"?>
<LinearLayout
    xmlns:android="http://schemas.android.com/apk/res/android"
    xmlns:tools="http://schemas.android.com/tools"
    android:layout_width="match_parent"
    android:layout_height="match_parent"
    android:orientation="vertical"
    tools:context=".MainActivity">

    <!--Edit text to enter course name-->
    <EditText
        android:id="@+id/idEdtCourseName"
        android:layout_width="match_parent"
        android:layout_height="wrap_content"
        android:layout_margin="10dp"
        android:hint="Enter course Name" />

    <!--edit text to enter course duration-->
    <EditText
        android:id="@+id/idEdtCourseDuration"
        android:layout_width="match_parent"
        android:layout_height="wrap_content"
        android:layout_margin="10dp"
        android:hint="Enter Course Duration" />

    <!--edit text to display course tracks-->
    <EditText
        android:id="@+id/idEdtCourseTracks"
        android:layout_width="match_parent"
        android:layout_height="wrap_content"
        android:layout_margin="10dp"
        android:hint="Enter Course Tracks" />

    <!--edit text for course description-->
    <EditText
        android:id="@+id/idEdtCourseDescription"
        android:layout_width="match_parent"
        android:layout_height="wrap_content"
        android:layout_margin="10dp"
        android:hint="Enter Course Description" />

    <!--button for adding new course-->
    <Button
        android:id="@+id/idBtnAddCourse"
        android:layout_width="match_parent"
        android:layout_height="wrap_content"
        android:layout_margin="10dp"
        android:text="Add Course"
        android:textAllCaps="false" />

</LinearLayout>
Step 4: Creating a new Java class for performing SQLite operations
Navigate to the app > java > your app's package name > Right-click on it > New > Java class and name it as DBHandler and add the below code to it. Comments are added inside the code to understand the code in more detail.
DBHandler.java
import android.content.ContentValues;
import android.content.Context;
import android.database.sqlite.SQLiteDatabase;
import android.database.sqlite.SQLiteOpenHelper;

public class DBHandler extends SQLiteOpenHelper {

    // creating a constant variables for our database.
    // below variable is for our database name.
    private static final String DB_NAME = "coursedb";

    // below int is our database version
    private static final int DB_VERSION = 1;

    // below variable is for our table name.
    private static final String TABLE_NAME = "mycourses";

    // below variable is for our id column.
    private static final String ID_COL = "id";

    // below variable is for our course name column
    private static final String NAME_COL = "name";

    // below variable id for our course duration column.
    private static final String DURATION_COL = "duration";

    // below variable for our course description column.
    private static final String DESCRIPTION_COL = "description";

    // below variable is for our course tracks column.
    private static final String TRACKS_COL = "tracks";

    // creating a constructor for our database handler.
    public DBHandler(Context context) {
        super(context, DB_NAME, null, DB_VERSION);
    }

    // below method is for creating a database by running a sqlite query
    @Override
    public void onCreate(SQLiteDatabase db) {
        // on below line we are creating
        // an sqlite query and we are
        // setting our column names
        // along with their data types.
        String query = "CREATE TABLE " + TABLE_NAME + " ("
                + ID_COL + " INTEGER PRIMARY KEY AUTOINCREMENT, "
                + NAME_COL + " TEXT,"
                + DURATION_COL + " TEXT,"
                + DESCRIPTION_COL + " TEXT,"
                + TRACKS_COL + " TEXT)";

        // at last we are calling a exec sql
        // method to execute above sql query
        db.execSQL(query);
    }

    // this method is use to add new course to our sqlite database.
    public void addNewCourse(String courseName, String courseDuration, String courseDescription, String courseTracks) {

        // on below line we are creating a variable for
        // our sqlite database and calling writable method
        // as we are writing data in our database.
        SQLiteDatabase db = this.getWritableDatabase();

        // on below line we are creating a
        // variable for content values.
        ContentValues values = new ContentValues();

        // on below line we are passing all values
        // along with its key and value pair.
        values.put(NAME_COL, courseName);
        values.put(DURATION_COL, courseDuration);
        values.put(DESCRIPTION_COL, courseDescription);
        values.put(TRACKS_COL, courseTracks);

        // after adding all values we are passing
        // content values to our table.
        db.insert(TABLE_NAME, null, values);

        // at last we are closing our
        // database after adding database.
        db.close();
    }

    @Override
    public void onUpgrade(SQLiteDatabase db, int oldVersion, int newVersion) {
        // this method is called to check if the table exists already.
        db.execSQL("DROP TABLE IF EXISTS " + TABLE_NAME);
        onCreate(db);
    }
}
Step 5: Working with the MainActivity.java file
Go to the MainActivity.java file and refer to the following code. Below is the code for the MainActivity.java file. Comments are added inside the code to understand the code in more detail.
MainActivity.java
import android.os.Bundle;
import android.view.View;
import android.widget.Button;
import android.widget.EditText;
import android.widget.Toast;

import androidx.appcompat.app.AppCompatActivity;

public class MainActivity extends AppCompatActivity {

    // creating variables for our edittext, button and dbhandler
    private EditText courseNameEdt, courseTracksEdt, courseDurationEdt, courseDescriptionEdt;
    private Button addCourseBtn;
    private DBHandler dbHandler;

    @Override
    protected void onCreate(Bundle savedInstanceState) {
        super.onCreate(savedInstanceState);
        setContentView(R.layout.activity_main);

        // initializing all our variables.
        courseNameEdt = findViewById(R.id.idEdtCourseName);
        courseTracksEdt = findViewById(R.id.idEdtCourseTracks);
        courseDurationEdt = findViewById(R.id.idEdtCourseDuration);
        courseDescriptionEdt = findViewById(R.id.idEdtCourseDescription);
        addCourseBtn = findViewById(R.id.idBtnAddCourse);

        // creating a new dbhandler class
        // and passing our context to it.
        dbHandler = new DBHandler(MainActivity.this);

        // below line is to add on click listener for our add course button.
        addCourseBtn.setOnClickListener(new View.OnClickListener() {
            @Override
            public void onClick(View v) {

                // below line is to get data from all edit text fields.
                String courseName = courseNameEdt.getText().toString();
                String courseTracks = courseTracksEdt.getText().toString();
                String courseDuration = courseDurationEdt.getText().toString();
                String courseDescription = courseDescriptionEdt.getText().toString();

                // validating if the text fields are empty or not.
                if (courseName.isEmpty() && courseTracks.isEmpty() && courseDuration.isEmpty() && courseDescription.isEmpty()) {
                    Toast.makeText(MainActivity.this, "Please enter all the data..", Toast.LENGTH_SHORT).show();
                    return;
                }

                // on below line we are calling a method to add new
                // course to sqlite data and pass all our values to it.
                dbHandler.addNewCourse(courseName, courseDuration, courseDescription, courseTracks);

                // after adding the data we are displaying a toast message.
                Toast.makeText(MainActivity.this, "Course has been added.", Toast.LENGTH_SHORT).show();
                courseNameEdt.setText("");
                courseDurationEdt.setText("");
                courseTracksEdt.setText("");
                courseDescriptionEdt.setText("");
            }
        });
    }
}
Now run your app and see the output of the app.
Output:
After successfully executed the code enter the required data inside the EditText. Most importantly if you want to know How to View and Locate SQLite Database in Android Studio then please refer to this article.
And you can see below this is how the data stored in the SQLite database.

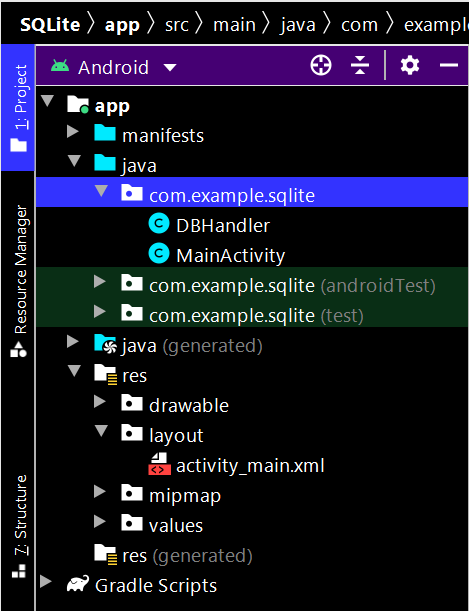
Below is the complete project file structure after performing the create and add operation: