

Creating a REST API using Spring Boot allows developers to build scalable and production-ready web services with minimal configuration. It simplifies RESTful service development by providing built-in support for HTTP methods, dependency injection, and auto-configuration.
- Offers embedded servers (Tomcat/Jetty) to run applications without external deployment
- Supports API testing using tools like Postman or Swagger UI
- Allows easy configuration via application.properties or application.yml
Why Spring Boot?
Spring Boot simplifies Java application development by providing automatic configuration and sensible defaults.
- Built on top of the Spring Framework.
- Reduces boilerplate configuration.
- Simplifies REST API development.
- Supports dependency injection and component scanning.
- Provides features suitable for production applications.
Steps to Implements a REST API in Spring Boot
Follow the below steps to create and run a REST API in Spring Boot.
Step 1: Create the Spring Boot Project
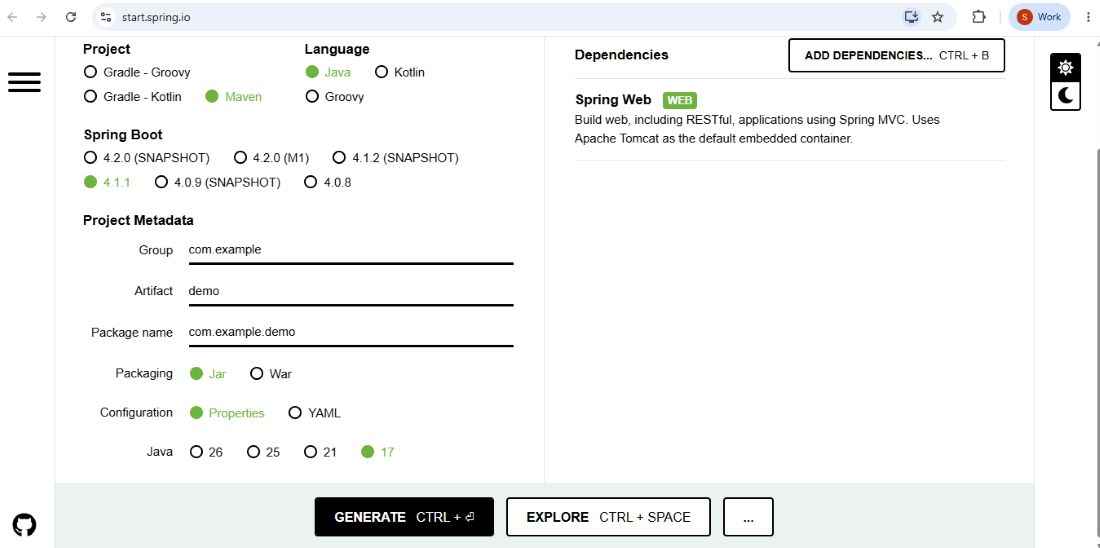
Using Spring Initializr is the recommended way to create a Spring Boot project.
1. Open Spring Initializr in your browser.
2. Select the following options:
- Project: Maven
- Language: Java
- Spring Boot: Select a current stable version available in Spring Initializr.
- Group: com.example
- Artifact: demo
- Name: demo
- Packaging: Jar
- Java: 17 or later
3. Click Add Dependencies and select Spring Web.
4..Click Generate to download the project.
5.Extract the downloaded ZIP file.
6. Open the project in Eclipse, IntelliJ IDEA, or VS Code.
Project Structure
Create the following package structure:
src/main/java
└── com.example.demo
├── DemoApplication.java
│
├── controller
│ └── EmployeeController.java
│
├── dao
│ └── EmployeeDAO.java
│
└── model
├── Employee.java
└── Employees.java
Keeping the main application class in the root package allows Spring Boot to scan the subpackages automatically.
Step 2: Create the Employee Model
Create an Employee class inside the model package.
package com.example.demo.model;


public class Employee {

    // Stores the employee ID
    private Integer id;

    // Stores the employee's first name
    private String firstName;

    // Stores the employee's last name
    private String lastName;

    // Stores the employee's email address
    private String email;

    // Default constructor required for creating an object
    public Employee() {
    }

    // Parameterized constructor for initializing employee details
    public Employee(Integer id, String firstName, String lastName, String email) {
        this.id = id;
        this.firstName = firstName;
        this.lastName = lastName;
        this.email = email;
    }

    // Returns the employee ID
    public Integer getId() {
        return id;
    }

    // Sets the employee ID
    public void setId(Integer id) {
        this.id = id;
    }

    // Returns the employee's first name
    public String getFirstName() {
        return firstName;
    }

    // Sets the employee's first name
    public void setFirstName(String firstName) {
        this.firstName = firstName;
    }

    // Returns the employee's last name
    public String getLastName() {
        return lastName;
    }

    // Sets the employee's last name
    public void setLastName(String lastName) {
        this.lastName = lastName;
    }

    // Returns the employee's email
    public String getEmail() {
        return email;
    }

    // Sets the employee's email
    public void setEmail(String email) {
        this.email = email;
    }

    // Returns employee details as a string
    @Override
    public String toString() {
        return "Employee [id=" + id
                + ", firstName=" + firstName
                + ", lastName=" + lastName
                + ", email=" + email + "]";
    }
}
Step 3: Create the Employee Storage Class
Create an Employees class inside the model package to store a list of employees.
package com.example.demo.model;

import java.util.ArrayList;
import java.util.List;

// Class used to store a list of employees
public class Employees {

    // Creates an empty list to store employee objects
    private List<Employee> employeeList = new ArrayList<>();

    // Returns the list of employees
    public List<Employee> getEmployeeList() {
        return employeeList;
    }

    // Updates the employee list
    public void setEmployeeList(List<Employee> employeeList) {
        this.employeeList = employeeList;
    }
}
The Employees class uses an ArrayList to store employee objects in memory.
Step 4: Create the DAO Class
- Create an
EmployeeDAOclass inside thedaopackage. - The DAO is responsible for retrieving and adding employee data.
package com.example.demo.dao;

import org.springframework.stereotype.Repository;

import com.example.demo.model.Employee;
import com.example.demo.model.Employees;

// Marks this class as a Spring-managed repository component
@Repository
public class EmployeeDAO {

    // Stores employee data in memory
    private final Employees employees = new Employees();

    // Constructor used to add initial employee data
    public EmployeeDAO() {

        // Adds the first employee
        employees.getEmployeeList()
                .add(new Employee(1, "Prem", "Tiwari", "prem@gmail.com"));

        // Adds the second employee
        employees.getEmployeeList()
                .add(new Employee(2, "Vikash", "Kumar", "vikash@gmail.com"));

        // Adds the third employee
        employees.getEmployeeList()
                .add(new Employee(3, "Ritesh", "Ojha", "ritesh@gmail.com"));
    }

    // Returns all employees
    public Employees getAllEmployees() {
        return employees;
    }

    // Finds an employee using the employee ID
    public Employee getEmployeeById(Integer id) {

        // Searches the employee list for the specified ID
        return employees.getEmployeeList()
                .stream()
                .filter(employee -> employee.getId().equals(id))
                .findFirst()
                .orElse(null);
    }

    // Adds a new employee to the list
    public void addEmployee(Employee employee) {
        employees.getEmployeeList().add(employee);
    }
}
The @Repository annotation registers EmployeeDAO as a Spring-managed component.
Step 5: Create the REST Controller
- Create an
EmployeeControllerclass inside thecontrollerpackage. - The controller defines the REST API endpoints.
package com.example.demo.controller;

import java.net.URI;

import org.springframework.http.ResponseEntity;
import org.springframework.web.bind.annotation.GetMapping;
import org.springframework.web.bind.annotation.PathVariable;
import org.springframework.web.bind.annotation.PostMapping;
import org.springframework.web.bind.annotation.RequestBody;
import org.springframework.web.bind.annotation.RequestMapping;
import org.springframework.web.bind.annotation.RestController;
import org.springframework.web.servlet.support.ServletUriComponentsBuilder;

import com.example.demo.dao.EmployeeDAO;
import com.example.demo.model.Employee;
import com.example.demo.model.Employees;

// Marks this class as a REST controller
@RestController

// Maps all endpoints in this controller to /employees
@RequestMapping("/employees")
public class EmployeeController {

    // Stores the EmployeeDAO dependency
    private final EmployeeDAO employeeDao;

    // Constructor injection for EmployeeDAO
    public EmployeeController(EmployeeDAO employeeDao) {
        this.employeeDao = employeeDao;
    }

    // Handles GET requests to /employees
    @GetMapping
    public Employees getEmployees() {

        // Returns all employees
        return employeeDao.getAllEmployees();
    }

    // Handles GET requests to /employees/{id}
    @GetMapping("/{id}")
    public ResponseEntity<Employee> getEmployee(@PathVariable Integer id) {

        // Finds an employee using the specified ID
        Employee employee = employeeDao.getEmployeeById(id);

        // Returns 404 if the employee does not exist
        if (employee == null) {
            return ResponseEntity.notFound().build();
        }

        // Returns the employee with HTTP 200 OK
        return ResponseEntity.ok(employee);
    }

    // Handles POST requests to /employees
    @PostMapping
    public ResponseEntity<Void> addEmployee(
            @RequestBody Employee employee) {

        // Generates a simple ID for the new employee
        Integer id = employeeDao.getAllEmployees()
                .getEmployeeList()
                .size() + 1;

        // Sets the generated ID
        employee.setId(id);

        // Adds the employee to the list
        employeeDao.addEmployee(employee);

        // Creates the URL of the newly created employee
        URI location = ServletUriComponentsBuilder
                .fromCurrentRequest()
                .path("/{id}")
                .buildAndExpand(employee.getId())
                .toUri();

        // Returns HTTP 201 Created with the resource location
        return ResponseEntity.created(location).build();
    }
}
The controller provides three endpoints:
GET /employees– Retrieves all employees.GET /employees/{id}– Retrieves an employee by ID.POST /employees– Adds a new employee.
Step 6: Run the Spring Boot Application
Open the generated DemoApplication.java file and run the application.
package com.example.demo;

import org.springframework.boot.SpringApplication;
import org.springframework.boot.autoconfigure.SpringBootApplication;

// Enables Spring Boot auto-configuration and component scanning
@SpringBootApplication
public class DemoApplication {

    // Entry point of the Spring Boot application
    public static void main(String[] args) {

        // Starts the Spring Boot application
        SpringApplication.run(DemoApplication.class, args);
    }
}
The @SpringBootApplication annotation enables Spring Boot's auto-configuration and component scanning.
Because DemoApplication is located in the com.example.demo package, Spring Boot can discover components in:
com.example.demo.controller
com.example.demo.dao
Step 7: Test the REST API
After starting the application, it runs by default on:
http://localhost:8080
We can test the REST API using Postman or a web browser.
GET Request: Fetch all employees
URL: http://localhost:8080/employees/
Response:

POST Request: Add a new employee
Response:

Again hitting the GET request after performing the POST request:

This concludes creating a REST API using Spring Boot. Now we have a fully functioning API to manage employees.