Efficient management of database connections is important for high-performance Java applications. Creating a new database connection for each request is expensive, involving:
- Costly network communication
- Authentication
- Resource allocation
To optimize this, we utilize connection pooling.
What is Connection Pooling
A technique to reuse existing database connections instead of creating new ones for each request. When an application needs to perform a database operation:
- It borrows a connection from the pool.
- Uses it for queries/updates.
- Returns it to the pool for reuse.
Prerequisites
The Following are the Prerequisites to Handle Connection Pooling in JDBC in Java
- Database setup (e.g., MySQL)
- JDBC driver (Connector/J for MySQL)
- Connection Pooling Library (e.g., HikariCP)
- Java development environment (JDK + IDE like Eclipse/IntelliJ)
- Project configuration with dependencies
Steps to Handle Connection Pooling in JDBC
Step 1: Create a Table in Your Database
Create a table in your database (Example: Employee).
Here is the basic example of an employee table:
Step 2: Set Up Project in Eclipse IDE
- Open Eclipse IDE. Create one Java project and name it as JDBCWithHikariCP.
- Add HikariCP Dependency to the Java project.
- Create two Class files in a Java project and name it as ConnectionManager and Main respectively.
Here is the path for Class files in Java project:

Step 3: Implement the Code
Open ConnnectionManager.java file and replace with the below code.
import java.sql.Connection;
import java.sql.SQLException;
import com.zaxxer.hikari.HikariConfig;
import com.zaxxer.hikari.HikariDataSource;

public class ConnectionManager {
    private static final HikariDataSource dataSource;

    static {
        HikariConfig config = new HikariConfig();
        config.setJdbcUrl("jdbc:mysql://localhost:3307/work");
        config.setUsername("root");
        config.setPassword("tiger");

          // Set maximum pool size
        config.setMaximumPoolSize(10);
        // Other configuration options

        dataSource = new HikariDataSource(config);
    }

    public static Connection getConnection() throws SQLException {
        return dataSource.getConnection();
    }

    public static void close() {
        if (dataSource != null) {
            dataSource.close();
        }
    }
}
Explanation of the above Program:
- Import the classes/interfaces for the JDBC and HikariCP configuration.
- Manage the database connection using the HikariCP connection pooling.
- Once the class is loaded into the memory, it will be execute.
- Configures HikariCP DataSource with the connection parameters such as JDBC URL, username, passwords and maximum pool size.
- Retrieves a database connection from connection pool with the help of getConnection() Method.
- If a connection can't be obtained, it will throws the SQLException.
- Closes the connection with close() method.
- To avoid the NullPointerException, checks if the dataSource is not null before closing.
Note: Make sure that you can replace JDBC URL, username and password.
Step 4: Use ConnectionManager in Main Class
Open Main.java file and replace with the below code:
import java.sql.Connection;
import java.sql.PreparedStatement;
import java.sql.ResultSet;
import java.sql.SQLException;

public class Main {
    public static void main(String[] args) {
        Connection connection = null;
        PreparedStatement preparedStatement = null;
        ResultSet resultSet = null;

        try {
            // Get connection from ConnectionManager
            connection = ConnectionManager.getConnection();

            if (connection != null) {
                // Prepare statement
                String sql = "SELECT * FROM employees";
                preparedStatement = connection.prepareStatement(sql);

                // Execute query
                resultSet = preparedStatement.executeQuery();

                // Process and print results
                while (resultSet.next()) {
                    int id = resultSet.getInt("id");
                    String name = resultSet.getString("name");
                    System.out.println("ID: " + id + ", Name: " + name);
                }
            } else {
                System.out.println("Failed to get connection.");
            }
        } catch (SQLException e) {
            e.printStackTrace();
        } finally {
            // Close resources
            try {
                if (resultSet != null) resultSet.close();
                if (preparedStatement != null) preparedStatement.close();
                if (connection != null) connection.close(); // Return connection to pool
            } catch (SQLException e) {
                e.printStackTrace();
            }
        }

        // Close the connection pool when application exits
        ConnectionManager.close();
    }
}
Explanation of the above Program:
- Program starts execution from the main method.
- Declares Connection, PreparedStatement, and ResultSet for database operations.
- Gets the database connection from ConnectionManager.
- Prepares and executes an SQL query to fetch employee data.
- Stores results in ResultSet and iterates to print employee details.
- Uses try-catch to handle SQLException.
- Closes all resources in the finally block to avoid leaks.
- Shuts down the connection pool after program completion.
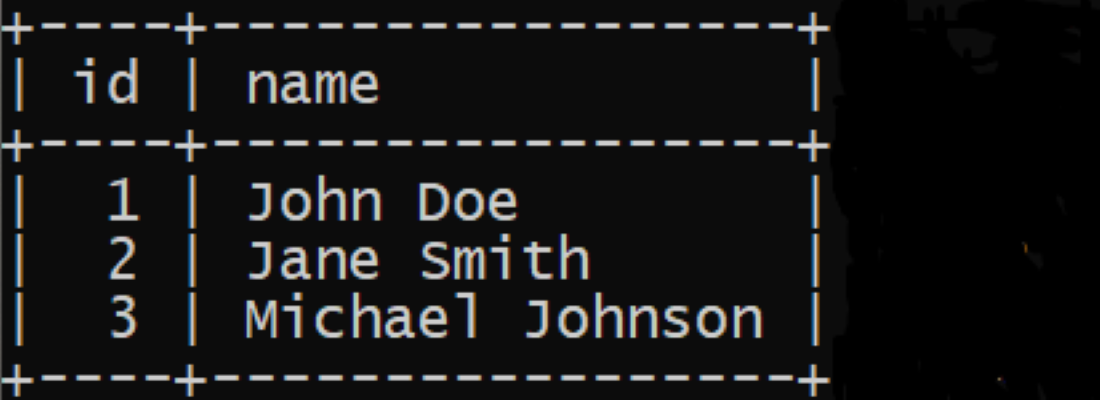
Step 5: Run the Code
- After complete the implementation of code, you need to run the code.
- For run the code, right click on the project the Run As > Java Application.
Here is the Output shown below in your console window:

Note:
If you get "Failed to get connection", it means application is failed to establish a connection to the database. You need to check the following troubleshoot the issues:
- Verify Database URL
- Check Database Credentials
- Database Server Running
- Firewall and Network Issues
- Database Driver
- Database Configuration
- Error Logging