JDBC makes it straightforward to perform CRUD (Create, Read, Update, Delete) operations by providing standard APIs to interact with relational databases. It allows developers to execute SQL queries and manage data efficiently within Java applications.
- Provides simple methods like executeQuery() and executeUpdate() for database operations
- Supports prepared statements for secure and efficient query execution
- Enables easy connection management and transaction handling
CRUD stands for:
- C (Create) -> Insert new records into the database.
- R (Read) -> Retrieve records from the database.
- U (Update) -> Modify existing records.
- D (Delete) -> Remove records from the database.
Prerequisites:
- MySQL Database installed.
- MySQL Connector jar.
CRUD Operations in JDBC with MySQL
CRUD operations in JDBC with MySQL involve using Java code to perform Create, Read, Update, and Delete actions on a MySQL database through SQL queries executed via JDBC APIs.
Step 1. Database Setup in MySQL
- In this step, we create a database and a table where student records will be stored.
- Run the following commands in MySQL Workbench / CLI:
CREATE DATABASE studentdb;

USE studentdb;

CREATE TABLE students (
    id INT AUTO_INCREMENT PRIMARY KEY,
    name VARCHAR(100) NOT NULL,
    age INT NOT NULL,
    email VARCHAR(150) UNIQUE
);
Step 2. Maven Dependency for MySQL
- We add the MySQL connector dependency in pom.xml so Java can talk to MySQL.
- This downloads the driver automatically from Maven Central.
pom.xml:
<dependency>
    <groupId>mysql</groupId>
    <artifactId>mysql-connector-j</artifactId>
    <version>9.0.0</version>
</dependency>
Step 3. Create JDBC connection
- This utility class sets up a connection with MySQL using JDBC.
- Change username and password as per your local MySQL setup.
import java.sql.Connection;
import java.sql.DriverManager;

public class Geeks{
    private static final String URL = "jdbc:mysql://localhost:3306/studentdb";
    private static final String USER = "root";   // change if different
    private static final String PASSWORD = "yourpassword"; // change to your MySQL password

    public static Connection getConnection() {
        try {
            return DriverManager.getConnection(URL, USER, PASSWORD);
        } catch (Exception e) {
            e.printStackTrace();
            return null;
        }
    }
}
Step 4. Create Operation (Insert Student)
- Use INSERT query to add new student records into the database.
- We use PreparedStatement to prevent SQL Injection.
This will add new student records into the database.
import java.sql.Connection;
import java.sql.PreparedStatement;

public class CreateStudent {
    public static void insertStudent(String name, int age, String email) {
        String sql = "INSERT INTO students (name, age, email) VALUES (?, ?, ?)";

        try (Connection conn = Geeks.getConnection();
             PreparedStatement stmt = conn.prepareStatement(sql)) {

            stmt.setString(1, name);
            stmt.setInt(2, age);
            stmt.setString(3, email);

            int rows = stmt.executeUpdate();
            System.out.println(rows + " student inserted successfully.");

        } catch (Exception e) {
            e.printStackTrace();
        }
    }
}
Step 5 Read Operation (Fetch Students)
- Use SELECT query to retrieve student details from the table.
- Results are stored in a ResultSet which we loop through to display records.
import java.sql.Connection;
import java.sql.ResultSet;
import java.sql.Statement;

public class ReadStudent {
    public static void getAllStudents() {
        String sql = "SELECT * FROM students";

        try (Connection conn = Geeks.getConnection();
             Statement stmt = conn.createStatement();
             ResultSet rs = stmt.executeQuery(sql)) {

            while (rs.next()) {
                System.out.println(rs.getInt("id") + " | " +
                                   rs.getString("name") + " | " +
                                   rs.getInt("age") + " | " +
                                   rs.getString("email"));
            }
        } catch (Exception e) {
            e.printStackTrace();
        }
    }
}
Step 6. Update Operation (Modify Student Email)
- Use UPDATE query to change existing student details.
- Here we update a student’s email by using their id.
import java.sql.Connection;
import java.sql.PreparedStatement;

public class UpdateStudent {
    public static void updateStudent(int id, String newEmail) {
        String sql = "UPDATE students SET email = ? WHERE id = ?";

        try (Connection conn = Geeks.getConnection();
             PreparedStatement stmt = conn.prepareStatement(sql)) {

            stmt.setString(1, newEmail);
            stmt.setInt(2, id);

            int rows = stmt.executeUpdate();
            System.out.println(rows + " student updated successfully.");

        } catch (Exception e) {
            e.printStackTrace();
        }
    }
}
Step 7. Delete Operation (Remove Student)
- Use DELETE query to remove student records by ID.
- Once deleted, the record will no longer appear in the table.
import java.sql.Connection;
import java.sql.PreparedStatement;

public class DeleteStudent {
    public static void deleteStudent(int id) {
        String sql = "DELETE FROM students WHERE id = ?";

        try (Connection conn = Geeks.getConnection();
             PreparedStatement stmt = conn.prepareStatement(sql)) {

            stmt.setInt(1, id);

            int rows = stmt.executeUpdate();
            System.out.println(rows + " student deleted successfully.");

        } catch (Exception e) {
            e.printStackTrace();
        }
    }
}
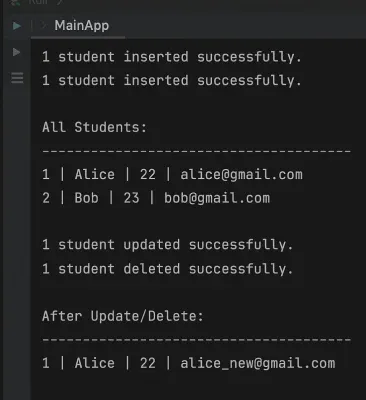
Step 8. Main Class (Testing All CRUD Operations)
- This is the driver class where we test all four operations step by step.
- Insert -> Display -> Update -> Delete -> Display again.
public class MainApp {
    public static void main(String[] args) {
        // CREATE
        CreateStudent.insertStudent("Alice", 22, "alice@gmail.com");
        CreateStudent.insertStudent("Bob", 23, "bob@gmail.com");

        // READ
        System.out.println("\nAll Students:");
        ReadStudent.getAllStudents();

        // UPDATE
        UpdateStudent.updateStudent(1, "alice_new@gmail.com");

        // DELETE
        DeleteStudent.deleteStudent(2);

        // READ again
        System.out.println("\nAfter Update/Delete:");
        ReadStudent.getAllStudents();
    }
}
Step 9. Run Application
- Run the MainApp class and check the output in IntelliJ console.
- We should see the effect of each operation one after the other.
Output: