Monitoring and managing applications in production is essential to ensure stability and performance. Spring Boot Actuator provides built-in features to track application health, metrics, and internal state through easy-to-use endpoints.
- Exposes production-ready endpoints (like /actuator/health) to check application status
- Supports monitoring via HTTP endpoints and JMX integration
- Helps track metrics, performance, and system behavior for better management

Advantages of Actuator Application
- It increases customer satisfaction.
- It reduces downtime.
- It boosts productivity.
- It improves Cybersecurity Management.
- It increases the conversion rate.
1. Configuration for Actuator
In order to use hibernate validators, these configurations are necessary in your Spring Boot project.
1.1 Adding Actuator Dependency
To use the "Actuator", add the following dependency in your application’s project settings file.
For Maven (pom.xml):
<dependencies>
<dependency>
<groupId>org.springframework.boot</groupId>
<artifactId>spring-boot-starter-actuator</artifactId>
</dependency>
</dependencies>
For Gradle (build.gradle):
dependencies {
implementation 'org.springframework.boot:spring-boot-starter-actuator'
}
1.2 Configuring Actuator in application.properties
Actuator provides several configuration options to customize its behavior. Below are some common configurations:
- We can also change the default endpoint by adding the following in the application.properties file.
management.endpoints.web.base-path=/details
- Including IDs/Endpoints
By default, all IDs are set to false except for 'health'. To include an ID, use the following property in the application.properties file.
management.endpoint.<id>.enabled
Example -> management.endpoint.metrics.enabled=true
- List down all IDs that we want to include which are separated by a comma.
management.endpoints.web.exposure.include=metrics,info
- Include only metrics and info IDs and will exclude all others ('health' too).
To add/include all ID information about our application, we can do it in the application.properties file by simply adding the following
management.endpoints.web.exposure.include=*
- Excluding IDs/Endpoints
To exclude an ID or endpoint, use the following property and list out the respective IDs separated by a comma in the application.properties file.
management.endpoints.web.exposure.exclude
Example -> management.endpoints.web.exposure.exclude=info
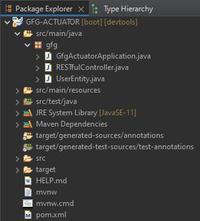
Project Folder Structure:
The below image demonstrates the picture of how your project must look:
2. Implementing the Project
2.1 Entity Class
UserEntity.java (Entity class representing the model data) is explained below:
- This class acts as a simple java bean whose properties are returned as JSON response by the REST API's get() method.
- 'Lombok' library is used to generate GETTER/SETTER methods automatically at runtime using '@Data' annotation.
- '@RequiredArgsConstructor' annotation is used to generate a zero-argument constructor and if final or '@NonNull' fields are present, then respective arguments constructor is created.
- To add the 'Lombok' library in your application, add the following dependency in your application's project build.
- '@Component' annotation is used so that this bean automatically gets registered in Spring's application context.
Implementation:
package gfg;

import lombok.Data;
import lombok.RequiredArgsConstructor;
import org.springframework.stereotype.Component;

@Component
@Data
@RequiredArgsConstructor
public class UserEntity {
    String id = "1";
    String name = "Darshan.G.Pawar";
    String userName = "@drash";
    String email = "drash@geek";
    String pincode = "422-009";
}
2.2 Controller
RESTfulController.java (A REST API controller) for defining APIs and testing the program.
This controller's get() method uses the UserEntity bean to return JSON response. UserEntiy bean is outsourced through '@Autowired' annotation which was registered in Spring's application context.
package gfg;

import org.springframework.beans.factory.annotation.Autowired;
import org.springframework.web.bind.annotation.GetMapping;
import org.springframework.web.bind.annotation.RequestMapping;
import org.springframework.web.bind.annotation.RestController;

@RestController
@RequestMapping("/get")
public class RESTfulController {

    @Autowired
    UserEntity entity;

    @GetMapping("/data")
      public UserEntity getEntity(){
        return entity;
    }
}
3. Testing Actuator APIs
3.1 Controller APIs
Here, the JSON Formatter Chrome extension is used to automatically parse the JSON body. Further, it will be required to work with "Actuator".

3.2 Working with Spring Boot Actuator APIs
To access the 'Actuator' services, you will have to use the HTTP endpoint as it becomes reliable to work with.
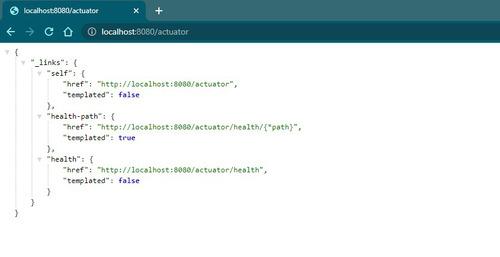
3.2.1 /actuator
It's simple just hit the default endpoint '/actuator', ensure that your Application is running.
Example:
We can also change the default endpoint by adding the following in the application.properties file.
management.endpoints.web.base-path=/details

3.2.2 /actuator/health
We can click on these above links and see the respective information. Additionally, we can activate other Actuator IDs and use them after '/actuator' to see more information. For example, 'health' ID is activated by default. Therefore we can click the link in the image or directly use 'http://localhost:8080/actuator/health'.

'UP' means the application's health is good.
Commonly Used Actuator Endpoints
There are a total of 25 IDs out of which the commonly used are listed out below:
EndpointID | Description |
|---|---|
| beans | Displays a complete list of all the Spring beans in your application. |
| caches | Exposes available caches. |
| conditions | Shows conditions evaluated on configuration and auto-configuration classes. |
| health | Shows application health information. |
| httptrace | Displays HTTP trace information (last 100 requests). |
| loggers | Shows and modifies the configuration of loggers in the application. |
| mappings | Displays a collated list of all @RequestMapping paths. |
| sessions | Retrieves and deletes user sessions (requires Spring Session). |
| threaddump | Performs a thread dump. |
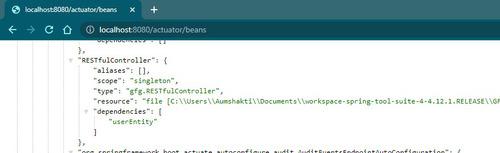
3.2.3 /actuator/beans
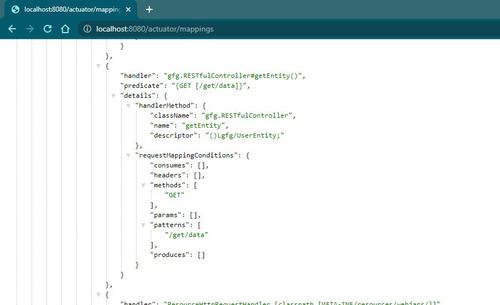
3.2.4 /actuator/mappings
Including IDs/Endpoints
By default, all IDs are set to false except for 'health'. To include an ID, use the following property in the application.properties file.
management.endpoint.<id>.enabled
Example -> management.endpoint.metrics.enabled=true
OR, we can just list down all IDs that you want to include which are separated by a comma.
management.endpoints.web.exposure.include=metrics,info
This will include only metrics and info IDs and will exclude all others ('health' too). To add/include all ID information about our application, we can do it in the application.properties file by simply adding the following
management.endpoints.web.exposure.include=*
Output:

Excluding IDs/Endpoints
To exclude an ID or endpoint, use the following property and list out the respective IDs separated by a comma in the application.properties file.
management.endpoints.web.exposure.exclude
Example -> management.endpoints.web.exposure.exclude=info
Use '*' in place of IDs in property to exclude all the IDs or endpoints.
Notes:
1. Before setting the management.endpoints.web.exposure.include, ensure that the exposed actuators do not contain sensitive information.
2. They should be secured by placing them behind a firewall or are secured by something like Spring Security.