Apache Kafka is a distributed messaging system used for building real-time data pipelines and streaming applications. Spring Boot provides seamless integration with Kafka, allowing applications to publish structured messages such as JSON objects.
- Enables sending structured JSON data between distributed services.
- Simplifies Kafka integration using Spring Boot and Spring for Apache Kafka.
Step-by-Step Implementation
Follow the steps below to publish JSON messages to Apache Kafka using Spring Boot.
Step 1: Create a Spring Boot Project
Go to Spring Initializr and create a new Spring Boot project.
Project Configuration:
- Project: Maven
- Language: Java
- Spring Boot Version: Latest stable version
- Group: com.gfg
- Artifact: springboot-kafka-json
- Packaging: Jar
- Java Version: 17 or higher
Add Dependencies:
Select the following dependencies:
- Spring Web
- Spring for Apache Kafka
Download the project, extract it, and open it in your IDE.

Step 2: Create a Model Class
Create a Student model class that represents the JSON message we want to send to Kafka.
Student.java
package com.gfg.kafka.model;

public class Student {

    private int id;
    private String firstName;
    private String lastName;

    public Student(int id, String firstName, String lastName) {
        this.id = id;
        this.firstName = firstName;
        this.lastName = lastName;
    }

    public int getId() {
        return id;
    }

    public void setId(int id) {
        this.id = id;
    }


    public String getFirstName() {
        return firstName;
    }

    public void setFirstName(String firstName) {
        this.firstName = firstName;
    }


    public String getLastName() {
        return lastName;
    }

    public void setLastName(String lastName) {
        this.lastName = lastName;
    }
}
Step 3: Create Kafka Configuration Class
Create a configuration class StudentConfig.java to configure Kafka producer settings and enable JSON serialization.
StudentConfig.java
package com.gfg.kafka.config;

import java.util.HashMap;
import java.util.Map;

import org.apache.kafka.clients.producer.ProducerConfig;
import org.apache.kafka.common.serialization.StringSerializer;
import org.springframework.context.annotation.Bean;
import org.springframework.context.annotation.Configuration;
import org.springframework.kafka.core.DefaultKafkaProducerFactory;
import org.springframework.kafka.core.KafkaTemplate;
import org.springframework.kafka.core.ProducerFactory;
import org.springframework.kafka.support.serializer.JsonSerializer;

@Configuration
public class StudentConfig {

    @Bean
    public ProducerFactory<String, Student> producerFactory() {

        Map<String, Object> config = new HashMap<>();

        config.put(ProducerConfig.BOOTSTRAP_SERVERS_CONFIG,
                "127.0.0.1:9092");

        config.put(ProducerConfig.KEY_SERIALIZER_CLASS_CONFIG,
                StringSerializer.class);

        config.put(ProducerConfig.VALUE_SERIALIZER_CLASS_CONFIG,
                JsonSerializer.class);

        return new DefaultKafkaProducerFactory<>(config);
    }

    @Bean
    public KafkaTemplate<String, Student> kafkaTemplate() {

        return new KafkaTemplate<>(producerFactory());
    }
}
Step 4: Create Controller Class
Create a REST controller that sends JSON messages to a Kafka topic.
UserResource.java
package com.gfg.kafka.controller;

import org.springframework.beans.factory.annotation.Autowired;
import org.springframework.kafka.core.KafkaTemplate;
import org.springframework.web.bind.annotation.*;

@RestController
@RequestMapping("gfg")
public class UserResource {

    @Autowired
    private KafkaTemplate<String, Student> kafkaTemplate;

    private static final String TOPIC = "StudentExample";

    @GetMapping("/publish/{id}/{firstName}/{lastName}")
    public String publishStudent(
            @PathVariable int id,
            @PathVariable String firstName,
            @PathVariable String lastName) {

        kafkaTemplate.send(
                TOPIC,
                new Student(id, firstName, lastName));

        return "Published Successfully";
    }
}
Step 5: Start Kafka and Zookeeper
Before running the application, ensure Kafka and Zookeeper servers are running.
Start Zookeeper
C:\kafka>.\bin\windows\zookeeper-server-start.bat .\config\zookeeper.properties
Start Kafka Server
C:\kafka>.\bin\windows\kafka-server-start.bat .\config\server.properties
Step 6: Create Kafka Topic
Create a topic named StudentExample.
Windows:
.\bin\windows\kafka-topics.bat --create --zookeeper localhost:2181 --replication-factor 1 --partitions 1 --topic StudentExample
Mac / Linux:
bin/kafka-topics.sh --create --zookeeper localhost:2181 --replication-factor 1 --partitions 1 --topic StudentExample
Step 7: Listen to Kafka Messages
To monitor messages published to Kafka, run the following command.
Windows:
.\bin\windows\kafka-console-consumer.bat --bootstrap-server localhost:9092 --topic StudentExample --from-beginning
Mac / Linux:
bin/kafka-console-consumer.sh --bootstrap-server localhost:9092 --topic StudentExample --from-beginning
Step 8: Run the Application and Test API
Run the Spring Boot application and open the following URL in a browser:
http://localhost:8080/gfg/publish/1/John/Doe
Output: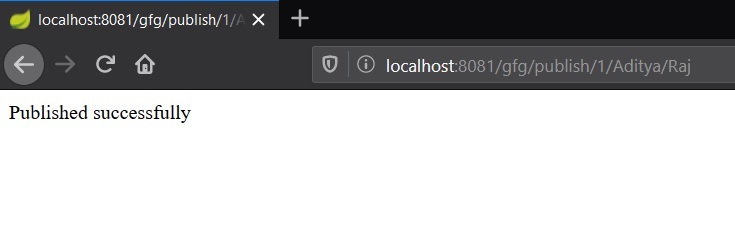
Checking the message in real time: 