As software projects grow larger and involve multiple teams, managing code becomes challenging. One of the ways to streamline code management is using a monorepo. Combined with powerful tools like Turborepo, monorepos offer an organized way to maintain multiple codebases in a single repository.
In this article, we'll learn more about Code Management with Monorepos and Turborepo.
What is a Monorepo?
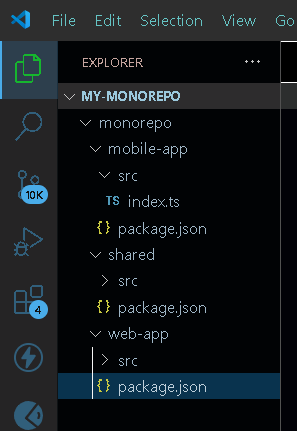
A monorepo is a single repository that contains the source code for multiple projects. These projects can range from different types of applications to libraries, services, and more. By keeping all related code in one place, a monorepo provides easier code sharing and management. Here's a simple structure to illustrate a monorepo setup:

In this example, the /web-app and /mobile-app directories represent different projects within the same monorepo. The /shared directory contains shared components and utilities that both apps can use. This setup allows you to update shared code in one place and ensure that all projects have access to the latest version.
Tools for managing a Monorepo
Some of the most popular and Effective tools for managing a monorepo:
- Turborepo: Turborepo is a high-performance build system for JavaScript and TypeScript monorepos. It automatically determines the dependency graph and only rebuilds what’s necessary, making it ideal for large codebases.
- Lerna: It is one of the most well-known tools for managing JavaScript monorepos.It helps in managing multiple packages within a single repository, including versioning, dependency management, and publishing.
- Nx: It is a smart, extensible build framework that helps manage monorepos. Originally created for Angular projects, It has expanded to support many frameworks and languages.
- Bazel: It is used to support large codebases across multiple languages. Originally developed by Google, Bazel is known for its performance and ability to handle large, complex builds efficiently. It's language-agnostic, making it suitable for diverse technology stacks.
Steps to build a Monorepo
Here are the basic steps to build a monorepo:
Step 1: Choose a version controlling System
Use Git or another version control system to create a new repository.
Step 2: Set Up Directory Structure
Organize your projects within the monorepo, typically in a structure like
Step 3: Initialize the Repository
Run git init in the root of your monorepo.
Step 4: Add Project Files
Add your existing project files to the respective directories.
Step 5: Configure Package Management
Use a tool like Yarn Workspaces or npm Workspaces to manage dependencies across projects.
Create a root-level package.json with workspace configuration.
Step 6: Setup Build Tools
Use tools like Turborepo, Lerna, or Nx to manage and optimize tasks such as building, testing, and deploying.
Step 7: Link Shared Code
Ensure shared libraries or components are referenced correctly within the monorepo, either by relative paths or using workspace references.
Step 8: Configure CI/CD
Set up Continuous Integration/Continuous Deployment (CI/CD) pipelines that support monorepo structures.
Step 9: Document and Manage Dependencies
Clearly document the structure and dependencies of your monorepo to ensure smooth collaboration.
Step 10: Test and Deploy
Thoroughly test the integrated projects within the monorepo and deploy as needed.
Benefits Of Using a Monorepo
- Everything in One Place: With a monorepo, all your projects are together, making it easy to see and work on them. If your website and mobile app share the same design system, you can update it in one place and have those changes reflected everywhere.
- Consistency Across Projects: When all your code is in one place, you can set up rules and standards that apply to everything. This consistency helps ensure that everyone on the team follows the same guidelines, whether they're working on the frontend or backend.
- Easy to Share Code: If different parts of your project need to use the same piece of code, like a utility function or a design component, a monorepo makes it simple to share that code. You don't have to worry about each project getting out of sync with others.
- Streamlined Updates: When you need to update something that affects multiple projects, like fixing a bug or adding a new feature, you can do it all at once in a monorepo. This ensures everything stays compatible and up-to-date.
What is Turborepo?
While the benefits of a monorepo are clear, managing a large monorepo can be challenging. This is where Turborepo comes in. Turborepo is a high-performance build system designed to manage monorepos efficiently. It helps by speeding up build times, optimizing task execution, and managing dependencies intelligently.
Key Features of Turborepo
- Incremental Builds: Turborepo only rebuilds the parts of your projects that have changed, saving time and resources. For example, if you update a utility function in the /shared directory, only the projects that depend on that function are rebuilt.
- Task Caching: Turborepo caches the results of tasks (like building or testing), so if the same task is needed again, it can be retrieved from the cache instead of being recomputed.
- Parallel Execution: It can run tasks in parallel, making full use of your hardware and reducing wait times.
How To Build Turborepo?
Here are the simplified steps to set up a monorepo using Turborepo:
Step 1: Create a New Directory
Create a directory for your monorepo:
mkdir my-monorepo
cd my-monorepo
Step 2: Initialize the Monorepo
Initialize the monorepo with a package manager (Yarn, npm, or pnpm). For example, using npm:
npm init -yStep 3: Install Turborepo
npm install turbo --save-devStep 4: Set Up Project Structure
Create the directory structure for your projects.

Step 5: Add Project Files
Add your project files to the respective apps or packages directories.
Step 6: Configure turbo.json
Create a turbo.json file in the root of your monorepo to define how tasks are run:
{
    "pipeline": {
        "build": {
            "outputs": [
                "dist/**"
            ]
        },
        "test": {},
        "lint": {}
    }
}
Step 7: Add Scripts to package.json
Update your root package.json with Turborepo scripts:
"scripts": {
    "build": "turbo run build",
    "test": "turbo run test",
    "lint": "turbo run lint"
}
Step 8: Run Tasks
Use Turborepo to run tasks across projects efficiently:
npm run build
npm run test
Step 9: Use Caching and Parallelism
Turborepo automatically leverages caching and parallelism to optimize task execution. You can configure these features in turbo.json file if needed.
Step 10: Configure CI/CD
Integrate Turborepo with your CI/CD pipeline to take advantage of its caching and performance optimizations.
Conclusion
A monorepo helps keep all your projects together, making it easier to share code and keep things consistent. Turborepo, on the other hand, is like a smart assistant that helps you manage this big collection of projects efficiently, ensuring everything runs smoothly and quickly.