In this article, we explore the creation of a digital Whac-A-Mole game using React. This beloved classic challenges players to "whack" moles as they pop up from their holes.
Prerequisites:
Approach
- Project Setup: Set up a new React project using the Create React App.
- Component Creation: Develop the main game component and its sub-elements.
- State Management: Utilize React state to manage game state, score, and timer.
- Game Logic and Styling: Implement game logic for mole appearance and scoring, and apply CSS for styling game elements.
Steps to Set Up Your React Project
Create React App: Use the Create React App tool to set up your project.
npx create-react-app whac-a-mole
cd whac-a-mole
Project Structure

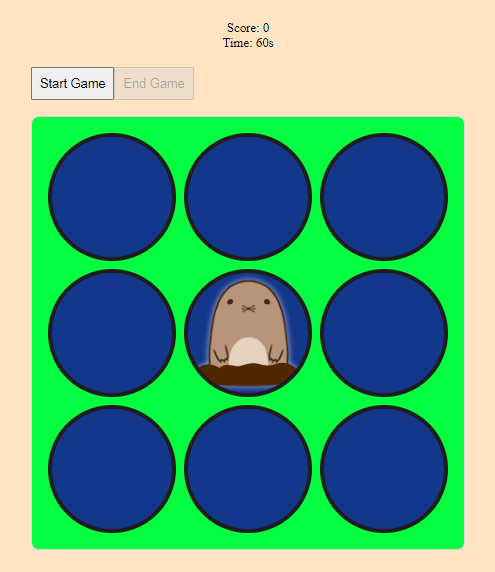
Example: To demonstrate creating a whack-a-mole game using the react.js
/* src/App.css */
body {
    background-color: rgb(255, 228, 196);
    display: flex;
    flex-direction: column;
    align-items: center;
    justify-content: center;
}

.game-info {
    display: flex;
    flex-direction: column;
    align-items: center;
    justify-content: center;
    margin: 20px;
}

#startButton,
#endButton {
    margin-bottom: 20px;
    padding: 10px;
    font-size: 16px;
    cursor: pointer;
}

.game-container {
    background-color: rgb(1, 254, 64);
    display: grid;
    grid-template-columns: repeat(3, 160px);
    gap: 10px;
    border: 2px solid rgb(216, 216, 216);
    padding: 20px;
    border-radius: 10px;
}

.hole {
    height: 150px;
    background: rgb(19, 55, 139);
    border: 5px solid rgb(30, 30, 30);
    cursor: pointer;
    border-radius: 100px;
}

.mole {
    background-size: 150px;
    background-image: url("https://media.geeksforgeeks.org/wp-content/uploads/20231130123541/mole.png");
}

@media only screen and (max-width: 600px) {
    .game-container {
        width: 80%;
        gap: 10px;
        padding: 5%;
        grid-template-columns: repeat(3, 38%);
    }

    .hole {
        height: 50px;
        width: 50px;
        border-radius: 100px;
    }

    .mole {
        background-size: 50px;
        background-image: url(
"https://media.geeksforgeeks.org/wp-content/uploads/20231130123541/mole.png");
    }
}
// src/App.js

import React, { useState, useEffect } from 'react';
import './App.css';

const App = () => {
    const [score, setScore] = useState(0);
    const [timer, setTimer] = useState(60);
    const [gameOver, setGameOver] = useState(true);
    const [molePosition, setMolePosition] = useState(null);

    useEffect(() => {
        let countdown;
        let moleInterval;
        if (!gameOver) {
            countdown = setInterval(() => {
                setTimer((prevTimer) => {
                    if (prevTimer <= 1) {
                        clearInterval(countdown);
                        setGameOver(true);
                        alert(`Game Over!\nYour final score: ${score}`);
                        setScore(0);
                        setTimer(60);
                        return 60;
                    }
                    return prevTimer - 1;
                });
            }, 1000);

            moleInterval = setInterval(() => {
                if (!gameOver) {
                    const random = Math.floor(Math.random() * 9);
                    setMolePosition(random);
                }
            }, 1000);
        }

        return () => {
            clearInterval(countdown);
            clearInterval(moleInterval);
        };
    }, [gameOver, score]);

    const startGame = () => {
        if (!gameOver) return;
        setGameOver(false);
        setScore(0);
        setTimer(60);
    };

    const endGame = () => {
        setGameOver(true);
        alert(`Game Ended!\nYour final score: ${score}`);
        setScore(0);
        setTimer(60);
    };

    const handleMoleClick = () => {
        if (!gameOver) {
            setScore(score + 1);
            setMolePosition(null);  // Immediately remove mole
        }
    };

    return (
        <div className="App">
            <div className="game-info">
                <div id="score">Score: {score}</div>
                <div id="timer">Time: {timer}s</div>
            </div>
            <button id="startButton" onClick={startGame} disabled={!gameOver}>
                Start Game
            </button>
            <button id="endButton" onClick={endGame} disabled={gameOver}>
                End Game
            </button>
            <div className="game-container">
                {Array.from({ length: 9 }).map((_, index) => (
                    <div
                        key={index}
                        className={`hole ${molePosition === index ? 'mole' : ''}`}
                        onClick={molePosition === index ? handleMoleClick : undefined}
                    ></div>
                ))}
            </div>
        </div>
    );
};

export default App;
//index.js

import React from 'react';
import ReactDOM from 'react-dom/client';
import App from './App';

const root = ReactDOM.createRoot(document.getElementById('root'));
root.render(
    <React.StrictMode>
        <App />
    </React.StrictMode>
);
Final Step: Run Your Project
npm startOutput: