@RequestMapping is a flexible Spring annotation used at the class and method level to map web requests to specific controllers or handler methods. It helps define URL endpoints for handling HTTP requests in Spring Boot applications.
- Supports building REST APIs
- Allows multiple endpoints for a single resource
- Enables defining multiple endpoints in one @RequestMapping annotation.
Syntax:
@RequestMapping(value = "/path", method = RequestMethod.GET)
Parameters:
- value or path -> Defines the URL path.
- method -> Specifies the HTTP request method.
Step-By-Step Implementation of @RequestMapping annotation
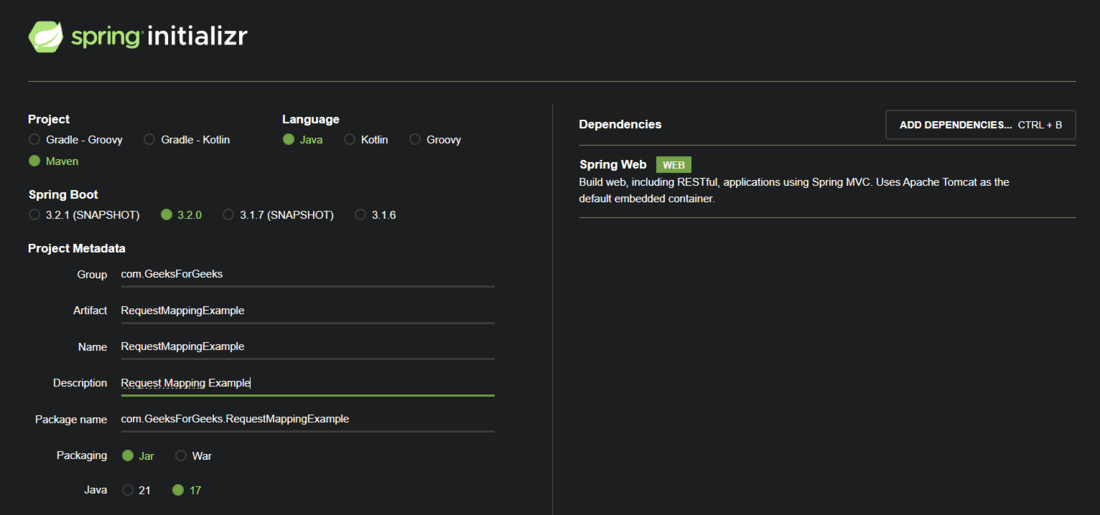
Step 1: Create a Spring Boot Project
Use Spring Initializr to generate a new Spring Boot project.
Project Configuration:
- Project Type: Maven
- Language: Java
- Spring Boot Version: 3.x (Latest Version)
- Dependencies: Spring Web
- Java Version: 17+
Click on Generate, which will download the starter project.
pom.xml File:
<?xml version="1.0" encoding="UTF-8"?>
<project xmlns="https://maven.apache.org/POM/4.0.0" xmlns:xsi="https://www.w3.org/2001/XMLSchema-instance"
    xsi:schemaLocation="https://maven.apache.org/POM/4.0.0 https://maven.apache.org/xsd/maven-4.0.0.xsd">
    <modelVersion>4.0.0</modelVersion>
    <parent>
        <groupId>org.springframework.boot</groupId>
        <artifactId>spring-boot-starter-parent</artifactId>
        <version>3.2.0</version>
        <relativePath/> <!-- lookup parent from repository -->
    </parent>
    <groupId>com.GeeksForGeeks</groupId>
    <artifactId>RequestMappingExample</artifactId>
    <version>0.0.1-SNAPSHOT</version>
    <name>RequestMappingExample</name>
    <description>Request Mapping Example</description>
    <properties>
        <java.version>17</java.version>
    </properties>
    <dependencies>
        <dependency>
            <groupId>org.springframework.boot</groupId>
            <artifactId>spring-boot-starter-web</artifactId>
        </dependency>

        <dependency>
            <groupId>org.springframework.boot</groupId>
            <artifactId>spring-boot-starter-test</artifactId>
            <scope>test</scope>
        </dependency>
    </dependencies>

    <build>
        <plugins>
            <plugin>
                <groupId>org.springframework.boot</groupId>
                <artifactId>spring-boot-maven-plugin</artifactId>
            </plugin>
        </plugins>
    </build>

</project>
Step-2: Define a Controller
- Create a new package for containing all the controllers that we will be adding in our application under the src/main/java/package_name/Controllers
- Create a new class called TestController where you will define the request mappings.

Step-4: Define URL Templates inside the controller
Annotate the Controller with @Controller to signify that this class is a controller that has some URL templates defined inside it and @RequestMapping on the controller as well as the methods to specify which URL path will give what output.
Implementation:
import org.springframework.stereotype.Controller;
import org.springframework.web.bind.annotation.RequestMapping;
import org.springframework.web.bind.annotation.ResponseBody;

import java.util.ArrayList;
import java.util.List;

// Controller class
@Controller
@ResponseBody
@RequestMapping("/test")
public class TestController {

    // URL Path - 1
    // Returns a String
    @RequestMapping("/hello")
    public String sayHello() {
        System.out.println("dsvsdvdsvs");
        return "Hello Geek!";
    }

    // URL Path - 2
    // Returns a String
    @RequestMapping("/sport")
    public String doSomeSport() {
        return "Run 5 kilometers today!";
    }

    // URL Path - 3
    // Returns a List
    @RequestMapping("/today/tasks")
    public List<String> todaysTasks() {

        List<String> myTasks = new ArrayList<String>();
        myTasks.add("Write 5 articles on GeeksforGeeks Today");
        myTasks.add("Run 5 kilometers");
        myTasks.add("Do Laundry");

        return myTasks;
    }
}
Explanation of the above Program:
We've defined multiple end points using @RequestMapping which can be accessed at following URLs :
- http://localhost:8080/test/hello
- http://localhost:8080/test/sport
- http://localhost:8080/test/today/tasks
Annotations used:
- @Controller: This annotation implicitly marks the class as a component making it eligible for component scanning while signifying that this class invokes business logic, handles incoming web requests and returns customized responses.
- @ResponseBody: This annotation is used on both class level as well as on method level to indicate that the return value generated by this class or method doesn't need to be resolved to a view page like HTML or JSP, rather it should be directly serialized into HTTP response body. And this serialization from Java Object to JSON is done by a technology called - Jackson Project that performs Jackson Data Binding under the hood.
Our request method can return any type of data - POJOs (Plain Old Java Objects) and this data will be serialized into JSON by the Jackson Project.
Note: @ResponseBody can be ignored if you're using @RestController instead of @Controller.
Outputs for every endpoint on POSTMAN:
Endpoint - 1: http://localhost:8080/test/hello
Endpoint - 2: http://localhost:8080/test/sport

Endpoint - 3: http://localhost:8080/test/today/tasks

Since our endpoints only return data and do not modify any database records, we use the GET request type in Postman.
In Spring Boot, @RequestMapping defines the URL endpoint and maps it to a handler method. Depending on the operation performed by the method, specialized mapping annotations are used for different HTTP request types.
Common Request Mapping Annotations:
- @GetMapping: Used to retrieve data from the server without modifying it.
- @PostMapping: Used to create or add new data to the database (e.g., adding a new student record).
- @PutMapping: Used to update existing data in the database.
- @DeleteMapping: Used to remove existing data from the database.
These annotations simplify request handling by clearly mapping HTTP operations to specific controller methods.