A SQL View is a virtual table created from the result of a SELECT query. It does not store data physically but displays data stored in underlying tables. Views help simplify complex queries, enhance security, and present data in a cleaner, customized format.
Example: First, we will create a demo SQL database and table, on which we will use the TRUNCATE TABLE command.

Query:
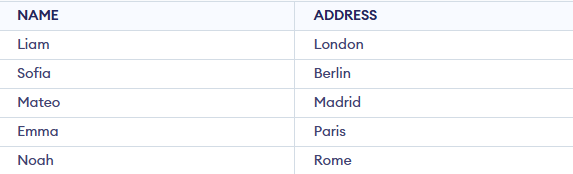
CREATE VIEW StudentView AS
SELECT NAME, ADDRESS
FROM StudentDetails;
SELECT * FROM StudentView;
Output:

CREATE VIEWS in SQL
We can create a view using CREATE VIEW statement. A View can be created from a single table or multiple tables.
Syntax:
CREATE VIEW view_name AS
SELECT column1, column2.....
FROM table_name
WHERE condition;
- view_name: Name for the View
- table_name: Name of the table
- condition: Condition to select rows
Example 1: Creating a Simple View from a Single Table
First, we will create a demo SQL database and table, on which we will use the View command.
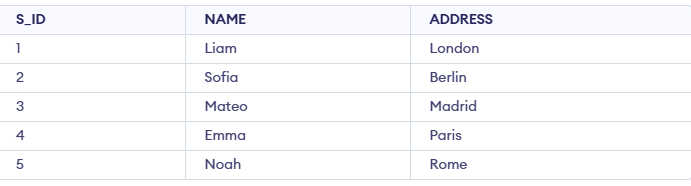
In this example, we create a View named DetailsView from the table StudentDetails.
Query:
CREATE VIEW DetailsView AS
SELECT NAME, ADDRESS
FROM StudentDetails
WHERE S_ID < 5;
Use the below query to retrieve the data from this view
SELECT * FROM DetailsView;
Output:

Example 2: Creating a View From Multiple Tables
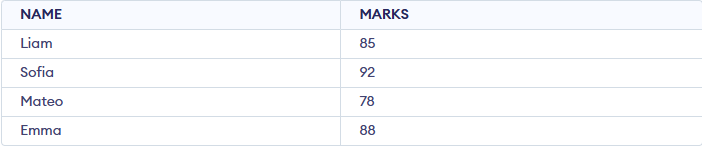
In this example, we create a View MarksView that combines data from bothtables StudentDetails and StudentMarks. To create a View from multiple tables we can simply include multiple tables in the SELECT statement.
Query:
CREATE VIEW MarksView AS
SELECT StudentDetails.NAME, StudentDetails.ADDRESS, StudentMarks.MARKS
FROM StudentDetails, StudentMarks
WHERE StudentDetails.NAME = StudentMarks.NAME;
To display data of View MarksView:
SELECT * FROM MarksView;
Output:

Managing Views
Here are some common operations used to manage views in SQL:
1. Listing all Views in a Database
We can list all the views in a database using the SHOW FULL TABLES statement or by querying the information_schema tables.
USE "database_name";
SHOW FULL TABLES WHERE table_type LIKE "%VIEW";
Using information_schema
SELECT table_name
FROM information_schema.views
WHERE table_schema = 'database_name';

OR

SELECT table_schema, table_name, view_definition
FROM information_schema.views
WHERE table_schema = 'database_name';
2. Deleting a View
SQL allows us to delete an existing View. We can delete or drop View using the DROP statement.
Syntax:
DROP VIEW view_name;
Example: In this example, we are deleting the View MarksView.
DROP VIEW MarksView;
3. Updating a View Definition
If we want to update the existing data within the view, use the UPDATE statement.
UPDATE view_name
SET column1 = value1, column2 = value2...., columnN = valueN
WHERE [condition];
If you want to update the view definition without affecting the data, use the CREATE OR REPLACE VIEW statement. For example, let’s add the Age column to the MarksView:
CREATE OR REPLACE VIEW view_name AS
SELECT column1, column2, ...
FROM table_name
WHERE condition;
Note: Not all views can be updated using the UPDATE statement.
Rules to Update Views in SQL:
Certain conditions need to be satisfied to update a view. If any of these conditions are not met, the view can not be updated.
- The SELECT statement which is used to create the view should not include GROUP BY clause or ORDER BY clause.
- The SELECT statement should not have the DISTINCT keyword.
- The View should have all NOT NULL values.
- The view should not be created using nested queries or complex queries.
- The view should be created from a single table. If the view is created using multiple tables then we will not be allowed to update the view.
Advanced Techniques with Views
Here are some advanced ways to work with SQL views:
1. Updating Data Through Views
We can use the CREATE OR REPLACE VIEW statement to add or replace fields from a view If we want to update the view MarksView and add the field AGE to this View from StudentMarks Table, we can do this by:
Example:
CREATE OR REPLACE VIEW MarksView AS
SELECT StudentDetails.NAME, StudentDetails.ADDRESS, StudentMarks.MARKS, StudentMarks.AGE
FROM StudentDetails, StudentMarks
WHERE StudentDetails.NAME = StudentMarks.NAME;
If we fetch all the data from MarksView now as:
SELECT * FROM MarksView;
Output:

2. Inserting Data into Views
We can insert a row in a View in the same way as we do in a table. We can use the INSERT INTO statement of SQL to insert a row in a View. In the below example, we will insert a new row in the View StudentDetailswhich we have created above in the example of "creating views from a single table".
Example:
INSERT INTO StudentDetails(NAME, ADDRESS)
VALUES("John","German");
If we fetch all the data from DetailsView now as,
SELECT * FROM StudentDetails;
Output:

3. Deleting a row from a View
Deleting rows from a view works the same as deleting from a table. Using the DELETE command removes the row from the base table, and the change automatically appears in the view. In this example, we delete the last row from StudentDetails added earlier.
Query:
DELETE FROM StudentDetails
WHERE NAME="John";
If we fetch all the data from DetailsView now as,
SELECT * FROM StudentDetails;
Output:
4. WITH CHECK OPTION Clause
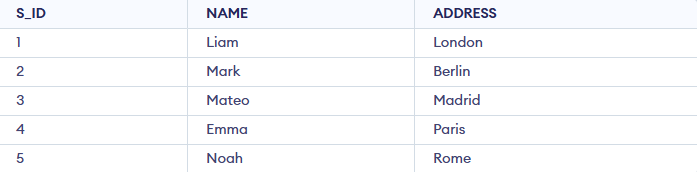
The WITH CHECK OPTION clause ensures that any INSERT or UPDATE on an updatable view must satisfy the view’s WHERE condition. If the condition is violated, SQL returns an error. In this example, a view is created with WITH CHECK OPTION to restrict changes that fall outside the defined criteria.
Query:
CREATE VIEW SampleView AS
SELECT S_ID, NAME
FROM  StudentDetails
WHERE NAME IS NOT NULL
WITH CHECK OPTION;
UPDATE SampleView SET NAME = 'Mark' WHERE S_ID = 2;
Output:
Explore
Basics
Queries & Operations
SQL Joins & Functions
Data Constraints & Aggregate Functions
Advanced SQL Topics
Database Design & Security