Bluetooth is key in today's tech world for easy device connections. From wireless headphones to keyboards and mice, Bluetooth technology allows you to enjoy a clutter-free setup.
Connecting and managing Bluetooth devices in Windows 10 is a straightforward process that enhances your computing experience. In this guide, we’ll walk you through the steps to easily connect your Bluetooth devices and manage your Bluetooth settings in Windows 10.
Table of Content
How to Turn on Bluetooth on Windows 10
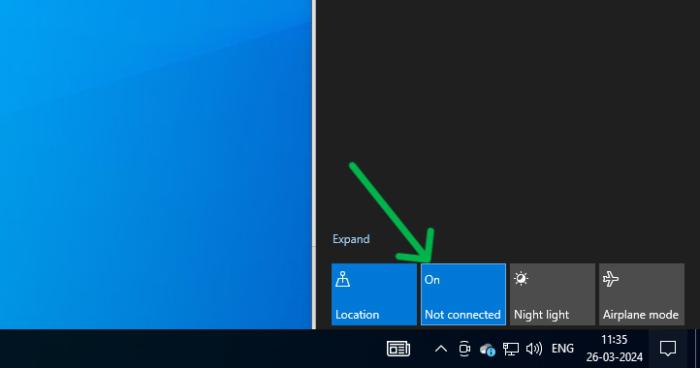
Step 1: Turn on Bluetooth via the Action Center
Getting Bluetooth turned on is as simple and fast as it gets in Windows 10 if you use the Action Center:
- Click on the Action Center icon, a speech bubble found at the bottom-right corner of the screen.
- You will tap on the Bluetooth icon if it appears, and it will turn Bluetooth on instantly.
- If that is not visible, expand the Action Center by clicking Expand, and the available options should show you the Bluetooth icon. Click on it to enable Bluetooth.

This is appropriate for users who want to enable Bluetooth with no further managing through Settings.
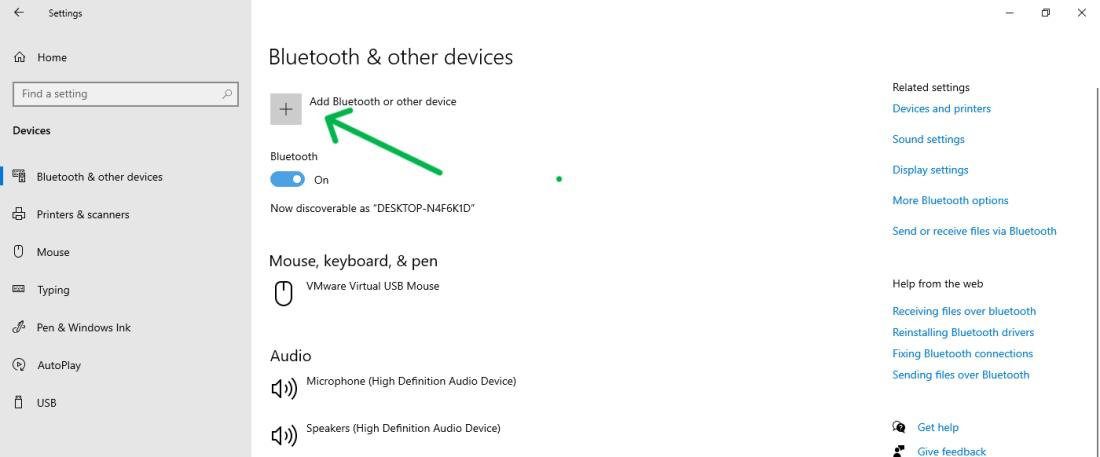
Step 2: Switch On Bluetooth through Settings
In case you have other options presented by Bluetooth and prefer a more detailed method, this way will be through Settings:
- Click Start in the lower left hand of the screen, and then click on Settings (the gear icon in Windows 10).

- Select Devices from the Options available in Settings window.

- On the left sidebar under Devices, click on Bluetooth & other devices.
- Finally, turn the Bluetooth switch On in the section of Bluetooth.

This method allows you to manage other Bluetooth settings, like adding new devices or managing existing connections, while ensuring Bluetooth is active.
Step 3: Enable Bluetooth via Device Manager
If your Action Center or settings fail to show Bluetooth, it is disabled. Hence, you can use Device Manager to activate it:
- Open Device Manager by Right Click on Start.
- Expand Bluetooth by clicking the little arrow close to it.
- Right-click your Bluetooth device. Example: "Intel Wireless Bluetooth." Select Enable from the resulting context menu.
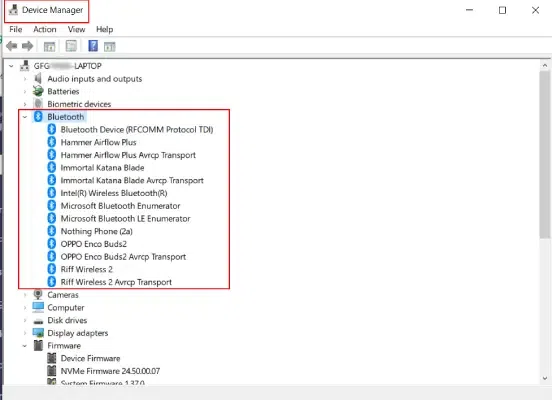
If the Bluetooth device is not present or is disabled, this method would assist you in getting it back and running Bluetooth again.
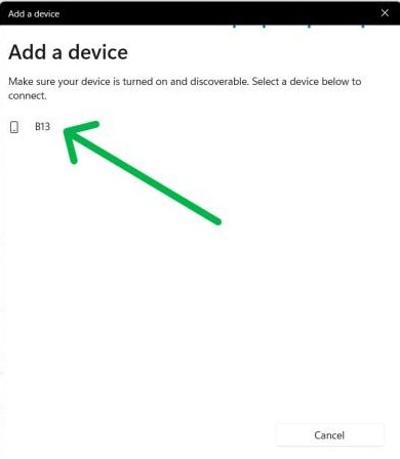
Step 4: Pairing Your Bluetooth Device
You could now connect your devices with Bluetooth as it has been activated when you go:
- To Settings > Devices then Bluetooth and other devices.
- Choose Add Bluetooth or other devices.
- Then Bluetooth from what comes next.
- Select your device from the list, then follow on-screen instructions to finish the process.
All are made possible now thanks to the Bluetooth-enabled devices for audio listening, mouse navigation, or probably any other gadget.
How to Pair Bluetooth Devices in Windows 10
You can easily navigate the world of wireless connections in Windows 10. In this section, We will show you how to connect bluetooth devices and manage your Bluetooth settings actively, enabling you to turn the feature on for device connectivity and off to save power or protect your privacy.
Method 1: Connect Bluetooth Devices Using Settings
Step 1: Open Settings by pressing Windows Key + I then navigate to "Devices"
Step 2: Toggle the Bluetooth switch to On.
Similarly, Toggle the Bluetooth switch to Off.

Method 2: Connect Bluetooth Devices Using Action Center
Step 1: Press Windows Key + A to open the action center
Step 2: Then, click on the Bluetooth icon to on or off
How to Pair a New Bluetooth Device on Windows 10 Using Settings?
The ‘Settings’ app in Windows 10 controls device connectivity. In this section, We'll show you how to connect your Bluetooth devices seamlessly. Follow these given steps to pair Bluetooth Devices on windows.
Step 1: Open Settings by pressing Windows Key + I then navigate to "Devices"
Step 2: Click on "Add Bluetooth or other device."
Step 3: Choose the method from the list like Bluetooth, Wireless display, or dock.
Step 4: Choose the device from the list and follow the on-screen instructions to complete the pairing process.
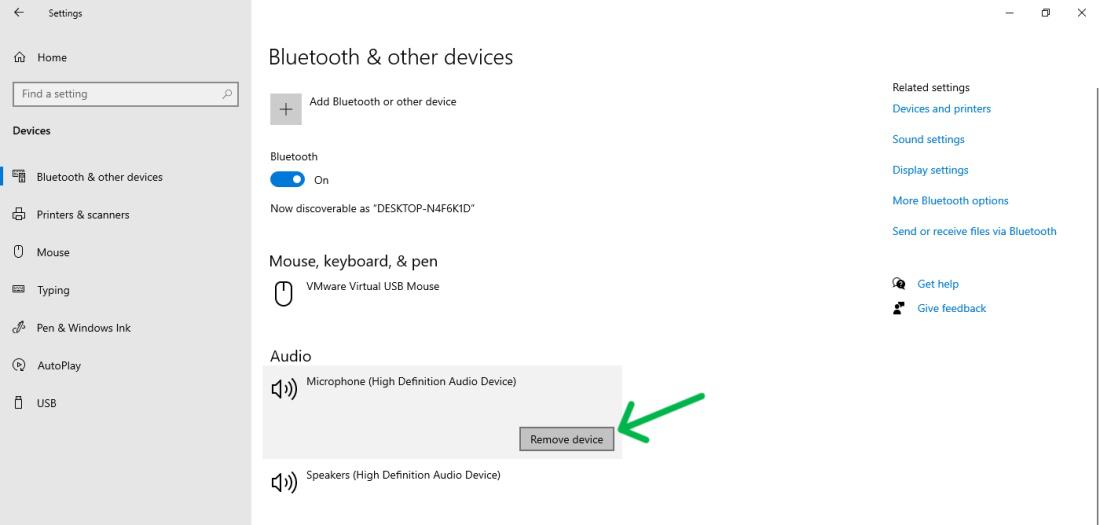
How to Remove/Unpair a Bluetooth Device Using Settings
In this section, we will show a simple method to unpair/ remove Bluetooth devices from Windows 10 in the Settings app. Follow the given steps to remove a Bluetooth device on Windows.
Step 1: Open Settings by pressing Windows Key + I then navigate to "Devices"
Step 2: Find the device you want to unpair and click Remove device.
How to Quickly Troubleshoot and Fix Bluetooth Problems?
Issues with Bluetooth can bring in a lot of frustration. This section is all about pinpointing computer Bluetooth issues in Windows 10 and the respective resolutions to get you back on the go. These 4 things will definitely help you quickly troubleshoot and fix Bluetooth Problems.
1. Check Device Compatibility
However, before connecting your Bluetooth device to Windows 10 verify that the device is compatible.
2. Restart Bluetooth Service
- Hit the Win + R keys together to bring the Run dialog box.
- Write services. msc and hit ENTER.
- Look for the “Bluetooth Support Service” in the list, and then, by clicking on “Restart,” you can restart the service.
3. Update Bluetooth Drivers
- Right-click the Start Menu, choose “Device Manager” by the right mouse button, and open it.
- Locate the “Bluetooth” category in your devices list, right-click it, and next specify “Update driver.”
4. Run Troubleshooter
- Proceed to “Settings” > "Update & Security" > "Troubleshoot".
- Click the "Bluetooth" option and then run the troubleshooter by clicking "Run".
You can find detailed instructions on fixing Bluetooth problems at the following link: Install and Fix Bluetooth Drivers in Windows
Conclusion
With the steps outlined above, you can seamlessly connect and manage your Bluetooth devices in Windows 10. Whether you're pairing a new audio device or troubleshooting an existing connection, understanding how to navigate the Bluetooth settings will help you maintain an efficient and enjoyable workspace. Make the most of your Bluetooth technology to enhance your overall computing experience.
Also Read