This post will explain how to find your MAC address in Windows 11 if you're wondering how to accomplish it. For networking purposes, your network adapter's MAC address is a unique identification that you must know. It's simple to find your MAC address in Windows 11 for troubleshooting or network setting purposes. Join us as we walk you through the process of verifying that you have the right information by checking the MAC address in Windows 11.
Table of Content
- How to Find Your MAC Address in Windows 11?
- Method 1: How to Find MAC Address Using Settings App
- Method 2: How to Find MAC Address Using Control Panel
- Method 3: How to Find MAC Address Using PowerShell
- Method 4: How to Find MAC Address Using System Information
- Method 5: How To Check MAC Address in Windows 11 Using Command Prompt
- How to Find Your MAC Address in Windows 11 - FAQs
How to Find Your MAC Address in Windows 11?
Below are the methods for finding your MAC address in Win 11.
Method 1: How to Find MAC Address Using Settings App
Check mac address windows 11 is simple using the Settings app. Just follow these easy steps:
Step 1: Press Win + I to open the settings app
Step 2: Click "Network & Internet" in the left panel.
Step 3: Select "Advanced network settings."
Step 4: Click on "Hardware and Connection Properties."
Step 5: Your MAC address is listed under "Physical address (MAC)" for the chosen adapter.

By following these steps, you can easily locate your MAC address using the Settings app in Windows 11.
Method 2: How to Find MAC Address Using Control Panel
Another way to find your MAC address in Windows 11 is by using the Control Panel. Here's how you can check mac address windows:
Step 1: Press Win + R then run dialog type "Control Panel".

Step 2: Select "Network and Internet."
Step 3: Click on "Network and Sharing Center."
Step 4: Choose "Change adapter settings" in the left pane.
Step 5: Right-click on your network adapter and select "Status."
![]()
Step 6: Click on "Details" and locate the MAC address under "Physical Address."

Using the Control Panel is a straightforward way to find your MAC address on Windows 11, providing you with a quick method to access your network connection details.
Method 3: How to Find MAC Address Using PowerShell
Using PowerShell is a quick and efficient way to find your MAC address in Windows 11. Follow these simple steps:
Step 1: Open the Start menu and search for "PowerShell."

Step 2: Step 2: Type the command getmac /v /fo list and press Enter.

Step 3: Your MAC address will be displayed for each network adapter listed.
This method is straightforward and allows you to quickly check MAC address windows for your network adapter using PowerShell.
Method 4: How to Find MAC Address Using System Information
Step 1: Open the Start menu and search for "System Information."
Step 2: Expand the "Components" branch and then "Network."
Step 3: Double Click on "Network" then click on "Adapter"
Step 4: Step 4: Under "MAC Address," you'll find the unique identifier for your chosen adapter.
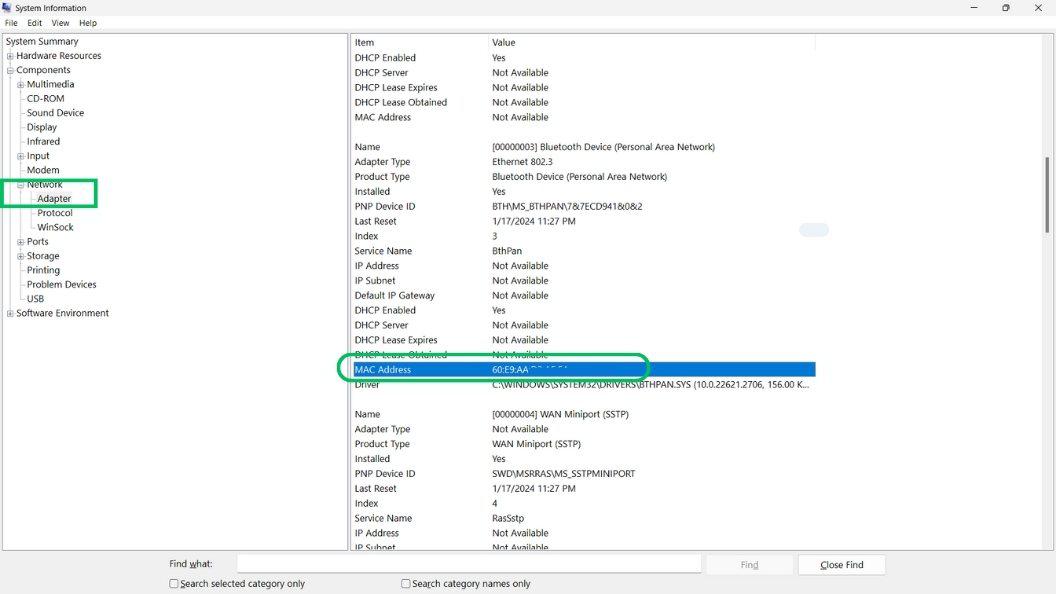
By following these steps, you can easily find your MAC address using the System Information tool in Windows 11. This method provides a detailed view of your network configuration and can help you manage your network settings more effectively.
Method 5: How To Check MAC Address in Windows 11 Using Command Prompt
You can use Command Prompt to check your MAC address in Windows 11 easily. Follow these steps:
Step 1: Open the Start menu and search for "CMD."

Step 2: Type the following command and hit enter
getmac /v /fo list
Conclusion
In Windows 11, locating your MAC address is an easy procedure that only requires a few steps to complete. For the purposes of device identification, network configuration, and network troubleshooting, it is helpful to know how to acquire your MAC address in Windows 11. In Windows 11, you can quickly check your MAC address and use it for a variety of network-related operations, regardless of whether you access it via the settings menu or command prompt.