Learning how to create a new user account in Windows is essential for managing multiple users on your computer. Whether you're using Windows 10 or Windows 11, the process is straightforward and helps you set up personalized environments for different users. In this guide, we'll walk you through the steps to add a new user and explain the benefits of proper Windows user account setup. Whether it's for work, family, or guests, knowing how to create a user account ensures each person has their own space to store files and settings.
Creating a New User On Windows
Step 1: At first, we need to open the settings of the device. There will be some options available. Among the options, there is an option present called 'Account'. We need to click on that. This will help to get more new options.

Step 2: After that on the left-hand side, there are more options present. Among those options, we need to click on Family & Other Users. This option helps to create a new account for the other user member.

Step 3: Now, in the newly opened window, there will be two sections. One is for Family & the other is for outside members. We have to create the account from the view of outsiders. We need to click on the button, 'Add Someone Else To This PC'.
Note: If a user wants to create an account under the Family section, there should be a Microsoft Account present. We need to always add a Microsoft Account for creating a new account for outsider members. If user want to add data for himself or for any other, there are always be a Microsoft Account present in this section. So, it is advisable to always go with the Other Users option. A Microsoft account doesn't need there.

Step 4: After clicking on the above button, a new window will be opened. There it will ask for the Microsoft Account. But we need to skip this. For that purpose, we need to click on the below-mentioned link. This will help to skip this part.

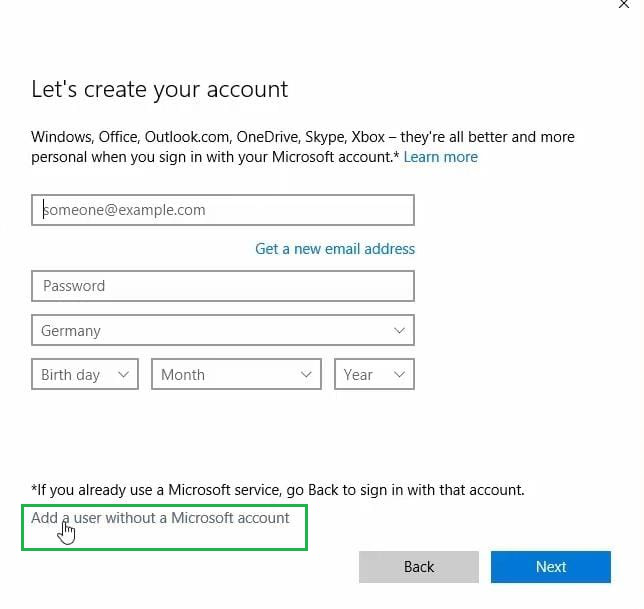
Step 5: Then in the next step, it will ask to create one Microsoft Account. But our intention is not to create one Microsoft Account. Our intention is not to create the Microsoft Account. So, we have to skip this part also. So, we have to click on the very below link there. That link will help to create a user account without a Microsoft Account.
Step 6: Now, a new window will open. This is our desired window. There is no need to provide a Microsoft Account. We need to provide a Username there. Also, we need to provide a password for that. There we have to provide a password hint for that. This is like a Security Question we used to provide for any password. As per the convenience of the user, they can provide any data. After that, we need to click on Next.

Step 7: After that, it will come back to the Accounts Page. We will find new user data on that page. We have provided the Username as User2.

Step 8: Now, we can restart the machine. Or we can log out from the device. There we will find the User2 account present. Users can log in with the User2 account by providing the password.

Conclusion
By following these steps, you can easily create a new user account in Windows and manage multiple profiles efficiently. Whether you're on Windows 10 or Windows 11, setting up individual user accounts allows for better organization and security. Explore the various Windows account creation steps and customize each profile according to your needs, ensuring a smooth user experience for everyone who accesses your computer.