How to Open Windows PowerShell as an Admin in Windows 11?
Last Updated :
23 Jul, 2025
Windows Powershell is a powerful command-line shell and scripting language devised for administrators and professionals. PowerShell with administrative privileges in Windows 11 makes it possible to carry out tasks with superior permissions. This article will discuss several ways of opening Windows PowerShell as admin.

What is Windows PowerShell?
The Windows PowerShell is a Command Line Interface and Scripting Language based on the .NET framework. Windows is an important tool that offers an active command line interface for automation of jobs and configuration management. PowerShell can run administrative commands and as such, provide administrator access.
Method 1: Open Windows PowerShell as an Administrator Using Win + X
Step 1: To open the quick access menu, right-click on Start or use the keyboard shortcut Win + X.
Step 2: Then, from the context menu, select "Terminal (Admin)".

Step 3: In user account control click on "Yes"
Method 2: Run PowerShell Script as Admin from Start Menu
Step 1: Click on the start button, then the search box, and type "Windows tools".
Step 2: Then, Right-click on "Windows PowerShell" from the list.
Step 3: Choose "Run as administrator."
Step 4: In user account control click on "Yes"
Method 3: Open PowerShell as Admin Using Windows Search
Step 1: Type "Windows PowerShell" in the Windows Search bar.
Step 2: Choose "Run as administrator" from the context menu

Step 3: In user account control click on "Yes"
Method 4: Run Windows PowerShell Using Task Manager
Step 1: Type “Task Manager” in the search bar or press Ctrl + Shift + Esc to open Task Manager.
Step 2: Choose "Run new task."
Step 3: Select Powershell, and tick administrative privilege.

Method 5: Open PowerShell as Admin Using Run Dialog
Step 1: Press Win + R to open the Run dialog.
Step 2: Type "PowerShelland " and press Ctrl + Shift + Enter to run as administrator. Do not click on OK button

Step 3: In user account control click on "Yes"
Method 6: Run Windows PowerShell as Admin from CMD
Step 1: Open Command Prompt as an administrator.

Step 2: In user account control click on "Yes"
Step 3: Type
powershell Start-Process powershell -Verb runAs

Method 7: Open PowerShell as Admin Using Windows File Explorer
Step 1: Open file explores by using the shortcut Win + E or type "File Explorer" on search bar
Step 2: Type the command in the File Explorer address bar and press Enter.
C:\Windows\System32\WindowsPowerShell\v1.0\
Step 3: Right click on Powershell then click on "run as administrator".

Step 4: In user account control click on "Yes"
Method 8: Open PowerShell as Admin Using Control Panel
Step 1: Open the Control Panel.
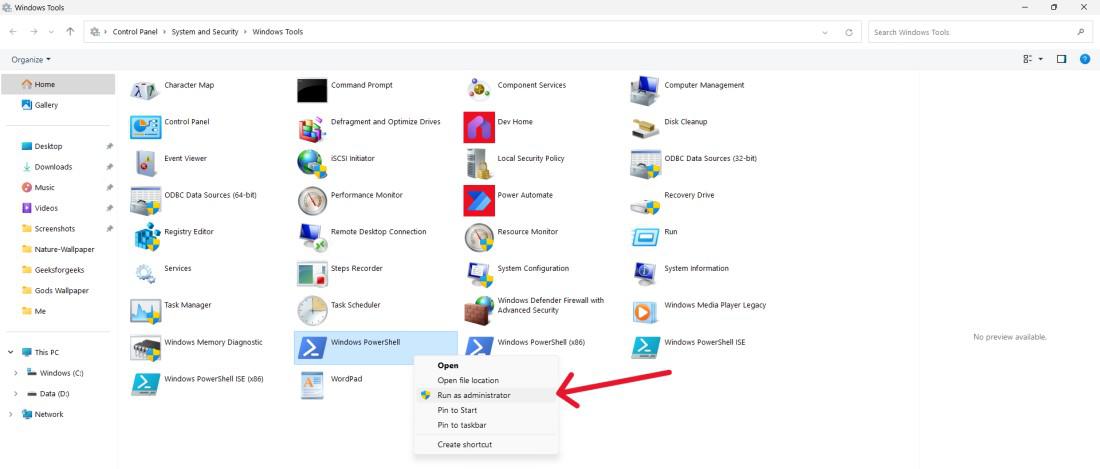
Step 2: Go to "System and Security" > "Windows Tools."

Step 3: Right-click on "Windows PowerShell ISE (x86)" or "Windows PowerShell" with administrative privileges.
Step 4: In user account control click on "Yes"
Method 9: Open PowerShell as Admin With a Desktop Shortcut
Step 1: Right-click on the desktop.
Step 2: Choose "New" > "Shortcut."

Step 3: Enter "powershell.exe" as the location.
Step 4: Click "Next" and give your shortcut a name.
Step 5: Right-click on the shortcut, go to "Properties," and under the "Shortcut" tab, click "Advanced" and check "Run as administrator."

Conclusion
There are different ways to launch Windows PowerShell with administrative rights in Windows 11 such that you may choose what best suits you. You can use different approaches through which the PowerShell is executed with its administrative access. These means include the use of keyboard shortcuts and the Start Menu among others since it’s an elevated command used in system-level tasks. Adopt these processes within your workflow to simplify your administrative duties in Microsoft Windows 11.
Also Read
Explore
How To
MAC
AI Tools
Shortcut Key