Want to update your name on Facebook, either to correct a typo or reflect a recent change? Whether it’s a personal profile name or a business page name, Facebook makes it easy to edit your name through a few simple steps. Understanding how to change your name on Facebook ensures your profile stays current and matches your identity or brand.
This guide will walk you through all the methods, whether you’re updating your profile name, fixing a spelling error, or adjusting the name on a Facebook page. No matter the reason, these steps will help you navigate the process on both desktop and mobile.
Disclaimer: Facebook has name change policies, so ensure your new name complies with their standards to avoid restrictions.

Table of Content
- Facebook's Name Change Policy
- How to Edit Your Name on Facebook (Personal Profile)
- Method 1: How to Change Your Name on Facebook (Desktop)
- Method 2: How to Change Your Name on Facebook (Mobile App)
- Method 3: How to Change a Facebook Page Name
- How to Change Your Business Name on Facebook
- How to Change Your Facebook Username
- How to Add Nickname on Facebook
Facebook's Name Change Policy
Facebook has specific rules about what names can be used. This ensures profiles remain authentic and do not violate community standards.
Rules for Names:
- Names must not include symbols, numbers, or unusual capitalization.
- Characters from multiple languages, titles, or offensive words are prohibited.
- Nicknames are allowed if they are variations of your real name (e.g., Abby for Abigail).
Pro Tip: To regain access to your account, use a name that matches your ID or a document on Facebook's approved list.
How to Edit Your Name on Facebook (Personal Profile)
Changing your name on Facebook is simple and can be done using various methods, whether on a desktop, mobile app, or for a business page. Below are the best and proven methods to change your fb name quickly and efficiently. Follow the steps under each method to align with Facebook’s naming policies while avoiding errors.
Method 1: How to Change Your Name on Facebook (Desktop)
This method is ideal to change fb page name using a computer browser. It’s perfect for personal accounts and ensures you comply with Facebook’s policies.
Step 1: Open Facebook
Open the Facebook app on your desktop or laptop and log in to your account. Tap your profile picture on the top right corner of the screen.

Step 2: Select Settings and Privacy
Select 'Settings and Privacy.' Under this, choose 'Settings.'
.webp)
Step 3: Go to the Meta Accounts Section
Go to the Meta Accounts Centre section on the left side of the page and click 'See more in Accounts Center.'
Step 4: Click on Profile
Tap 'Profiles' and click on your Facebook profile.

Step 5: Click on Name
As you click on your personal profile, you get 4 options- Name, Username, Profile Picture and Avatar. Now, to change the name, we click on Name.
.webp)
Step 6: Enter Name and Click "Review Change"
Enter the new name and click 'Review change.'

Step 7: Select the Order and Click "Done"
You can also select the order you want your name to appear and tap 'Done' to save it.
Method 2: How to Change Your Name on Facebook (Mobile App)
You can also change your Facebook profile name on Mobile. Here we will cover the steps for mobile (iPhone/Android):
Change your name on Facebook on iPhone
Here are the steps on how to change your name on Facebook on iPhone:
Step 1: Open Facebook App
Open the Facebook app on your iPhone.
Note: All the screenshots listed below are taken on an iPhone. However, if you have Android, you must follow the same steps as iOS.
Step 2: Click on "Menu"
Tap 'Menu' at the bottom right of the screen.

Step 3: Click on "Settings and Privacy"
Click on the 'Settings and Privacy' drop-down. This section will provide a few options such as Settings, Privacy shortcuts, Your time on Facebook, and more. Choose Settings. 
Step 4: Select "See More Accounts"
Select 'See more in Accounts Centre' and click 'Profiles.'
Step 5: Click on your Profile
Click on the Profile to changes the name.

Step 5: Select Username
Now, you will get 4 options- Name, Username, Profile Picture and Avatar. You can change any of these by clicking any of the 4 options. Now, as we change the name on Facebook, we will select 'Name' here.

Step 6: Enter New Name and click Review Change
Enter the new name and click 'Review change.'
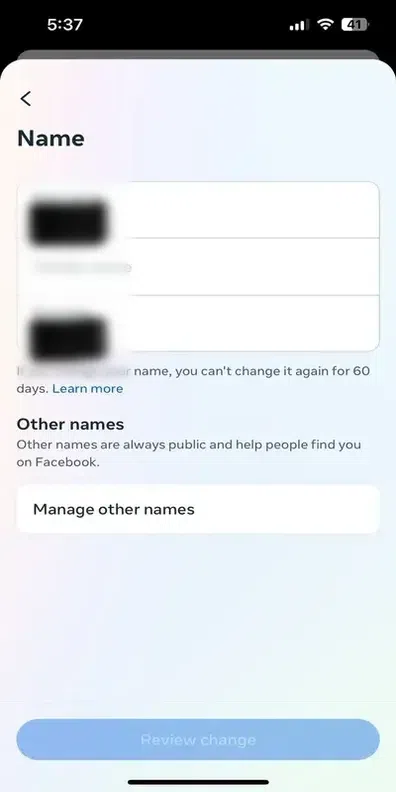
Step 7: Select the Order of the Name
You can also select the order you want your name to appear and tap 'Done' to save it.

Change Your Name on Facebook on Android
If you need to change your name on Android then follow the steps given below:
Step 1: Open Facebook App
Open the Facebook app on your device.
Step 2: Click on Three Bars
After opening the app click on the Three Bars located at the top right corner of the interface.

Step 3: Click on the Gear Icon
Click on the Gear icon located at top-right side of the interface.

Step 4: Click on Personal Details
Now in the Settings and Privacy section click on the Profile Details.

Step 5: Select your Profile
Select your profile of which you want to change name.

Step 6: Select Name
As you are changing the name so you need to click on the Name.

Step 7: Enter name and Click Save
Now enter the name that you want to replace with the previous one. and click on the Save.

Step 8: Name Changed
Congrats! You have now successfully changed the name on your Facebook profile.

Method 3: How to Change a Facebook Page Name
This method is ideal for rebranding or updating your Facebook business or community page name.
Step 1: Open Your Facebook Page
- Log in to your account and navigate to the page you want to update.
Step 2: Access Page Settings
- Click "Settings" in the menu on the left, then select "Page Info."
Step 3: Edit the Page Name
- In the "Name" field, delete the current name and enter the new name. Ensure it reflects your page’s purpose.
Step 4: Submit the Request
- Click "Save Changes" to submit your request. Facebook may review and approve the change within 24-48 hours.
How to Change Your Business Name on Facebook
Here are the following steps to change a Facebook page name:
Step 1: Open Your Facebook Page
Navigate to the page you manage.
Step 2: Access Page Settings
Click on Settings from the left-hand menu.
Step 3: Edit the Page Name
Select Page Info and click Edit next to the current page name.
Step 4: Enter the New Name
Input your updated business name and click Save Changes.
Step 5: Submit for Review
Facebook may review the change, which can take up to 3 days. If approved, the name will update.
How to Change Your Facebook Username
Your username (URL) is unique to your profile and can also be updated for better personalization.
Step 1: Access Settings
- Go to "Settings & Privacy" > "Settings" and navigate to the "Username" section.
Step 2: Enter a New Username
- Type your desired username and ensure it’s available. It should be simple, recognizable, and comply with Facebook’s rules.
Step 3: Save Changes
- Click "Save Changes" to finalize the update. Your new username will appear in your profile URL.
How to Add Nickname on Facebook
Nicknames can be used if you meet Facebook's community standards and policies. Follow these steps if you want to use a nickname on Facebook:
Step 1: Open Facebook and Click on the Menu
Once you open the Facebook app on your iPhone or Android, tap the 'Menu' icon at the bottom right of the screen.
Note: All the screenshots listed below are taken on an iPhone. However, if you have Android, you must follow the same steps as iOS.

Step 2: Choose "Settings and Privacy"
Scroll down the list and choose 'Settings and Privacy'. Then, you will get other options; select 'Settings.'
.webp)
Step 3: Click on See More in Accounts Cetnre
Click on 'See more in Accounts Center.'
.webp)
Step 4: Select Options Profile
Select the option 'Profiles' which will open your Facebook Profile.
Step 5: Select Name
Select 'Name' and then 'Manage other Names.'

Step 6: Enter your Nickname
Now, you only need to tap 'Name Type' (it could be your nickname, former spelling,birth name, alternative spelling, father's name, maiden name, etc.) and click on 'Save'.
.webp)
Also Read:
Conclusion
Changing your name on Facebook, whether for your profile or a business page, is a straightforward process when you follow these steps. Keeping your profile or page up-to-date ensures it reflects your identity or brand accurately. Use this guide to make changes confidently, and enjoy a seamless experience across the platform!