Struggling with an overflowing inbox? Managing emails in Outlook can be overwhelming, but with the right email filtering techniques, you can streamline your workflow, prioritize important messages, and keep spam at bay. Whether you're using Outlook on Windows, Mac, Microsoft 365, or Outlook Web, this guide will walk you through how to filter emails in Outlook using built-in filters, rules, and folders. By the end, you'll have a clutter-free inbox and a smarter email management system.
Note: This Article can be informative for Outlook Microsoft 365 Outlook 2021 Outlook 2019 Outlook 2016 Outlook 2013 Outlook 2010 Users.

Table of Content
- Method 1: How to Filter Emails in Outlook using Built-in Filters
- Method 2: Using Rules to Automatically Filter Emails
- Method 3: Using Folders to Manually Sort Emails
- Method 4: Filtering Spam Emails in Outlook
- Method 5: Filtering Emails in Outlook Web
- Troubleshooting: Why Isn’t My Outlook Email Filter Working
Method 1: How to Filter Emails in Outlook using Built-in Filters
This method is useful for those who want an easy way to view specific types of emails, such as unread messages, flagged emails, or emails with attachments. It is a simple, one-click solution to filter emails instantly. Follow the below steps to easily Filter emails in outlook.
Step 1: Open Outlook and Go to Your Inbox
- Launch Microsoft Outlook on your device.
- Click on the Inbox or any folder you want to filter emails in.

Step 2: Click on Filter Email Icon
- Click on the Filter Email button in the Home tab.
- Select a filtering option from the dropdown menu, such as:
- Unread Mail – Shows only unread emails.
- Has Attachments – Filters emails that include attachments.
- Flagged – Displays emails marked as important.
- Categorized – Sorts emails by categories.

Step 3: Customize the Filter Further (Optional)
- Click on More Filters to add specific conditions, such as sender, subject, or date.
- Click Apply to filter emails based on your selection.
Pro Tip: Click "Clear All Filters" to return to your full inbox view anytime.
Method 2: Using Rules to Automatically Filter Emails
Using rules is a powerful way to automate email organization. It ensures that emails from specific senders or topics land in the right folders without manual effort. Follow the below steps to Automatically sort incoming emails into folders based on sender, subject, or keywords:
Step 1: Open Outlook and Access Rules
Open Outlook and click on File > Manage Rules & Alerts.

Step 2: Create a New Rule
- In the Rules and Alerts window, click New Rule.
- Choose a rule template (e.g., "Move messages from someone to a folder").

Step 3: Define Conditions
- Select conditions like specific sender, subject, keywords, or attachments.
- Click Next and choose an action (move to folder, delete, mark as important, etc.).
Step 4: Apply the Rule and Save
- Click Finish to save the rule.
- Outlook will now automatically filter emails based on your rule.

Pro Tip: Set up rules for Work, Personal, Promotions, and Newsletters to keep your inbox organized!
Method 3: Using Folders to Manually Sort Emails
This method is best for users who prefer sorting emails manually into different folders. It is useful when managing projects, categorizing emails by importance, or keeping work and personal emails separate.
Step 1: Create a New Folder
- Open Outlook and go to your Inbox.
- Right-click on your email account and select New Folder.

Pro Tip: Combine this method with rules to automate sorting!
Step 2. Select a Sender from Emails
Now, choose a sender from your emails for whom you want to set up automatic email forwarding to the folder you've just created.
Step 3: Select Rules
After you have decided on the sender's name, simply right-click on the email send by that particular sender and choose "Rules" from the options. Then, select "Always Move Messages from: Sender Name."

Step 4: Select the Created Folder
After selecting the above rule, a window will pop up, asking where you want to move the emails. Now, choose the newly created folder and press Ok.

Method 4: Filtering Spam Emails in Outlook
Junk email filtering ensures that unwanted emails don’t clutter your inbox. This method automatically blocks spam while ensuring you don’t miss important messages. Follow the below steps to Block unwanted spam and junk emails to keep your inbox clean:
Step 1: Open Junk Email Settings
Open Outlook and go to Home > Junk > Junk Email Options.

Step 2: Adjust Spam Filtering Settings
Select your preferred spam filtering level:
- Low – Blocks obvious spam.
- High – Blocks most spam but may filter good emails.
- Safe Lists Only – Only allows emails from contacts and trusted senders.
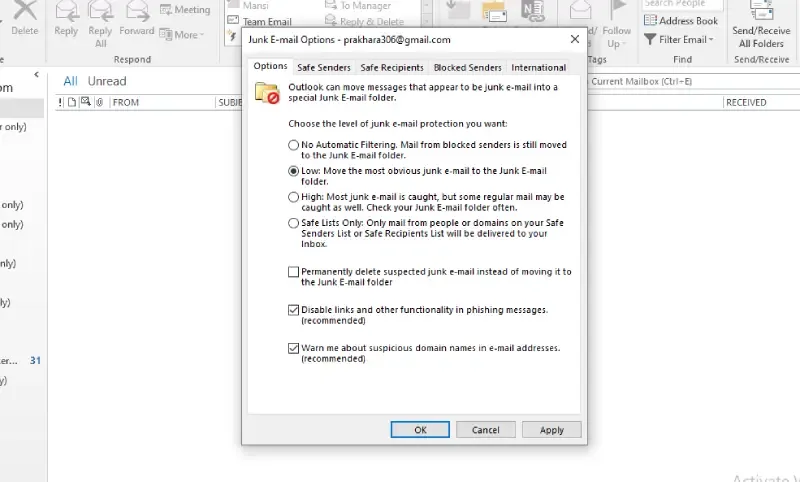
Step 3: Add Blocked Senders
- Click Blocked Senders and manually add email addresses you want to block.
- Click Apply > OK to save settings.

Pro Tip: Review your Junk Email folder regularly to prevent missing important emails.
Method 5: Filtering Emails in Outlook Web
Outlook Web allows you to filter and manage emails on any device without needing the desktop application. This is great for remote work and frequent travelers. Follow the below steps to Set up automatic filters from any device using Outlook Web (Office 365 & Outlook.com)
Step 1: Open Outlook Web & Access Settings
- Sign in to Outlook Web.
- Click Settings (gear icon) > View all Outlook settings.

Step 2: Create a New Rule
- Go to Email > Rules > Add a New Rule.
- Name your rule (e.g., "Move Promotions to Newsletter Folder").

Step 3: Set Conditions & Actions
- Choose the condition (sender, subject, keywords, attachments, etc.).
- Select the action (move to folder, mark as important, delete, etc.).

Step 4: Save and Apply the Rule
Click Save, and Outlook will automatically filter future emails based on your rule.
Pro Tip: Use multiple rules to separate work emails from promotional or social media updates!
Troubleshooting: Why Isn’t My Outlook Email Filter Working
If your email filters are not working properly, try these solutions:
- Restart Outlook – Close and reopen Outlook to refresh filters.
- Check Rule Order – Outlook applies rules from top to bottom, so arrange them properly.
- Update Outlook – Ensure you’re using the latest version.
- Review Junk Mail Settings – Adjust spam filter levels if necessary.
- Test with a New Rule – If a rule isn’t working, create a new one and check if it applies.
Conclusion
Managing an overflowing inbox can be overwhelming, but with Hotmail's powerful filtering features, users can stay organized and prioritize important messages effectively. The above article covers step-by-step instructions on creating rules to automatically filter emails from specific senders into designated folders, ensuring a clutter-free inbox. By following the outlined steps, users can efficiently manage their inbox and ensure that important communications are promptly attended to while keeping spam at bay.