Build And Deploy Java Application With Docker | Step-By-Step Tutorial
Docker is a platform for OS-level virtualization that allows developers to build, package and deploy applications efficiently. It provides a lightweight and isolated environment, making applications portable and resource-efficient.
What Is a Docker Container
The Docker container is a part of Docker that provides a lightweight isolation environment for running applications. It is used because it takes fewer resources and helps to build, test and deploy the application in a very small and easy way.
Prerequisite
- Docker should be installed and in running condition.
- We should have a proper Java application that we have to deploy.
- Java should be installed on your system.
Step-by-Step Implementation
Step 1: Create a Simple Java Application
We’ll create a simple Java program that displays “Hello, World!” in the browser.
1.1 Choose an IDE or Text Editor
You can use any of the following to write Java code:
- IntelliJ IDEA (recommended for beginners)
- Eclipse
- VS Code with Java extensions
- Or even a simple text editor like Notepad or Notepad++
1.2 Create Project Folder
First, create a folder to hold your project. Open a terminal/command prompt and run:
mkdir HelloWorldApp
cd HelloWorldApp
This will create a folder named HelloWorldApp and navigate into it.
1.3: Create Java File
Inside your project folder, create a new Java file named HelloWorld.java:
touch HelloWorld.java
If you are using Windows Command Prompt, use:
type NUL > HelloWorld.java
Open HelloWorld.java in your IDE or text editor and add the following code:
import com.sun.net.httpserver.HttpServer;
import com.sun.net.httpserver.HttpHandler;
import com.sun.net.httpserver.HttpExchange;
import java.io.IOException;
import java.io.OutputStream;
import java.net.InetSocketAddress;

public class HelloWorld {
    public static void main(String[] args) throws IOException {
        HttpServer server = HttpServer.create(new InetSocketAddress(8001), 0);

        server.createContext("/", new HttpHandler() {
            @Override
            public void handle(HttpExchange exchange) throws IOException {
                exchange.getResponseHeaders().set("Content-Type", "text/html");
                exchange.sendResponseHeaders(200, 0);

                OutputStream responseBody = exchange.getResponseBody();
                String htmlResponse = "<html><body><h1>Hello, World!</h1></body></html>";
                responseBody.write(htmlResponse.getBytes());
                responseBody.close();
            }
        });

        server.start();
        System.out.println("Server is listening on port 8001...");
    }
}
Now, Before deploying this application with the Docker we have to build it with the help of Dockerfile.
Step 2: Create a Dockerfile
A Dockerfile defines the steps required to build a Docker image for your application. It uses simple, human-readable commands
Here’s the Dockerfile for the HelloWorld application:
# Use a specific OpenJDK version
FROM openjdk:11# Set the working directory inside the container
WORKDIR /javaapp# Copy the Java source file into the container
COPY HelloWorld.java .# Compile the Java program
RUN javac HelloWorld.java# Set the default command to run the Java program
CMD ["java", "HelloWorld"]
Explanation of key Dockerfile commands:
- FROM: Specifies the base image (OpenJDK 11).
- WORKDIR: Sets the working directory inside the container.
- COPY: Copies files from the local system to the container.
- RUN: Executes commands like compiling Java code.
- CMD: Defines the default command to run when the container starts.
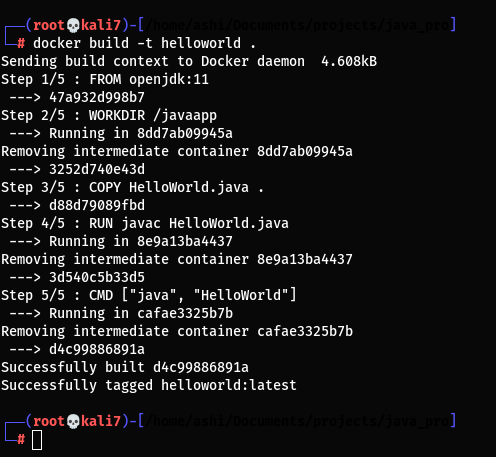
Step 3: Build the Docker Image
Build The Docker image by using dockerfile. Open a terminal in the project directory (where your Dockerfile is located) and run:
docker build -t helloworld .
- -t helloworld gives your Docker image a name (helloworld).
- The . specifies the current directory as the build context.
You can list all Docker images with:
docker images

Step 4: Deploy the Java Application in a Docker Container
After building the Docker image, now we are ready to deploy the application with Docker.For deployment we have to create the Docker container.
Run The Docker container using Docker image.
- To create the docker container from the docker images.
docker run -p 8001:8001 -d helloworld
 List all the containers in docker:
- To list all the running containers.
docker ps

Step 5: Access the Application
Now, We can access the java application with the help of localhost:port that you have given while creating the docker container.
Open your browser and go to:
http://127.0.0.1:8001


