How to Convert Excel to Word: 4 Easy and Effective Methods
Last Updated :
12 Apr, 2025
Converting Excel to Word is a useful skill when you need to present data from your spreadsheets in a more readable or formal document format. Whether you're preparing a report, creating a proposal, or simply transferring tables and charts from Excel into Word, knowing how to convert Excel to Word will save you time and effort. In this guide, we’ll show you different methods for converting Excel data into a Word document, including copy-pasting, embedding, and linking Excel content to Word for easy updates.
Method 1: Copy & Paste a Table from Excel to a Word document
One of the easiest ways to transfer data is by copying and pasting an Excel to a Word table. Follow these steps:
Step 1: Open the Excel File
Open the Excel workbook containing the data you want to convert.
 Open the Excel File
Step 2: Select the Data
Highlight the range of cells you want to copy.
Step 3: Copy the Data
Press Ctrl + C (Windows) or Command + C (Mac) to copy the selected data.
 Copy the Data
Step 4: Open Word
Launch Microsoft Word and open a new or existing document.
Step 5: Paste the Data
Position the cursor where you want to insert the data and press Ctrl + V (Windows) or Command + V (Mac).
 Paste the Data
After pasting, you can:
- Resize the table by dragging its corners.
- Use the Table Design tab in Word to style the table.
Tips for Better Results:
- Paste Options: When pasting, use the options to:
- Keep Source Formatting: Retains Excel’s formatting.
- Use Destination Theme: Matches Word’s style.
- Paste as Picture: Converts the data into an image that cannot be edited.
- Break Large Tables: Split large tables into smaller sections for better readability in Word.
Method 2: Embed an Excel file into Word
Embedding an Excel sheet as an object allows you to keep the Excel functionality within Word. This is especially useful for dynamic data that may require updates.
Step 1: Open Microsoft Word
Open a Word document where you want to insert the Excel data.
Step 2: Insert an Object
Go to the Insert tab in the ribbon and click on Object in the Text group.
 Go to Insert Tab>> Select " Object"
Step 3: Choose Create from File
- In the dialog box, select Create from File and click Browse to locate your Excel file.
 Select "Create From File">> Click on "Browse"
Step 4: Insert the File
- Select the desired Excel file and click Insert.
- Click OK to embed the file as an object in the Word document.
 Select the File>> Click on Insert
Step 5: Edit the Embedded Object
- Double-click the embedded Excel object to open it in Excel. Make changes, and they will reflect in the Word document.
 Edit the Embedded Object
Advantages:
- The Excel file retains all its functionalities, such as formulas and charts.
- Updates in the embedded Excel file automatically appear in Word.
Tips for Embedded Objects:
- Resize the Object: Click and drag the object’s corners to resize it in Word.
- Link the File: If you want Word to automatically update the object when the Excel file changes, check Link to File during insertion.
Method 3: Use Mail Merge for Dynamic Data
Mail Merge is a powerful feature in Microsoft Word that allows you to dynamically generate personalized Word documents using data from an external source, such as an Excel spreadsheet. While it is primarily designed for creating personalized letters, envelopes, and labels, Mail Merge Excel to Word can effectively be used to convert Excel data into structured Word documents. Mail Merge is ideal for generating multiple documents (e.g., letters, invoices) from an Excel database.
Step 1: Prepare Your Excel File
- Ensure your Excel file has a header row with column names (e.g., Name, Address, Amount).
- Save the file in a compatible format like .xlsx or .xls.
 Prepare Your Excel File
Step 2: Start Mail Merge in Word
- Open a Word document.
- Click Select Recipients > Use an Existing List.
- Locate and select your Excel file, then choose the worksheet with your data.
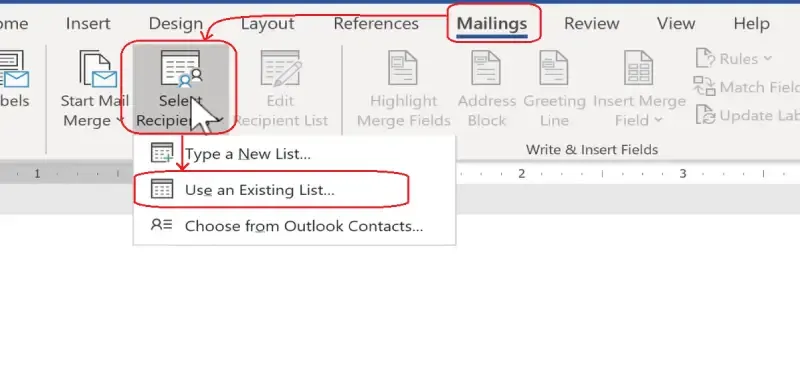 Click on "Mailings" Tab >> Select "Recipients">> Select " Use an Existing List"
Step 3: Edit your Recipients List
Click on "Edit Recipients List" and Edit your Recipients. You can Select, Deselect your Recipients
 Edit your Recipients List
Step 4: Select the Text and Click on Insert Greeting Line
Select the text where you wants to insert the greeting line.
 Select the Text >> Click on Greeting Line
Step 5: Insert Merge Fields
Use the Insert Merge Field option to add placeholders for your Excel data in the Word document (e.g., <<Name>>, <<Address>>).
 Insert Merge Field
Step 6: Preview and Finish
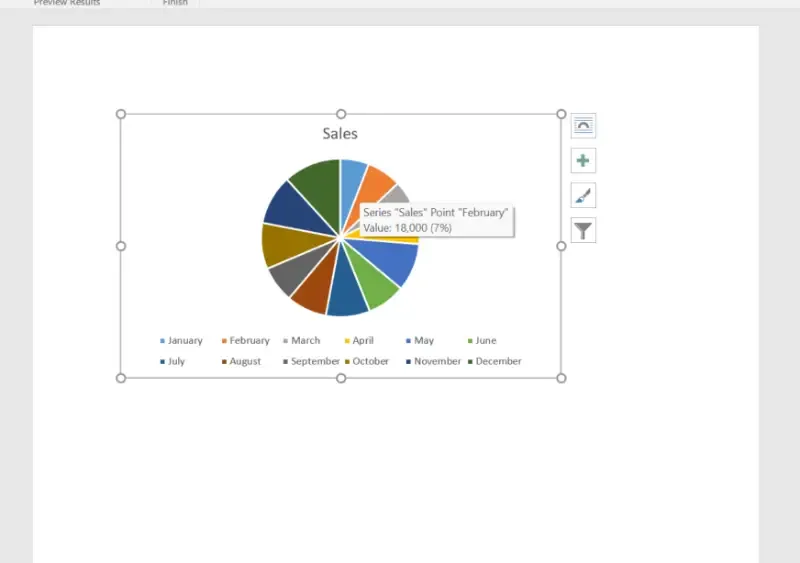
- Click Preview Results to see how the document will appear.
- Click Finish & Merge to generate the final documents.
 Preview and Finish
Method 4: Export Excel Charts to Word
Charts are a visual way to represent data and are often created in Excel. You can easily export Excel chart to Word for use in reports or presentations.
Step 1: Create a Chart in Excel
Use your data to generate a chart in Excel.
 Create a Chart in Excel
Step 2: Select and Copy the Chart
Click on the chart to select it. Right-click and choose Copy or press Ctrl + C.
Step 3: Paste into Word
Open a Word document. Paste the chart using Ctrl + V. By default, the chart will embed as an editable object.
 Paste into Word
Step 4: Adjust Paste Options
After pasting, click the Paste Options button and choose:
- Embed Workbook: Allows the chart to remain linked to the Excel file.
- Keep Source Formatting: Retains the original design of the chart.
- Use Destination Theme: Matches the chart to the Word document’s style.
Conclusion
Now that you know how to convert Excel to Word, you can easily integrate your spreadsheets into more polished documents for reports, presentations, or collaborative work. Whether you choose to embed tables, link data, or simply copy and paste, these techniques will make transferring content between Excel and Word effortless. By mastering this skill, you'll be able to present your data in a professional format, streamlining your workflow and enhancing your document creation process.
Similar Reads
How to Convert an Excel to a Google Sheet : 4 Easy Ways
Everyone has their preferred spreadsheet tool. For some, it’s Microsoft Excel, while others swear by Google Sheets. Even though they might look similar to the untrained eye, personal preferences and specific use cases often dictate the choice. But in a collaborative world, working with people who us
7 min read
4 Easy Ways to Convert a PDF to Excel
Do you need to extract data from a PDF and transfer it into Excel for better analysis or organization? Learning how to convert a PDF to Excel can save time and effort while ensuring data accuracy. This guide explores four easy methods to convert PDF to Excel, whether using built-in tools in Microsof
8 min read
Excel Transpose: Convert Rows to Columns (4 Easy Methods)
If you want to flip rows to columns or columns to rows but you don't want to retype all the data, then you need to use the Excel Transpose function, and this guide will help you to learn how to use Excel Transpose.Here in this guide you will learn formulas like INDIRECT + ADDRESS to save you time al
8 min read
How to Convert Text to Date in Excel
Have you ever found yourself staring at a column of dates in Excel, only to realize they’re formatted as text? It's a common problem that can hinder your data analysis and reporting tasks. Fortunately, converting text to date in Excel is straightforward. If you're looking to use the Text to Columns
5 min read
How to Start a New Line in Excel Cell: 4 Easy Methods
When you are using MS Excel for storing and manipulating text data sometimes starting a new line within a cell in Excel can be incredibly useful when you want to enter multiple pieces of information or data in a single cell without cluttering your spreadsheet. Now, if you are looking for a guide to
6 min read
How to Wrap Text in Excel Automatically and Manually - 3 Easy Methods
How to Wrap Around Text in Excel - Quick StepsSelect the cell(s).Go to Home >> Click Wrap Text.Adjust the row height if needed.Wrapping text in Excel is a simple yet essential feature that ensures your data is displayed clearly and fits neatly within each cell. When working with long entries,
8 min read
How to Combine Two Columns in Excel (6 Methods Explained )
Combining columns in Excel is a vital skill for organizing and analyzing data effectively. Whether you're merging first and last names, combining data points, or creating seamless datasets, there are several techniques to get the job done. This guide explores six efficient methods, including using t
8 min read
How to Split Cells in Excel: Easy Methods Explained
How to Separate a Cell in Excel- Quick StepsOpen MS Excel>>Select Data Go to the Data tab>>Click Text to Columns.Choose Delimited and click NextSplitting cells in Excel can simplify data management, especially when dealing with combined information in a single column or cell. Whether you
10 min read
How to Convert a JSON File to Microsoft Excel?
JSON file is used to store human-provided text & then it will eventually convert it to a computer-readable file. The JSON file can't be readable and that's why it is often converted to an Excel file that is readable. That's why procedural steps must be followed to easily convert the JSON file to
3 min read
How to Make a Copy of an Excel Sheet
Making a copy of an Excel sheet can be necessary for various reasons, like safeguarding important information or testing new ideas without risking the original data. However, it's vital to duplicate sheets carefully to prevent any accidental changes or mistakes. This ensures that the copied data sta
3 min read