Image Caption Generator using Deep Learning on Flickr8K dataset
Last Updated :
15 Jul, 2025
Generating a caption for a given image is a challenging problem in the deep learning domain. In this article we will use different computer vision and NLP techniques to recognize the context of an image and describe them in a natural language like English. We will build a working model of the image caption generator using CNN (Convolutional Neural Networks) and LSTM (Long short term memory). For training our model we will use Flickr8K dataset which consists of 8000 unique images. You can download this dataset from kaggle.
1: Import the required libraries
Here, we will use numpy, pandas, os, seaborn, tenserflow, PIL and scikit learn.
Python
import os
import warnings
warnings.filterwarnings('ignore')
import numpy as np
import matplotlib.pyplot as plt
import pandas as pd
import seaborn as sns
import tensorflow as tf
from tensorflow.keras.applications.inception_v3 import InceptionV3
from tensorflow.keras.preprocessing.image import img_to_array, load_img
from tensorflow.keras.preprocessing.text import Tokenizer
from tensorflow.keras.preprocessing.sequence import pad_sequences
from tensorflow.keras.utils import to_categorical, plot_model
from tensorflow.keras.models import Model, load_model
from tensorflow.keras.layers import Input, Dense, LSTM, Embedding, add
from tensorflow.keras.layers import Flatten, Dropout, BatchNormalization
from tensorflow.keras.optimizers import Adam
from tensorflow.keras.callbacks import EarlyStopping, LearningRateScheduler
from sklearn.model_selection import train_test_split
from PIL import Image
from tqdm import tqdm_notebook
from collections import Counter
2. Load the descriptions
The format of our file is image and caption separated by a newline (“\n”) i.e it consists of the name of the image followed by a space and the description of the image in CSV format. Here we need to map the image to its descriptions by storing them in a dictionary.
python
images_directory = '/kaggle/input/flickr8k/Images/'
captions_path = '/kaggle/input/flickr8k/captions.txt'
def load_captions(file_path):
    with open(file_path, 'r') as f:
        captions = f.readlines()
        captions = [caption.lower() for caption in captions[1:]]
    return captions

def tokenize_captions(captions):
    tokenizer = Tokenizer()
    tokenizer.fit_on_texts(captions)
    return tokenizer

captions = load_captions(captions_path)
captions[:15:3]
Output:

3. Cleaning the text
One of the main steps in NLP is to remove noise so that the machine can detect the patterns easily in the text. Noise will be present in the form of special characters such as hashtags, punctuation and numbers. All of which are difficult for computers to understand if they are present in the text. So we need to remove these for better results. Additionally you can also remove stop words and perform Stemming and Lemmatization by using NLTK library.
python
def clean_text(text):
    text = re.sub(r'[^\w\s]', '', text)
    text = re.sub(r'\d+', '', text)
    text = re.sub(r'\s+', ' ', text).strip()
    return text

cleaned_captions = [clean_text(caption.split(',')[1]) for caption in captions]
cleaned_captions[:15:2]
Output:

4. Cleaning the captions
We further process the captions by adding start and end tokens to define the sentence boundaries.
python
captions_IDs = []
for i in range(len(cleaned_captions)):
    item = captions[i].split(',')[0]+'\t'+'start '+cleaned_captions[i]+' end\n'
    captions_IDs.append(item)

captions_IDs[:20:3], len(captions_IDs)
Output:

5. Load some images with captions
Here we need to map the images in the training set to their corresponding descriptions which are present in our descriptions variable. Create a list of names of all training images and then create an empty dictionary and map the images to their descriptions using image name as key and a list of descriptions as its value. while mapping the descriptions add unique words at the beginning and end to identify the start and end of the sentence.
python
def visualaization(data, num_of_images):
    captions_dictionary = {}
    for item in data[100:100+(num_of_images)*5]:
        image_id, caption = item.split('\t')
        if image_id not in captions_dictionary:
            captions_dictionary[image_id] = []
        captions_dictionary[image_id].append(caption)
    else:
        list_captions = [x for x in captions_dictionary.items()]

    count = 1
    fig = plt.figure(figsize=(10,20))
    for filename in list(captions_dictionary.keys()):
        captions = captions_dictionary[filename]
        image_load = load_img(images_directory+filename, target_size=(199,199,3))

        ax = fig.add_subplot(num_of_images,2,count,xticks=[],yticks=[])
        ax.imshow(image_load)
        count += 1

        ax = fig.add_subplot(num_of_images,2,count)
        plt.axis('off')
        ax.plot()
        ax.set_xlim(0,1)
        ax.set_ylim(0,len(captions))
        for i, caption in enumerate(captions):
            ax.text(0,i,caption,fontsize=20)
        count += 1
    plt.show()

visualaization(captions_IDs, 5)
Output:
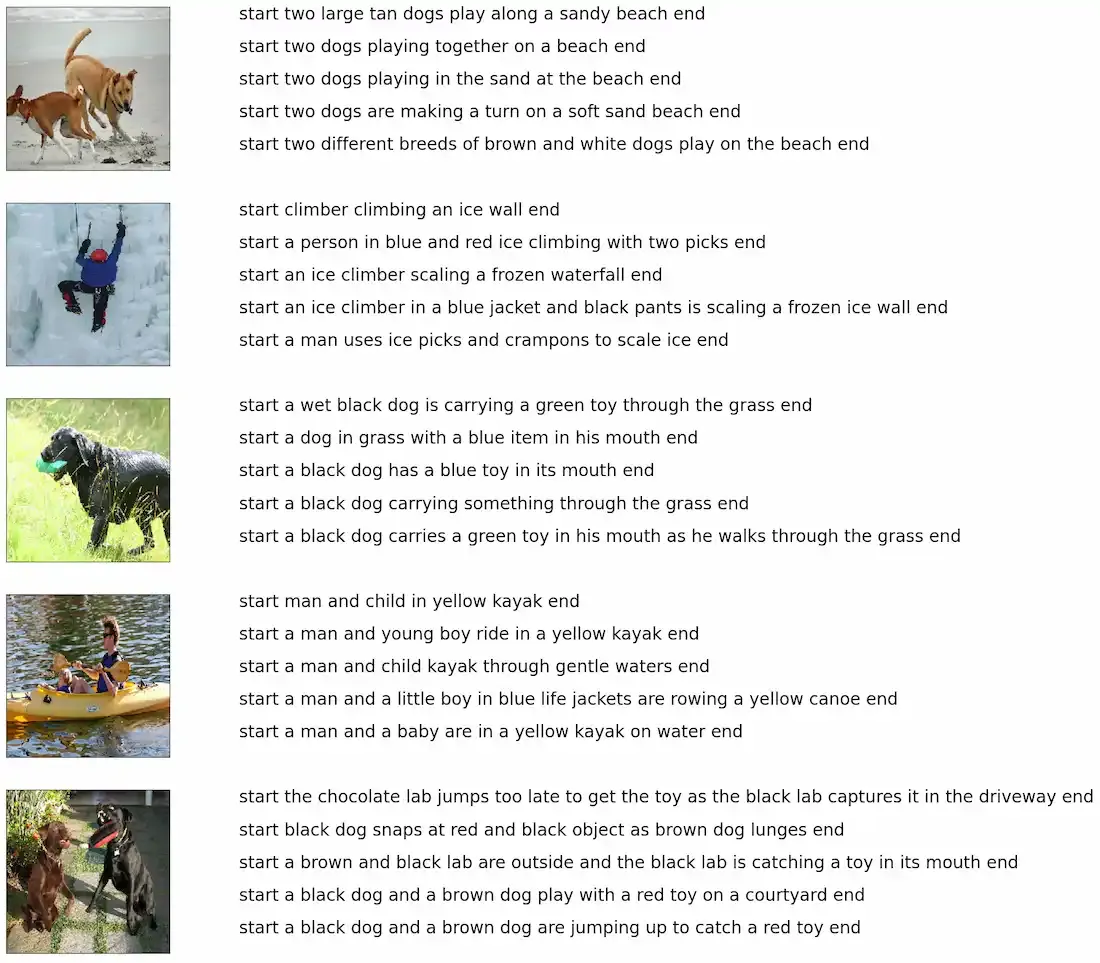 Exploring the dataset
6. Exploring the Caption Length Distribution
We analyze the length of captions to determine an optimal sequence length.
Python
def captions_length(data):
    plt.figure(figsize=(15, 7), dpi=300)
    sns.set_style('darkgrid')
    sns.histplot(x=[len(x.split(' ')) for x in data], kde=True, binwidth=1)
    plt.title('Captions length histogram', fontsize=15, fontweight='bold')
    plt.xticks(fontweight='bold')
    plt.yticks(fontweight='bold')
    plt.xlabel('Length', fontweight='bold')
    plt.ylabel('Freaquency', fontweight='bold')
    plt.show()

captions_length(cleaned_captions)
Output:
 Distribution of length of the caption
 7. Tokenizing the vocabulary
We will use Keras Tokenizer to convert text data into numerical sequences.
python
tokenizer = tokenize_captions(cleaned_captions)
vocab_size = len(tokenizer.word_index) + 1
vocab_size
Output:
8586
8. Splitting the data into train, validation and test sets
We divide our dataset into training, validation and testing subsets.
Python
all_image_ids = os.listdir(images_directory)

train_image_ids, val_image_ids = train_test_split(all_image_ids, test_size=0.15, random_state=42)
val_image_ids, test_image_ids = train_test_split(val_image_ids, test_size=0.1, random_state=42)

train_captions, val_captions, test_captions = [], [], []
for caption in captions_IDs:
    image_id, _ = caption.split('\t')

    if image_id in train_image_ids:
        train_captions.append(caption)

    elif image_id in val_image_ids:
        val_captions.append(caption)

    elif image_id in test_image_ids:
        test_captions.append(caption)

    else:
        print('Unknown image ID !')

train_captions[0], val_captions[0], test_captions[0], len(train_captions)/5, len(val_captions)/5, len(test_captions)/5
Output:

9. Extract the feature vector from all images
Now we will give an image as an input to our model but unlike humans, machines cannot understand the image by seeing them. So we need to convert the image into an encoding so that the machine can understand the patterns in it. For this task, I'm using transfer learning i.e, we use a pre-trained model that has been already trained on large datasets and extract the features from these models and use them for our work. Here I'm using the InceptionV3 model which has been trained on Imagenet dataset that had 1000 different classes to classify. We can directly import this model from Keras.applications module. We need to remove the last classification layer to get the (2048, ) dimensional feature vector from InceptionV3 model.
Python
def preprocess_image(image_path):
    img = load_img(image_path, target_size=(299, 299))
    img = img_to_array(img)
    img = np.expand_dims(img, axis=0)
    img = tf.keras.applications.inception_v3.preprocess_input(img)
    return img

def extract_image_features(model, image_path):
    img = preprocess_image(image_path)
    features = model.predict(img, verbose=0)
    return features

inception_v3_model = InceptionV3(weights = 'imagenet', input_shape=(299, 299, 3))
inception_v3_model.layers.pop()
inception_v3_model = Model(inputs=inception_v3_model.inputs, outputs=inception_v3_model.layers[-2].output)
Output:
96112376/96112376 [==============================] - 1s 0us/step
10. Extracting Image Features for Training, Validation and Testing
To train our Image Caption Generator, we need to extract feature vectors from images using the pre-trained InceptionV3 model. These features will serve as inputs to our captioning model. We store the extracted features in dictionaries corresponding to training, validation, and testing datasets.
python
train_image_features, val_image_features, test_image_features = {}, {}, {}  # A Dictionary to store image features with their corresponding IDs

pbar = tqdm_notebook(total=len(all_image_ids), position=0, leave=True, colour='green')

for caption in all_image_ids:
    image_id = caption.split('\t')[0]
    image_path = os.path.join(images_directory, image_id)
    image_features = extract_image_features(inception_v3_model, image_path) # Extracting features

    if image_id in train_image_ids:
        train_image_features[image_id] = image_features.flatten()  # Flattening the features
        pbar.update(1)

    elif image_id in val_image_ids:
        val_image_features[image_id] = image_features.flatten()  # Flattening the features
        pbar.update(1)

    elif image_id in test_image_ids:
        test_image_features[image_id] = image_features.flatten()  # Flattening the features
        pbar.update(1)

    else:
        print('Unknown image ID !')

pbar.close()
11. Creating a Data Generator for Model Training
Since training a deep learning model requires handling large datasets, we implement a data generator to yield batches of image features and corresponding tokenized captions. This approach improves memory efficiency by processing data dynamically rather than loading everything into memory at once.
Python
def data_generator(captions, image_features, tokenizer, max_caption_length, batch_size):
    num_samples = len(captions)
    image_ids = list(image_features.keys())
    while True:
        np.random.shuffle(image_ids)  # Shuffle image_ids for each epoch
        for start_idx in range(0, num_samples, batch_size):
            end_idx = min(start_idx + batch_size, num_samples)
            X_images, X_captions, y = [], [], []
            for caption in captions[start_idx:end_idx]:
                image_id, caption_text = caption.split('\t')
                caption_text = caption_text.rstrip('\n')
                seq = tokenizer.texts_to_sequences([caption_text])[0] # Tokenizing the caption
                for i in range(1, len(seq)):
                    in_seq, out_seq = seq[:i], seq[i] # X_caption, Y
                    in_seq = pad_sequences([in_seq], maxlen=max_caption_length)[0]
                    out_seq = to_categorical([out_seq], num_classes=vocab_size)[0]
                    X_images.append(image_features[image_id])
                    X_captions.append(in_seq)
                    y.append(out_seq)

            yield [np.array(X_images), np.array(X_captions)], np.array(y)


max_caption_length = max(len(caption.split()) for caption in cleaned_captions) + 1

cnn_output_dim = inception_v3_model.output_shape[1] # 2048

batch_size_train = 270
batch_size_val = 150

train_data_generator = data_generator(train_captions, train_image_features, tokenizer, max_caption_length, batch_size_train)
val_data_generator = data_generator(val_captions, val_image_features, tokenizer, max_caption_length, batch_size_val)
12. Building the Image Captioning Model
We define the architecture of our Image Captioning model using the Keras Functional API. The model consists of:
- Image Feature Extractor (CNN Output Processing): The input image feature vector (2048-dimensional) is normalized using Batch Normalization. A Dense layer transforms it into a 256-dimensional vector to match the LSTM output size.
- Text Sequence Processor (LSTM-based Decoder): The tokenized captions are passed through an Embedding layer, mapping words to dense vector representations. An LSTM layer processes the embedded sequence to generate a feature representation.
- Decoder and Final Prediction: The processed image and text features are combined using an addition operation. A Dense layer refines the representation before making the final word prediction using a softmax activation function
python
def build_model(vocab_size, max_caption_length, cnn_output_dim):
    input_image = Input(shape=(cnn_output_dim,), name='Features_Input')
    fe1 = BatchNormalization()(input_image)
    fe2 = Dense(256, activation='relu')(fe1) # Adding a Dense layer to the CNN output to match the decoder output size
    fe3 = BatchNormalization()(fe2)

    input_caption = Input(shape=(max_caption_length,), name='Sequence_Input')
    se1 = Embedding(vocab_size, 256, mask_zero=True)(input_caption)
    se2 = LSTM(256)(se1)

    decoder1 = add([fe3, se2])
    decoder2 = Dense(256, activation='relu')(decoder1)
    outputs = Dense(vocab_size, activation='softmax', name='Output_Layer')(decoder2)

    model = Model(inputs=[input_image, input_caption], outputs=outputs, name='Image_Captioning')
    return model

caption_model = build_model(vocab_size, max_caption_length, cnn_output_dim)

optimizer = Adam(learning_rate=0.01, clipnorm=1.0)
caption_model.compile(loss='categorical_crossentropy', optimizer=optimizer)

caption_model.summary()
Output:
 Python
plot_model(caption_model)
 Architecture of the Model
13. Training the Model with Early Stopping and Learning Rate Scheduling
We train the model using the Adam optimizer and categorical cross-entropy loss while implementing early stopping to prevent overfitting. A learning rate scheduler is applied to gradually decrease the learning rate over epochs, ensuring stable convergence. The model is trained for up to 15 epochs with validation monitoring.
python
early_stopping = EarlyStopping(monitor='val_loss', patience=3, restore_best_weights=True)

def lr_scheduler(epoch, lr):
    return lr * tf.math.exp(-0.6)

lr_schedule = LearningRateScheduler(lr_scheduler)

history = caption_model.fit(train_data_generator, steps_per_epoch=len(train_captions) // batch_size_train,
                        validation_data=val_data_generator, validation_steps=len(val_captions) // batch_size_val,
                        epochs=15, callbacks=[early_stopping, lr_schedule])
Output:

14. Visualizing Training and Validation Loss
We plot the training and validation loss over epochs to analyze the model's learning process. This helps in identifying overfitting and assessing model performance improvements across iterations.
python
plt.figure(figsize=(15, 7), dpi=200)
sns.set_style('whitegrid')
plt.plot([x+1 for x in range(len(history.history['loss']))], history.history['loss'], color='#E74C3C', marker='o')
plt.plot([x+1 for x in range(len(history.history['loss']))], history.history['val_loss'], color='#641E16', marker='h')
plt.title('Train VS Validation', fontsize=15, fontweight='bold')
plt.xticks(fontweight='bold')
plt.yticks(fontweight='bold')
plt.xlabel('Epoch', fontweight='bold')
plt.ylabel('Loss', fontweight='bold')
plt.legend(['Train Loss', 'Validation Loss'], loc='best')
plt.show()
Output:

15. Generating Captions Using Greedy Search
We implement a greedy search algorithm to generate captions by predicting one word at a time. The model selects the word with the highest probability at each step until the end token is reached.
Python
def greedy_generator(image_features):
    in_text = 'start '
    for _ in range(max_caption_length):
        sequence = tokenizer.texts_to_sequences([in_text])[0]
        sequence = pad_sequences([sequence], maxlen=max_caption_length).reshape((1,max_caption_length))
        prediction = caption_model.predict([image_features.reshape(1,cnn_output_dim), sequence], verbose=0)
        idx = np.argmax(prediction)
        word = tokenizer.index_word[idx]
        in_text += ' ' + word
        if word == 'end':
            break

    in_text = in_text.replace('start ', '')
    in_text = in_text.replace(' end', '')

    return in_text
16. Generating Captions Using Beam Search
We implement beam search to generate captions by exploring multiple possible sequences at each step. This method selects the top K probable sequences.
Python
def beam_search_generator(image_features, K_beams = 3, log = False):
    start = [tokenizer.word_index['start']]
    start_word = [[start, 0.0]]
    for _ in range(max_caption_length):
        temp = []
        for s in start_word:
            sequence  = pad_sequences([s[0]], maxlen=max_caption_length).reshape((1,max_caption_length))
            preds = caption_model.predict([image_features.reshape(1,cnn_output_dim), sequence], verbose=0)
            word_preds = np.argsort(preds[0])[-K_beams:]
            for w in word_preds:
                next_cap, prob = s[0][:], s[1]
                next_cap.append(w)
                if log:
                    prob += np.log(preds[0][w]) # assign a probability to each K words
                else:
                    prob += preds[0][w]
                temp.append([next_cap, prob])

        start_word = temp
        start_word = sorted(start_word, reverse=False, key=lambda l: l[1])
        start_word = start_word[-K_beams:]

    start_word = start_word[-1][0]
    captions_ = [tokenizer.index_word[i] for i in start_word]
    final_caption = []
    for i in captions_:
        if i != 'end':
            final_caption.append(i)
        else:
            break

    final_caption = ' '.join(final_caption[1:])
    return final_caption
17. BLEU Score
It Computes the BLEU (Bilingual Evaluation Understudy) score a metric for evaluating the quality of text translations by comparing them to one or more reference translations.
Python
def BLEU_score(actual, greedy, beam_search):
    score_greedy_1 = corpus_bleu(actual, greedy, weights=(0.3, 0.3, 0.3, 0))
    score_greedy_2 = corpus_bleu(actual, greedy, weights=(0.25, 0.25, 0.25, 0.25))
    score_BS_1 = corpus_bleu(actual, beam_search, weights=(0.3, 0.3, 0.3, 0))
    score_BS_2 = corpus_bleu(actual, beam_search, weights=(0.25, 0.25, 0.25, 0.25))

    return [
        (f'BLEU-2 Greedy: {round(score_BS_2, 5)}'),
        (f'BLEU-1 Greedy: {round(score_BS_1, 5)}'),
        (f'Greedy: {greedy[0]}'),
        (f'BLEU-2 Beam Search: {round(score_greedy_2, 5)}'),
        (f'BLEU-1 Beam Search: {round(score_greedy_1, 5)}'),
        (f'Beam Search:  {beam_search[0]}')
    ]
18. Generating Captions for Test Images
We generate captions for all test images using the greedy search method. A progress bar is used to track the generation process efficiently.
Python
generated_captions = {}

pbar = tqdm_notebook(total=len(test_image_features), position=0, leave=True, colour='green')
for image_id in test_image_features:
    cap = greedy_generator(test_image_features[image_id])
    generated_captions[image_id] = cap
    pbar.update(1)

pbar.close()
19. Visualizing Caption Generation Results
We randomly select images from the test set and display them alongside their actual captions, greedy search-generated captions and beam search-generated captions. The BLEU score evaluator is used to assess the quality of the generated captions.
Python
def visualization(data, greedy_caps, beamS_generator, evaluator, num_of_images):
    keys = list(data.keys())
    images = [np.random.choice(keys) for i in range(num_of_images)] # Randomly selected images
    count = 1
    fig = plt.figure(figsize=(6,20))
    for filename in images:
        actual_cap = data[filename]
        actual_cap = [x.replace("start ", "") for x in actual_cap]
        actual_cap = [x.replace(" end", "") for x in actual_cap]

        greedy_cap = greedy_caps[filename]
        beamS_cap = beamS_generator(test_image_features[filename])

        caps_with_score = evaluator(actual_cap, [greedy_cap]*(len(actual_cap)), [beamS_cap]*(len(actual_cap)))

        image_load = load_img(images_directory+filename, target_size=(199,199,3))
        ax = fig.add_subplot(num_of_images,2,count,xticks=[],yticks=[])
        ax.imshow(image_load)
        count += 1

        ax = fig.add_subplot(num_of_images,2,count)
        plt.axis('off')
        ax.plot()
        ax.set_xlim(0,1)
        ax.set_ylim(0,len(caps_with_score))
        for i, text in enumerate(caps_with_score):
            ax.text(0,i,text,fontsize=10)
        count += 1
    plt.show()

visualization(test_actual_captions, generated_captions, beam_search_generator, BLEU_score, 7)
Output:
 Caption Generated
We can see that our model is working fine specifically Beam Search and Greedy algorithms for generating image captions. The captions generated by each model are evaluated using BLEU scores (both BLEU-1 and BLEU-2) which measure the similarity between the generated captions and reference captions. The images include various scenes such as a man performing a trick, a boy jumping into a pool, and dogs running, with the respective captions and their BLEU scores provided.
In this article we created a Image Caption Generator using Deep Learning on the Flickr8k dataset. We covered the entire process, from data preprocessing and feature extraction using InceptionV3 to training a sequence-based LSTM model for caption generation. We implemented two decoding strategies—Greedy Search and Beam Search—to generate meaningful captions, and finally, we evaluated their performance using the BLEU score. The visualization of generated captions demonstrated how our model interprets images and constructs descriptive sentences. While the results are promising, further improvements such as attention mechanisms and transformer-based architectures can enhance caption quality.
Source Code : Image Caption Generator using Deep Learning on Flickr8K dataset
Explore
Deep Learning Basics
Neural Networks Basics
Deep Learning Models
Deep Learning Frameworks
Model Evaluation
Deep Learning Projects