Ansible ad hoc commands are quick, one-line instructions you can send to multiple computers at once using the /usr/bin/ansible tool. They are like short messages telling your systems to perform a single task immediately without writing a full playbook.
Ad hoc commands are perfect for:
- Checking if hosts are reachable
- Starting or stopping services
- Copying files
- Managing packages, users, and groups
- Gathering system information
If you need to perform a small task across many machines quickly, ad hoc commands are the fastest solution.
Syntax
ansible [target hosts] -m [module name] -a "[arguments]"
- [target hosts]:The group or hosts you want to run the command on
- -m [module name]: The module to use (e.g.,
ping, copy, service) - -a "[arguments]": The task details
Arguments can be passed:
- Simple way:
key=value - Complex way:
{ ... } enclosed in braces
Getting Started with Ansible Ad-hoc Command
Ad hoc commands are good for tasks you don't do often. For example, if you want to turn off all your work computers for a holiday, you can use a quick ad hoc command instead of writing a full playbook.
Command :
ansible [what computers] -m [what to do] -a "[how to do it]"
The -a part is where you give more details about what you want to do. You can write these details in two ways:
- Simple way: key=value
- More complex way: Use { at the start and } at the end
You can learn more about choosing computers and what tasks you can do on other pages.
Popular Ansible Ad Hoc Commands
1. Check Connectivity
This below command checks if all your computers are reachable. It's like knocking on each computer's door to see if anyone's home. When a computer responds, you see "SUCCESS" and "ping": "pong". This tells you which computers are ready to take orders. It's a quick way to make sure everything's connected before you do more complex tasks.
Command :
ansible all -m ping
2. Run a Command on All Hosts
This below command tells all your computers to say "hello". It's a simple way to run the same command on every machine at once. You'll see the word "hello" printed for each computer that successfully runs the command. This is useful for testing if you can run commands on all your machines or for sending a quick message to all of them.
Command :
ansible all -a "/bin/echo hello"
3. Copy a File to All Hosts
This below command copies a file from your computer to all the others. It's like sending the same letter to many friends at once. You tell Ansible where the file is on your computer (src) and where to put it on the other computers (dest). This is handy when you need to quickly distribute a file, like a config file or a script, to many machines.
Command :
ansible all -m copy -a "src=/path/to/file dest=/path/on/remote"
Shell Module V/s Command Module in Ansible
Shell Module | Command Module |
|---|
The Shell module runs commands through a shell on the remote system. It supports shell features like pipes, redirects, and environment variables. This makes it more flexible but potentially less secure. Use it when you need shell features or complex commands that rely on the shell environment. | The Command module runs a command on a remote system without using a shell. It's more secure and works on all systems. It doesn't support shell features like pipes or redirects. Use it for simple, direct commands that don't need shell processing. |
Use Cases for Ad-hoc Tasks
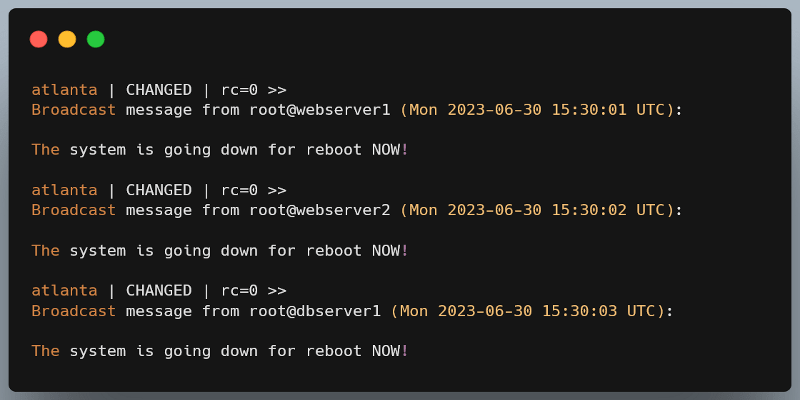
1. Rebooting servers
The ansible command usually uses the "command" module by default. It lets you run simple tasks on many computers at once. To restart all computers in a group called "atlanta" use the below command. This command tells all computers in the "atlanta" group to restart.
Command :
ansible atlanta -a "/sbin/reboot"
Output :
Controlling How Many Computers at Once. Ansible usually talks to 5 computers at a time to do that use below command. The "-f 10" part tells Ansible to work with 10 computers at once.
Command :
ansible atlanta -a "/sbin/reboot" -f 10
Running as a Different User If you need to run the command as someone else use the below command. The "-u username" tells Ansible to act as that user.
Command :
ansible atlanta -a "/sbin/reboot" -f 10 -u username
For tasks that need extra permissions use the below command. In the command "--become" part asks for special permissions. Add "-K" if you need to type a password for this.
Command :
ansible atlanta -a "/sbin/reboot" -f 10 -u username --become
To use a different module, like "shell" you need to use the below command. In this command "-m ansible.builtin.shell" tells Ansible to use the shell module instead of the default command module.
Command :
ansible raleigh -m ansible.builtin.shell -a 'echo $TERM'
Be careful with how you use quotation marks in your commands. They can change how Ansible understands what you want to do, especially when you're using variables.
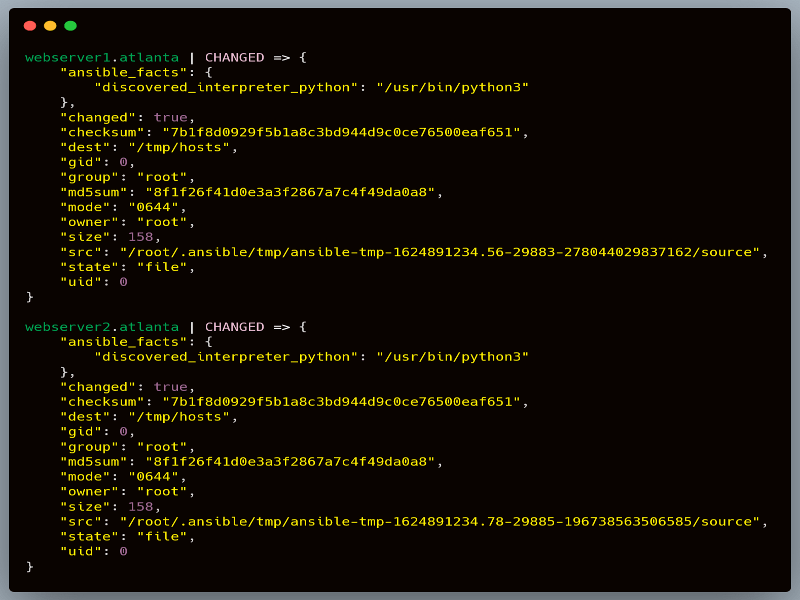
2. Managing files
This below command copies the file "/etc/hosts" to "/tmp/hosts" on all computers in the "atlanta" group. It uses the "copy" module to send the file to many machines at once. For tasks you do often, it's better to use a playbook with the "template" module instead.
Command :
ansible atlanta -m ansible.builtin.copy -a "src=/etc/hosts dest=/tmp/hosts"
Output :
This below command changes the permissions of "/srv/foo/a.txt" to 600 on all "webservers". The "file" module is used to make this change.
Command :
ansible webservers -m ansible.builtin.file -a "dest=/srv/foo/b.txt mode=600 owner=mdehaan group=mdehaan"
This below command changes the owner and group of "b.txt" to "mdehaan" and sets the permissions to 600. It uses the "file" module to make these changes on all "webservers".
Command :
ansible webservers -m ansible.builtin.file -a "dest=/srv/foo/b.txt mode=600 owner=mdehaan group=mdehaan"
This below command creates the new folder called "c" with the permissions 755 and sets the owner and group to the "mdehaan". The "file" module is used with the "state=directory" option to create the folder.
Command :
ansible webservers -m ansible.builtin.file -a "dest=/path/to/c mode=755 owner=mdehaan group=mdehaan state=directory"
This below command removes the file or folder at "/path/to/c" on all "webservers". If it's a folder, it will delete everything inside it too. The "file" module with "state=absent" is used to delete files or folders.
Command :
ansible webservers -m ansible.builtin.file -a "dest=/path/to/c state=absent"
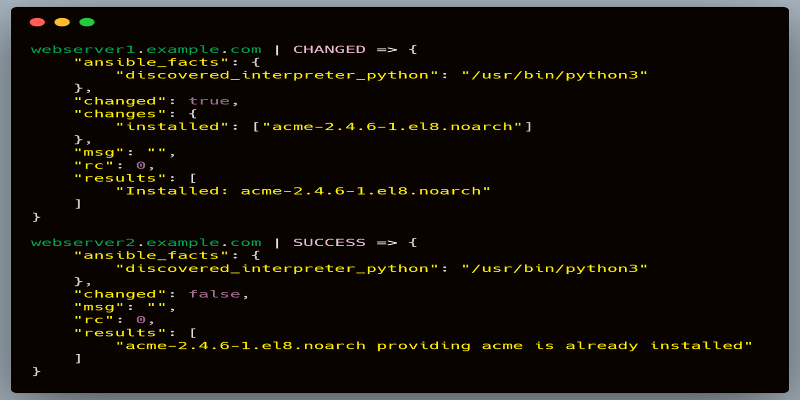
3. Managing packages
This below command installs the "acme" package on all the "webservers" if it is not already installed. It uses the "yum" module which works with the yum package manager. The "state=present" option tells the Ansible to make sure the package is installed but not to update it if it is already there.
Command :
ansible webservers -m ansible.builtin.yum -a "name=acme state=present"
Output :
This below command installs version 1.5 of the "acme" package on all "webservers". It's useful when you need a particular version of a package.
Command :
ansible webservers -m ansible.builtin.yum -a "name=acme-1.5 state=present"
This below command makes sure the "acme" package is at its newest version on all "webservers". If the package is not installed this will install it. If it is already installed but an update is available this will update it automatically.
Command :
ansible webservers -m ansible.builtin.yum -a "name=acme state=latest"
This below command removes the "acme" package from all "webservers" if it's installed. The "state=absent" option tells Ansible to make sure the package is not on the system.
Command :
ansible webservers -m ansible.builtin.yum -a "name=acme state=absent"
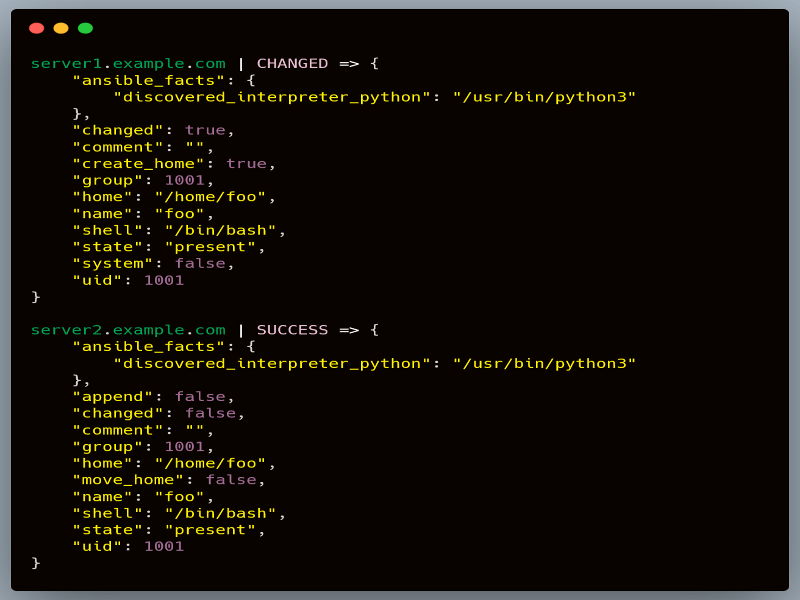
4. Managing users and groups
This below command creates a new user named "foo" on all managed computers. The "user" module is used to manage user accounts. You need to provide an encrypted password here, not a plain text one. Ansible can't see or store the actual password.
Command :
ansible all -m ansible.builtin.user -a "name=foo password=<encrypted password here>"
Output :
This below command removes the user "foo" from all managed computers. The "state=absent" option tells Ansible to make sure the user don't exist on the system.
Command :
ansible all -m ansible.builtin.user -a "name=foo state=absent"
5. Managing services
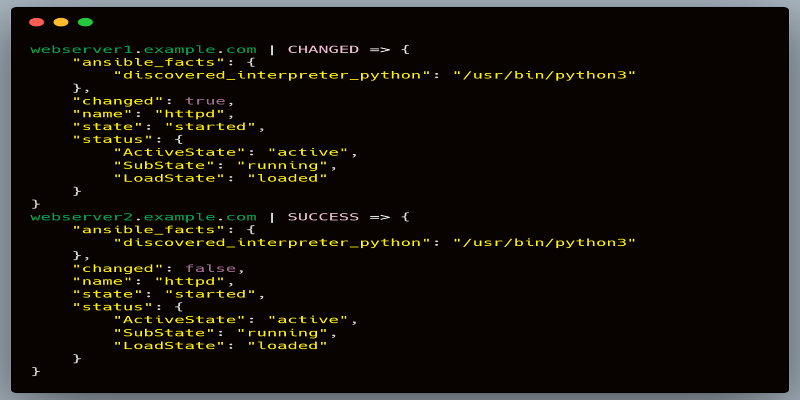
This below command starts the "httpd" service on all the computers in the "webservers" group. It uses the "service" module to manage system services. The "state=started" option tells Ansible to make sure the service is running.
Command :
ansible webservers -m ansible.builtin.service -a "name=httpd state=started"
Output :
This below command restarts the "httpd" service on all "webservers". It's useful when you've made changes that require the service to be restarted to take effect.
Command :
ansible webservers -m ansible.builtin.service -a "name=httpd state=restarted"
This below command stops the "httpd" service on all "webservers". The "state=stopped" option tells Ansible to make sure the service is not running.
Command :
ansible webservers -m ansible.builtin.service -a "name=httpd state=stopped"
6. Gathering facts
This below command uses the "setup" module to gather all available facts about all the computers Ansible is managing. Facts are pieces of information about each system, like its operating system, IP addresses, memory size, CPU type, disk space, and many other details.
Command :
ansible all -m ansible.builtin.setup
Output :

When you run this command, Ansible will connect to each managed computer and collect a large amount of information. The output can be quite long, as it includes many details about each system.
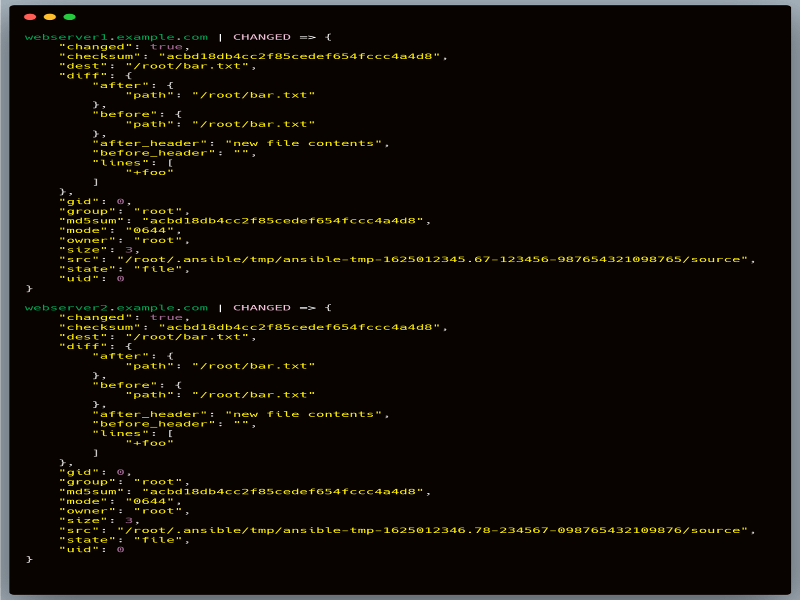
7. Check mode
The below command tries to copy the content "foo" into a file named "bar.txt" in the "/root" directory on all managed computers. The "-C" at the end enables check mode. In check mode, Ansible doesn't actually make any changes. Instead, it simulates what would happen if the command were run normally.
Command :
ansible all -m copy -a "content=foo dest=/root/bar.txt" -C
Output :
Explore
DevOps Basics
Version Control
CI & CD
Containerization
Orchestration
Infrastructure as Code (IaC)
Monitoring and Logging
Security in DevOps