Setting Up a VPN Gateway for Azure VMs
Last Updated :
23 Jul, 2025
Azure VPN Gateway is a service that companies can use to set up remote access for their clients or representatives to safely give them the option to work from home or anywhere without risking their security frameworks to the public web.
Overview of VPN Gateway and Its Benefits for Azure VMs
Azure VPN Gateway acts as a bridge between your virtual machine on your virtual organization and your On-premises organization. Workers associated with On-premises organizations would have the option to get to your cloud assets through the VPN gateway. VPN Gateway additionally adds more security between the confidential cloud and public cloud to speak with one another.
Benefits for Azure VMs
Secure Connection: A VPN Gateway can be used when we need to make sure that data transmitted between Azure VMs and on-premises or other VNets is encrypted and protected from unauthorized access.
Cost-Effective: Instead of investing in expensive, dedicated private networks, we can use VPN Gateways to establish secure connections over the public internet.
Scalability: VPN Gateways in Azure are highly scalable, which means that businesses can easily expand their network.
Availability: Azure VPN Gateways are designed for high availability and it also offers redundancy and load balancing.
Step-by-Step Setup of VPN Gateway for Azure Virtual Machines
To set up the VPN gateway for the azure virtual machines, following steps are needed to be followed step by step:
Step 1: Create Resource
First step is to create resource for the azure, for this you will have to install the azure in the visual studio first:
Refer to the following article for installation:
Microsoft Azure – Using VS Code for Azure Function Projects
After the installation, run following command one by one in the terminal of visual studio:
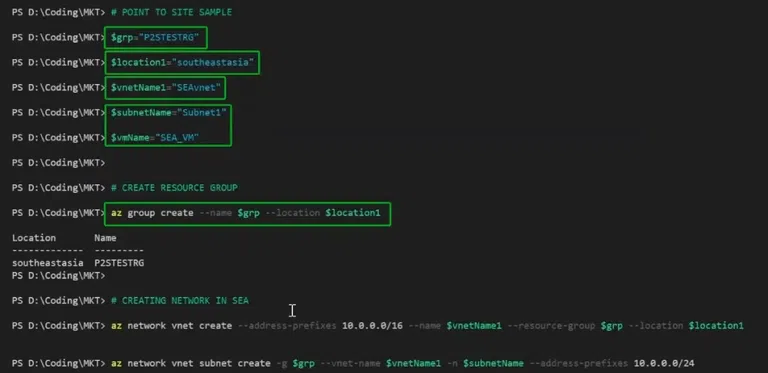
$grp="GROUP-NAME"
Enter the group name for the resource.
$location1="southeastasia"
Here, enter the location of the server for the resource.
$vnetName1="SEAvnet"
Here enter the name for the virtual network name.
$subnetName="Subnet1"
$vmName="SEA_VM"
Enter subnetName and vmName for the resource.
az group create --name $grp --location $location1
This command creates a new virtual network (VNet) in Azure using the Azure CLI. It specifies the address range for the VNet, assigns a name, associates it with a resource group, and defines the location where the VNet will be deployed.
az network vnet create --address-prefixes 10.0.0.0/16 --name $vnetName1 --resource-group $grp --location $location1
Step 2: Check PowerState
Once the virtual machine is created we can check by seeing if it is showing the powerstate as VM running, if it says so then it means that the VM is running.
 Check PowerState.
Step 3: Open manage user certificates
Next step is to create and manage user certificates, for this open start menu and type cert to open this program.
 Open manage user certificates.
Step 4: Open powershell
Next step is to open the powershell, this is required for creating certificates.
 Open powershell.
Step 5: Create certificate
After opening the powershell, create the certificates, for creating the certificates enter the following command in the terminal:
# root certificate
$cert = New-SelfSignedCertificate -Type Custom -KeySpec Signature -Subject "CN=RootCertificate" -KeyExportPolicy Exportable -HashAlgorithm sha256
 -KeyLength 2048 -CertStoreLocation "Cert:\CurrentUser\My" -KeyUsageProperty Sign -KeyUsage CertSign

# client certificate
New-SelfSignedCertificate -Type Custom -DnsName P2SChildCert -KeySpec Signature -Subject "CN=ClientCertificate"
-KeyExportPolicy Exportable -HashAlgorithm sha256 -KeyLength 2048 -CertStoreLocation "Cert:\CurrentUser\My" -Signer $cert -TextExtension @("2.5.29.37={text}1.3.6.1.5.5.7.3.2")
 create certificate.
Step 6: Open certmgr
Next step is to open certmgr, after completing the above steps, open certmgr in windows and select the rootcertificate and open all tasks > export. this will export the certificate into the local computer.
 Open certmgr
Step 7: Copy certificate
Once the certificate is exported, open it and copy the base64 code which is similar to shown in image below:
 Copy certificate.
After this, we will have to more to the configuration settings for further setup.
Configuring VPN Gateway Settings and Managing Connections
Once the VPN gateway is made, we can configure the VPN gateway settings and manage connections, following are the steps for configuring and managing the gateway:
Step 1: open point to site configuration
Open point to site configuration by going to the settings menu and selecting the following option.
 Open configuration setting.
Step 2: Add root certificate data
Add the root certificate data into the public certificate data and add a name for it, after this click on the save button. once saved wait for a few seconds and the download VPN client will appear, from this download and run the setup file.
 Add public certificate data.
Step 3: Connect to the VPN
Once we successfully run the setup from the above step, we can go to the settings and then the network and internet tab and open VPN, here we will see an option to connect to our azure VPN, simply click on connect and it will connect to the VPN.

Step 4: Open the gateway
For opening the gateway in the desktop, we will first have to find the NIC private IP, for this we will open azure and then open the networking tab of the virtual machine, here the NIC private IP will be shown, as seen in the image below:

We will have to enter this private IP address in the browser window and the virtual machine will be shown:

This means that we have successfully created a VPN gateway for azure virtual machine and also accessed it successfully.
Explore
DevOps Basics
Version Control
CI & CD
Containerization
Orchestration
Infrastructure as Code (IaC)
Monitoring and Logging
Security in DevOps