AutoSum in Excel: Calculate SUM, AVERAGE, MAX, MIN, and COUNT
Last Updated :
09 Apr, 2025
AutoSum in Excel is one of the most powerful and time-saving tools for quickly adding up a range of numbers. Whether you're working with a small list of values or a large data set, AutoSum can save you from the process of manually entering formulas to calculate sums.
In this step-by-step guide, learn how to use AutoSum in Excel and explore additional tips to optimize its functionality.
3 Easy Ways to Use AutoSum in Microsoft Excel
In the below methods learn how to use AutoSum in Excel to make your workflow faster and more efficient. From basic summation to advanced calculations, AutoSum can significantly speed up your spreadsheet tasks:
Method 1: Use AutoSum function to Sum Numbers in a Range
In this method, you will learn how AutoSum is used to calculate the sum of a range of numbers in spreadsheet:
Step 1: Select the Cell
Click on the cell where you want the sum to be displayed. Like in the below image, we have selected B7.
 Select the Cell
 Step 2: Click on AutoSum
- Now, naviagte to the Home tab and click on the AutoSum (∑) icon in the Editing group.
- Alternatively, you can also go to the Formulas tab > AutoSum.
Shortcut Key to AutoSum Function : Alt + =
 Go to Home Tab >> Select AutoSum
Step 3: Check the Range
Excel will automatically detect the range of adjacent cells to sum. Verify that the range is correct. If necessary, adjust it by dragging the selection borders or entering the desired range manually.
 Check the Range
Step 4: Press Enter
Press the Enter key, and AutoSum feature will calculate and display the sum in the selected cell.
 Go to Home Tab >> Select AutoSum>> Check the Range>> Press Enter
Method 2: How to AutoSum Multiple Rows and Columns in Excel
Now, in this method you'll learn how AutoSum can efficiently calculate totals for multiple rows and columns at the same time:
Step 1: Highlight the Range
Select the range of cells that includes the data and you can also include an empty row or column (optional) where the totals will be placed.
 Select the Range
Step 2: Click the AutoSum Icon
Go to the Home tab and click on the AutoSum (∑) icon in the Editing group.
 Go to Home Tab>> Select AutoSum
Step 3: Preview AutoSum Total
Excel will automatically calculate the totals for each row and column and place them in the corresponding empty row or column.
 View the Totals
Method 3: Use AutoSum to Calculate AVERAGE, MAX, MIN, and COUNT
Do you know? AutoSum can be used for more than just summing values. It allows you to calculate averages, counts, maximum, and minimum with ease.
Step 1: Select the Result Cell
Click on the cell where you want the result to appear. In the below example, we have selected F2.
 Select the Result Cell
Step 2: Access Additional Functions
Go to Home Tab and Click the dropdown arrow next to the AutoSum (∑) icon.
Step 3: Choose a Function
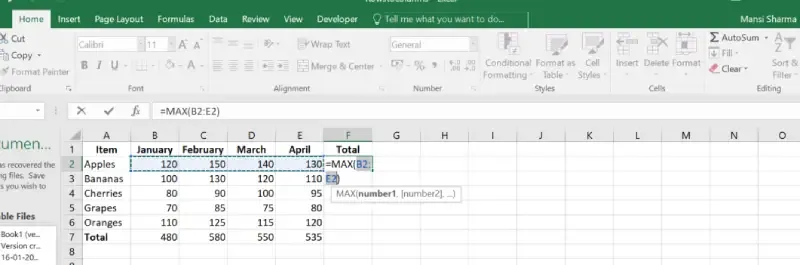
Select any function like Average, Count Numbers, Max, or Min from the dropdown list based on your usecase. Here, we have selected Max to find out the Maximum number in the row.
 Go to Home Tab >> Select the Function
Step 4: Verify or Adjust the Range
Excel will auto suggest a range of cells. Confirm or modify the range as needed.
 Adjust the Range
Step 5: Press Enter and Preview Result
Now, Press Enter and Preview the Results. Here, it has shown 150 is the maximum number between B2:E2.
 Press Enter
Important points to remember when using AutoSum in Excel
- To update the total as rows are filtered, use the SUBTOTAL function instead of the SUM function (=SUBTOTAL(9, Range to total). When applying the filter, the number 9 signifies just adding the viewable rows.
- Simply select a cell and press Alt to total something (horizontally or vertically). The sum function will choose which range you want to total. Enter if the range is correct. This is an alternative to Excel's autosum formula.
Tips and Tricks for using AutoSum Feature in Excel
- Shortcut key for AutoSum: Press Alt + = to quickly apply AutoSum to a selected range.
- Quick Totals: Highlight multiple rows or columns, and Excel will calculate totals for all of them at once.
- Combine with Filters: Use AutoSum on filtered data to calculate totals for visible cells only, ignoring hidden rows.
How to Fix AutoSum Not Working in Excel (Troubleshooting AutoSum)
If you need to troubleshoot AutoSum in Excel, check for common issues like formatting errors, blank cells, hidden rows, or incorrect range selection. These problems are often the reason behind Excel AutoSum not working, and resolving them will help you quickly fix the issue and get accurate results.
1. Numbers are Formatted as Text
Problem: Numbers are stored as text, so AutoSum cannot calculate.
Solution:
- Select the cells, go to the Home tab, and set the format to Number or General.
- Re-enter the values or use the Text to Columns feature to convert text to numbers.
2. Blank or Non-Numeric Cells
Problem: AutoSum skips blank or non-numeric entries, causing incorrect totals.
Solution: Ensure the range contains only numeric values and remove any errors or blank cells.
3. Hidden Rows or Columns
Problem: Hidden rows or columns are included in the calculation.
Solution: Use the SUBTOTAL function to exclude hidden rows:
=SUBTOTAL(9, range)
4. Incorrect Range Selection
Problem: AutoSum selects the wrong range, especially if there are gaps in data.
Solution: Manually adjust the range by dragging the selection borders or typing the correct range.
5. Filters Are Applied
Problem: Filtered-out data may still be included in the sum.
Solution: Use SUBTOTAL or AGGREGATE to calculate only visible rows:
=SUBTOTAL(9, range)
6. Auto Calculation is Disabled
Problem: Excel is set to manual calculation, so AutoSum doesn’t update.
Solution: Go to Formulas > Calculation Options and select Automatic.
7. Protected Sheet or Circular References
Problem: The sheet is protected, or there’s a circular reference in your formula.
Solution:
- Unprotect the sheet from the Review tab.
- Fix circular references by checking Formulas > Error Checking > Circular References.
Conclusion
The AutoSum feature in Excel is an important tool for handling data calculations quickly and efficiently. By understanding this function, you can easily perform quick calculations in Excel and resolve any common AutoSum issues without spending much time. With its features like having a dedicated shortcuts key and the ability to apply additional functions, AutoSum makes working with spreadsheets much simpler.
Similar Reads
How to Calculate Mean, Median and Mode in Excel Understanding the concepts of mean, median and mode in Excel can grow your mathematics and Excel skills. Understanding how to calculate mean in Excel, work out mean on Excel, how to calculate median in Excel, find median in Excel, and calculate mode in Excel can revolutionize how you interpret data.
9 min read
How to calculate Sum and Average of numbers using formulas in MS Excel? Everyday in school, offices, business sectors or any other field lots of information are there that are required to store for future use. For anyone, it is very difficult to remember that information for a long time. Earlier data and information are stored in a form of a register, file, or by paperw
4 min read
How to Calculate Weighted Average in Excel Understanding how to calculate a weighted average in Excel can be a game-changer for anyone dealing with data analysis, financial modeling, or academic grading. Unlike a simple average, a weighted average considers the relative importance of each data point, providing a more accurate reflection of t
5 min read
How to Calculate Mean Absolute Error in Excel? Mean absolute error is the measure of error between the observed and the expected values in a given data set. Where, O stands for Observed values,E stands for Expected values,n stands for total no. of observations. Now let us understand it with the help of an example. Example: Follow the below steps
1 min read
Average Value and Calculation Understanding averages is a fundamental aspect of quantitative analysis across various fields, from finance to academia, from sports to business. Whether it's determining the average income of a population or the average score of a student, the concept of average value serves as a crucial tool for s
7 min read
How to Calculate Average in Excel: Essential Formulas & Examples for 2025 Whether you're a student crunching numbers for a project, a business analyst examining sales data, or simply someone looking to get insights from personal data, mastering the art of calculating averages in Excel can significantly enhance your data-handling capabilities.In this article, you will lear
8 min read