How to Insert a Text Box in Google Docs
Last Updated :
21 Nov, 2024
Add a Text Box in Google Docs - Quick Steps
- Open Google Docs > Go to Insert Tab
- Select Drawing Tool > Click on New
- Click on the Text Box Icon > Drag the Text Box
- Type your Text in the Box
Inserting a text box in Google Docs can help you emphasize specific content, create layouts, or highlight important information. Imagine needing to add a callout, label, or design element in your document and wanting it to stand out from the rest of your text. While Google Docs doesn’t have a direct “text box” button like some other word processors, there are multiple ways to achieve this, such as using the Drawing tool, tables, or even shapes. This guide will walk you through step-by-step methods to insert and customize text boxes in Google Docs, helping you create professional and visually engaging documents with ease.
 How to Add Text Boxes in Google Docs
How to Add a Text Box in Google Docs
Follow the steps given below to know how to add a text box on google docs:
Step 1: Launch Google Docs
In the very first step, we need to visit the Google Docs official website, from which we are provisioned to create and edit the documents.
 Open Google Docs
Step 2: Open an Existing Document or Create a New
Now, after opening the Google Docs website, We have two options for opening the document. We can open the existing document in Google Docs, or we can create a new Document.
 Open Document
Step 3: Go to Insert Tab
Now we need to click on the Insert Tab which is situated on the top panel of the editing space.
 Go to the Insert Tab
Step 4: Select the Drawing Option and Click New
A list of options will be displayed when we navigate to the Insert Tab, so from these sub-options, we need to select the option of Drawing > New.
 Select Drawing Option >> Select New
Step 5: Click on the Text Box Icon
After clicking the "New" option, a window will pop up. From this window, you should choose the Text Box Icon.
-768.webp) Click on Text Box
Click on Text BoxStep 6: Drag the Text Box and Click "Save and Close" Option
To make a text box, you should drag it to the drawing area. Once you've done that, you can change it the way you want. After creating the text box, click the "Save & Close" button to add it to your document.
 Create a Text Box
Step 7: Preview Text Box
After clicking on the Save & Close Button, the Text Box will get added to our document successfully.
 Preview Results
How to Put Text Box in Google Docs by Inserting Shapes
You can insert a shape in Google Docs like arrows, squares, stars, and flowchart shapes. These shapes are flexible, so you can add text, change colors, and line thickness. To know how to put a text box in google docs follow the steps given below:
Step 1: Open the Google Document
After opening the Google Docs website, open the document, in which we need to insert or add the Text Box.
 Open the Document
Step 2: Go to Insert Tab
Click on the Insert Tab which is situated on the top panel of the editing space.
.webp) Go to the Insert tab
Go to the Insert tabStep 3: Select the Option Drawing
A list of suboptions will be displayed when we navigate to the Insert Tab, so from these sub-options, we need to select the option of Drawing > New.
.webp) Select Drawing >> New
Select Drawing >> NewStep 4: Click on the Shapes Icon
After clicking on the New option, a window will open, from this window, we need to select the icon of Shapes which is stated in the below screenshot.
 Click on "Shapes"
Step 5: Choose the Shape
Now, Choose your preferred shape.
.webp) Choose the Shape
Choose the ShapeStep 6: Add Text in Shape and Click on "Save and Close" Button
We need to create the text box by dragging it to the drawing space. We can customize it as per our requirement, after creating the desired shape, we need to click on the Save & Close Button to apply the Text shape to our document.
 Click on "Save and Close"
Step 7: Preview Text Box
After clicking on the Save & Close Button, the Shape (Text Box) will get added to our document successfully.
.webp) Preview Text Box
Preview Text BoxHow To Insert a Text Box In Google Docs Using Single Cell Table
To know how to add text box on google docs follow the steps given below:
Step 1: Open the Google Document
Open the document, in which we need to Insert or add the Text Box using Table.
 Open Document
Step 2: Go to Insert Tab
After opening the document in which we need to add the textbox, we need to click on the Insert Tab which is situated on the top panel of the editing space.
Go to the Insert tabStep 3: Select the Table Option
After clicking on the Insert Tab, we will select the 1 x 1 Table Cell and add it to our document. This is the way to insert text box in Google Docs without drawing.
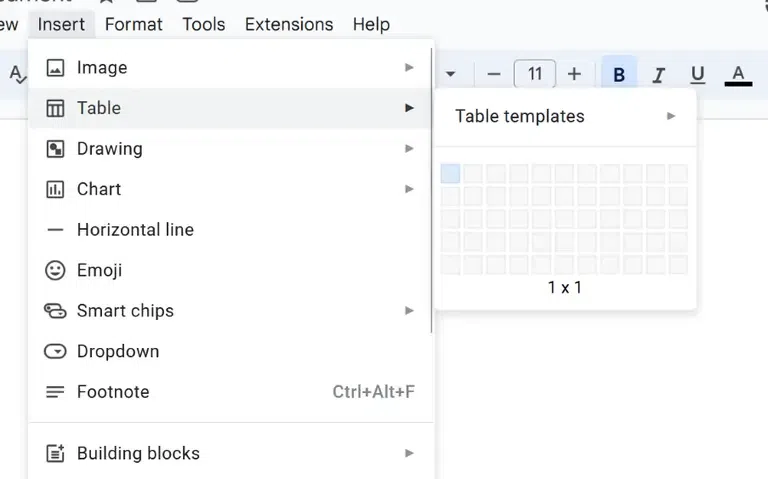 Select Table >> Choose Dimensions
Step 4: Insert Text in Cell
Once the Table cell gets inserted into our document, we can adjust its length and width and also we can enter the text into our cell. This is the indirect way to create a Text Box using a Table.
 Insert Text in Cell
How to Add Text Box in Google Docs Mobile (Android & iOS)
To know how to insert text box in google docs mobile follow the steps given below:
Step 1: Open Google Docs
Firstly, we have to open the Google Docs application. If you do not have it, you can install it using the Play Store application.
.webp) Open Google Docs
Open Google DocsStep 2: Open the Google Document
After installing the mobile application for Google Docs we need to open the design document in which we need to add a text box.
.webp) Open Document
Open DocumentStep 3: Click on (+) Insert Icon
After opening the design document, we need to click on the plus insert icon, which is situated on the top menu of the application.
 Click on "Insert" Icon
Step 4: Insert 1 x 1 Table Cell
From the list of options displayed, we need to select the option of the table. And we need to create a 1 x 1 dimension table cell.
.webp) Insert 1*! table
Insert 1*! tableStep 5: Enter Text in the Cell
Once the table gets inserted into our document, we can enter the text into it and adjust its size, color, and other formatting options. So in this way, we can add the text box using the table option.
.webp) Enter Text in Cell
Enter Text in CellAlso Read:
Conclusion
Learning text boxes in Google Docs opens up a world of possibilities for organizing and highlighting information effectively. Whether you're creating a professional report, a visually engaging presentation, or simply enhancing the readability of your document, knowing how to add text boxes in Google Docs gives you a powerful tool at your fingertips. By following these easy steps on how to insert a text box google docs, you can effortlessly customize your content, improve document structure, and ensure key points stand out. Start utilizing text boxes today to take your document creation to the next level.
Similar Reads
How to Insert LaTeX in Google Docs
Are you looking to incorporate complex mathematical equations and symbols into your Google Docs? Learning how to insert LaTeX in Google Docs allows you to enhance the presentation of scientific, technical, and academic documents. LaTeX is a powerful typesetting system widely used for writing mathema
6 min read
How to Add Text Boxes in Google Docs
Add a Text Box in Google Docs - Quick StepsOpen Google Docs > Go to Insert Tab Select Drawing Tool > Click on NewClick on the Text Box Icon > Drag the Text BoxType your Text in the BoxInserting a text box in Google Docs can help you emphasize specific content, create layouts, or highlight i
8 min read
How to Insert Word Art in Google Docs
Google Docs is a cloud-based product where you can create projects, implement reports, create personal documents, and so on. Google Docs is a free tool that gives you many advantages such as accessing your documents from anywhere, auto-saving features, and real-time collaboration. One such useful an
5 min read
How to Insert Shapes in Google Docs
Looking to enhance your Google Docs with visual elements? Learning how to insert shapes in Google Docs can transform your documents from plain text to engaging presentations. Whether you're creating flowcharts, highlighting important information, or simply adding a creative touch, mastering the inse
6 min read
How To Put Text Over An Image In Google Docs
Placing text over images in Google Docs can make your documents visually appealing and more engaging. This is a useful technique for creating presentations, flyers, or marketing materials. While Google Docs is mainly for text editing, there are ways to overlay text on images with some simple tricks.
6 min read
How to Insert a Vertical Line in Google Docs
Google Docs is a free online document editor provided by Google. Google Docs is used for creating, and editing documents. As a document editor, it has extensive features available free of cost such as image insertion, table insertion, and formatting text in the document by changing its font size, fo
7 min read
How to Move a Table in Google Docs
Google Docs, a free online document editor offered by Google, provides an array of features for document creation, editing, collaboration, and storage. Users can initiate a document from scratch or opt for one of its templates. Within Google Docs, you have the flexibility to alter fonts, font colors
6 min read
How to Insert Cells in Google Sheets
How to Insert Cells in Google Sheets - Quick StepsOpen Google Sheets>>Choose your SpreadsheetSelect a Cell>>Perform a right-clickSelect Insert Rows or ColumnsCells InsertedIn Google Sheets, inserting cells can help you structure your data more effectively, allowing you to add new informa
7 min read
How to Lock Text in Google Docs
Google Docs is a trending and popular word-processing tool used for creating and collaborating on documents. However, there are times when you may need to lock text in Google Docs to prevent accidental edits or to maintain document integrity. While Google Docs doesn’t offer a built-in text-locking f
7 min read
How To Make a Matrix In Google Docs
How to Insert Matrix in Google Docs - Quick StepsOpen your Google Docs document.Click where you want the matrix.Go to "Insert" Tab >> Go to Equation >> choose "Insert equation."Use the provided matrix template >>Fill in your matrix values.Click outside the equation box to exit.Your
7 min read