How to Build and Publish SCADE Apps to Apple and Google Stores?
Last Updated :
23 Jul, 2025
The two most popular platforms for distributing and promoting apps are Google Play and the Apple App Store. These two platforms are critical in the app development process since they allow developers to build mobile apps and test them on actual devices. Your applications should be created according to the specific specifications of each of these Stores to avoid any difficulties and probable rejections. A Google Developer Account is required to publish your SCADE app on the Google Play Store. The registration fee is $25, and it's a one-off payment. You must also register as an Apple Developer to create and publish your SCADE app on the App Store. Apple charges $99 a year to give out this account, and its continuous usability requires a renewal.
So you have finished developing your SCADE app and are ready to share it with the world, then his tutorial is aimed at using an eReader app to show you how to build and deploy your SCADE app on the App Store and Google Play.
Getting Started
Note: This tutorial is divided into two categories - the first guide will show you how to build and release your app to the AppStore while the second one will put you through how to achieve the same feat with PlayStore.
1. Build and Release a SCADE App on Apple App Store
Sideloading apps into iOS devices is not possible, unlike with Android. Before you can deploy your app to users and testers, you must first go through App Store Connect on the Apple Developer portal.

However, you must first create a certificate, provision profile, and AppID for your SCADE app, which has yet to be published. How do you go about creating them? The steps below will walk you through everything that needs to be done:
i. How to create an Apple Developer Certificate
You'll need a "Certificate-Signing-Request (CSR) file" from your Mac to manually generate a Certificate. You must first open Keychain Access using your Mac's Spotlight Search. Then, on the Keychain Access Menubar, go to Certificate Assistant and select "Request a Certificate from a Certificate Authority". Fill in your name and email address on the following pop-up box, then save the generated file to disk.
Log on to your Apple Developer Account and click on the "Certificates, Identifiers & Profiles" tab to proceed with creating a certificate for your app. Once you can confirm you are on the Certificate page, click the plus icon beside Certificates to create a new certificate file for yourself. Since you are creating the certificate for the distribution of your app to the App Store, click on iOS Distribution (App Store and Ad Hoc) and press the Continue button.
See the Screenshots below as a Guide:


Upload the "CertificateSigningRequest.certSigningRequest" file you created earlier using Keychain Access to the next page, then download and add your certificate to your KeyChain.
See the Screenshots below as a Guide:


ii. Creating an AppID
Create a new AppID by clicking the plus icon button on the Identifier tab. To register your AppID, select the App IDs option and provide it with a description and a bundle ID on the following page.
Note: Ensure that this bundle ID matches that of the app id in the build.yaml file of your project.


Download your certificate to your Mac, then double click the .cer file to install and get it added to Keychain Access. In Keychain Access, select the login Keychain, navigate to the Certificates tab, and right-click on the certificate you just added to the Keychain to export it as a .p12 file

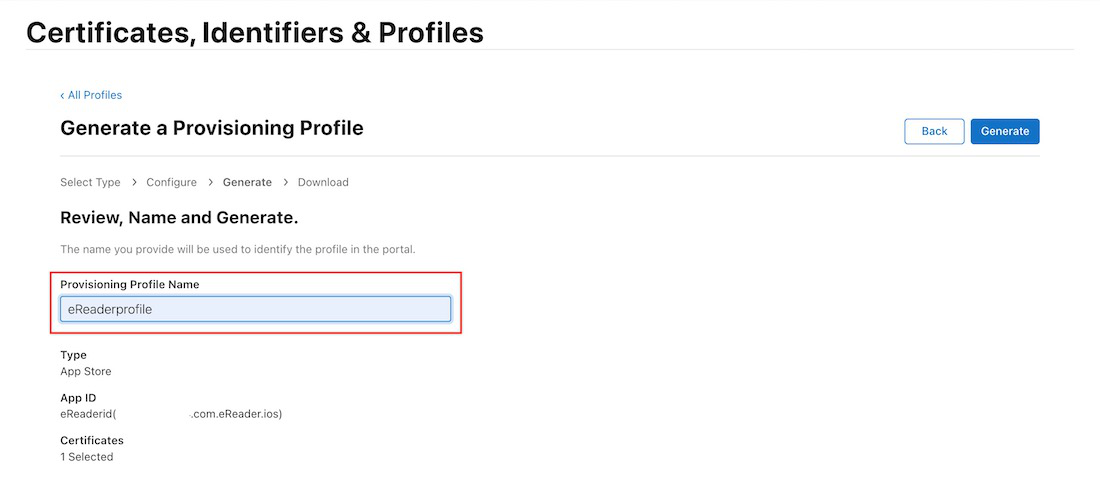
iii. How to Generate a Provision Profile File
Click the plus icon button on the Provision Profiles page, then select App Store under the Distribution section to register a new Provisioning Profile. Choose the AppID you created in the previous step on the next screen.
See the Screenshots below as a Guide:


Afterward, select the certificate you want to include in this provisioning profile and give it a unique name on the next screen to generate your provision profile file.
See the Screenshots below as a Guide:

Finally, double-click on the newly generated provision profile file (in any directory on your Mac) to install it; this is required to avoid errors when creating your .ipa file. If an Xcode homescreen appears, your provision profile file has been successfully installed.
iv. Build your ipa File
Open the build.yaml file of your SCADE project and set path to the certificate (.p12 file) and provision profile (.mobileprovision file) you generated earlier. Change the export method mode from ad-hoc to app-store, as well as the versions and icons
See the Screenshot below as a Guide:

After you've completed these steps, click the large rectangle button in the top-left corner of your IDE, go to iOS, click on Create-IPA, and press Play (or Command + R) to generate the .ipa file. The .ipa file you just created can be found in the Product folder's ios-device subdirectory within your project folder:

v. How to Submit your SCADE App to App Store
Log in to App Store Connect with your Apple ID. Click "My Apps" and also click on the plus icon you find on the next screen and select "New App" if you are publishing a new app.

Once the above is done, you will be taken to another screen prompting you to enter information about your app. Follow the on-screen instructions and fill the form out. Once you are done hit "Create"
See the Screenshot below as a Guide:

The next step is to upload your .ipa file to the App Store and TestFlight. To do so, run the following command in the screenshot below:

Note: Instead of using Apple Developer Account Password, visit AppleID, sign-in, and generate App-Specific Password for your .ipa file to avoid errors while uploading to App Store.
Return to the App Store Connect page and submit information about your app, such as the version number, promotional text, description, copyright, screenshots, contact information, and so on. Fill in all the fields and select the build (.ipa file) that you just uploaded. Finally, on the right-top corner of the page, click the save button before the "Add for Review" button for submission.
See the Screenshots below as a Guide:


2. Build and Release a SCADE App on Google Play Store
You must provide your app with a digital signature before publishing it on the Play Store - before they can be uploaded to the Play Store, Android requires all Android App Bundles to be digitally signed with a certificate. To sign your app, follow the steps below:
i. How to generate an Upload Keystore File
Proceed to the next step if you already have a Keystore. If you don't have one yet, you can generate one by following the Android Studio key generation steps or by using the command line on your Mac to run the following command in the screenshot below:

Note: The upload-keystore.jks file is saved in your home directory using the above command. Change the argument you provide to the -keystore parameter if you wish to store it somewhere else. However, don't check the Keystore file into public source control; keep it private!
ii. Create a file named keystore.properties for Referencing your KeyStore
Make a file called keystore.properties with a reference to your upload-keystore.jks in it: Now, within key.properties, paste the following text below inside the created file:

Note: The keyAlias, storePassword, and the keyPassword are the same as those you provided in the upload-keystore.jks file.
iii. Create Android App Bundle
Before you could be able to generate your .aab file, open the build.yaml file of your SCADE project and set your app icons, version-name, and version-code. Not only that, but you also need to change the build-type mode from Debug to Release and set the path to the key-store-properties you generated earlier.
See the Screenshot below as a Guide:

Once these are done, click on the project launch selector button at the top-left corner of your IDE, under Android, select Create-Android-App-Bundle and press the Play button ( or use Cmd + R) to generate the .aab file. The .aab file you just created can be found in the android-aab folder of the Product folder within your project folder:

iv. How to Publish to Play Store
Click the Create App button on your Google Developer Account home page, then fill in the App Name, Default Language, App Type, Free or Paid, and all the checkboxes on the next screen. Then click the Create button at the far right end of the page to open your App Dashboard.
See the Screenshot below as a Guide:


Then go to Store Presence and click on Main Store Listing, where you can fill up the Short and Full descriptions.
See the Screenshots below as a Guide:


After you've completed the preceding steps, you'll need to add an App Icon and a Feature Graphic to their respective boxes.
See the Screenshots below as a Guide:


Next, under the Phone Screenshots section, provide at least two screenshots of your app. If you have screenshots of 7' and 10' tablets, you may add them to the Tablet section. Save the Main Store Listing and navigate to the Store Setting page.
See the Screenshot below as a Guide:

On the Store Settings page, select your app Category and add tags if you want to. You must also provide your email address and, if desired, your phone number and website URL before hitting the save button.


To tell Google Play about the content of your app, you must also fill out the App Content page (found at the bottom of the navigation menu). They'll need this information to make sure your app complies with Google's Play policies.
The steps in the App Content page are listed below:
The implementation of a privacy policy can help you be more transparent about how you handle sensitive user and device data. If your intended users include children under the age of 13, you must add a Privacy policy.
See the Screenshot below as a Guide:

Provide instructions in the App access section if parts of your app are restricted depending on login credentials, memberships, location, or any other forms of authentication. If otherwise, select the option that states "All functionality is available without special access".
See the Screenshot below as a Guide:

Next, go to Ads and pick YES if your app has advertisements or NO if it doesn't.
See the Screenshot below as a Guide:

In the Content Rating part, you are to complete the content rating questionnaire to get official content ratings for your app. What is the need for this? On Google Play, users need to see these ratings to decide if your app is right for them or not.
See the Screenshot below as a Guide:

Next, go to the Target audience and content section. Select the target age groups for your app in the Target age tab. To access the Store presence tab, click the Next button twice, then select the appropriate option and click the Save button.
See the Screenshot below as a Guide:

Go to News apps part and select YES if your app is a news app, otherwise select NO. Google Play requires this information to determine whether or not your app complies with their news policy.
See the Screenshot below as a Guide:

That's not all; you also need to tell Google Play whether or not your app is a "COVID-19 contact tracing and status app".
See the Screenshot below as a Guide:

Users must also know how your app collects and shares their information. In the Data Safety section, you'll need to give details regarding your app's safety. Users can learn how you collect and share their data by looking at the information you provide on your store listing.
See the Screenshot below as a Guide:

Then go to the Production page once you are done with the above steps in the App Content page and add the countries/regions where you want your app to be shown.
See the Screenshot below as a Guide:

Click on Production from the sidebar, click on the Release dashboard tab, and upload the app-release.abb app bundle file in the App Bundle section and also add a Release Note that will display on your Google Play App's home page.
See the Screenshots below as a Guide:


After you've completed all of these steps, click the Save and Review Release buttons before finally hitting the "Start Rollout To Production" button. That's all there is to it - you must now wait for the Google team's response. They will manually review your app before adding it to the Google Play Store.
See the Screenshots below as a Guide:

Conclusion
You can now build and deploy SCADE apps to the App Store and Google Play Store by following every guideline in this tutorial.
Similar Reads
Android Tutorial In this Android Tutorial, we cover both basic and advanced concepts. So whether you are a fresher (graduate) or an experienced candidate with several years of Android Development experience, you can follow this Android tutorial to kick-start your journey in Android app development. Our Android Tutor
15+ min read
Basics
Introduction to Android DevelopmentAndroid operating system is the largest installed base among various mobile platforms across the globe. Hundreds of millions of mobile devices are powered by Android in more than 190 countries of the world. It conquered around 71% of the global market share by the end of 2021, and this trend is grow
5 min read
History of AndroidAndroid devices form a very essential part of a huge section of mobile phone users in today's world. With the global turmoil in the COVID-19 eras, the population has now entered a digital sphere. Android is the most used OS in smartphones during these days of transformation. But when did something l
15+ min read
Best Way to Become Android Developer – A Complete RoadmapAndroid is an open-source operating system, based on the Linux kernel and used in mobile devices like smartphones, tablets, etc. Further, it was developed for smartwatches and Android TV. Each of them has a specialized interface. Android has been one of the best-selling OS for smartphones. Android O
7 min read
Android Development Prerequisites [2025] - Things to Learn Before Android DevelopmentHave you ever wondered how your phone's apps—such as those for making calls, playing games, or checking the weather—are created? Android Development is the procedure used to generate these apps. The Android operating system powers the majority of phones, just like an engine powers a car. To ensure t
8 min read
Android App Development Fundamentals for BeginnersAndroid is an operating system that is built basically for Mobile phones. It is based on the Linux Kernel and other open-source software and is developed by Google. It is used for touchscreen mobile devices such as smartphones and tablets. But nowadays these are used in Android Auto cars, TV, watche
6 min read
Android ArchitectureAndroid architecture contains a different number of components to support any Android device's needs. Android software contains an open-source Linux Kernel having a collection of a number of C/C++ libraries which are exposed through application framework services. Among all the components Linux Kern
5 min read
Android System ArchitectureThe Android software stack generally consists of a Linux kernel and a collection of C/C++ libraries that are exposed through an application framework that provides services, and management of the applications and run time. Linux KernelAndroid was created on the open-source kernel of Linux. One main
3 min read
Android Boot ProcessBooting Process In computing, booting is starting up a computer or computer appliance until it can be used. It can be initiated by hardware such as a button press, or by software command. After the power is switched on the computer is relatively dumb, and can read only part of its storage called Rea
4 min read
Difference between Java and Kotlin in Android with ExamplesKotlin KOTLIN is a cross platform, statically types, general purpose programming language with type inference. KOTLIN is designed to interoperate fully with java but type inference allows its syntax to be more concise.KOTLIN is sponsored by JetBrains and Google through the Kotlin Foundation. Java JA
3 min read
Interesting Facts About AndroidAndroid is a Mobile Operating System that was released on 23, September 2008. Android is free, open-source operating system and is based on modified version of Linux kernel. Open Handset Alliance (OHA) developed the Android and Google commercially sponsored it. It is mainly designed for touchscreen
3 min read
Software Setup and Configuration
Android Studio Tutorial It is stated that "If you give me six hours to chop down a tree then I will spend the first four hours in sharpening the axe". So in the Android Development World if we consider Android Development as the tree then Android Studio should be the axe. Yes, if you are starting Android Development then y
9 min read
File Structure & Components
Core Topics
How Does Android App Work?Developing an android application involves several processes that happen in a sequential manner. After writing the source code files, when developers click the Run button on the Android studio, plenty of operations and process starts at the backend. Every operation happening in the background is a c
7 min read
Activity Lifecycle in Android with Demo AppIn Android, an activity is referred to as one screen in an application. It is very similar to a single window of any desktop application. An Android app consists of one or more screens or activities. Each activity goes through various stages or a lifecycle and is managed by activity stacks. So when
9 min read
Introduction to GradleGradle is an open-source construction tool that is capable of controlling the development tasks with compilation and packaging, including testing, deployment and publishing. It is an automation tool that is based on Apache Ant and Apache Maven. This tool is capable of developing applications with in
4 min read
What is Context in Android?Android Applications are popular for a long time and it is evolving to a greater level as users' expectations are that they need to view the data that they want in an easier smoother view. Hence, the android developers must know the important terminologies before developing the app. In Android Progr
9 min read
Bundle in Android with ExampleIt is known that Intents are used in Android to pass to the data from one activity to another. But there is one another way, that can be used to pass the data from one activity to another in a better way and less code space ie by using Bundles in Android. Android Bundles are generally used for passi
6 min read
Activity State Changes In Android with ExamplePrerequisites: Activity lifecycle in android As it is known that every Android app has at least one activity associated with it. When the application begins to execute and runs, there are various state changes that activity goes through. Different events some user-triggered and some system triggered
6 min read
Processes and Application Lifecycle in AndroidAs an android developer, if one does not know the application lifecycle of android application or does not have in-depth knowledge about it, there are very high chances that the application will not have a good user experience. Not having proper knowledge of the application lifecycle will not affect
7 min read
Desugaring in AndroidGoogle has officially announced Kotlin as a recommended language for Android Development and that's why so many developers are switching from Java to Kotlin for Android development. So day by day new APIs are been introduced in Android by the Google Team and which are available in newer versions of
4 min read
Difference Between AndroidX and Android Support LibrariesSupport library packages in Android are a set of code libraries whose prime purpose is to provide backward-compatibility to the code and Android API framework. In the real world, there is a strong possibility that an application that is developed on the latest Android version is used on an older ver
3 min read
Memory Leaks in AndroidA memory leak is basically a failure of releasing unused objects from the memory. As a developer one does not need to think about memory allocation, memory deallocation, and garbage collection. All of these are the automatic process that the garbage collector does by itself, but the situation become
7 min read
Layout & View
Layouts in Android UI DesignLayout Managers (or simply layouts) are said to be extensions of the ViewGroup class. They are used to set the position of child Views within the UI we are building. We can nest the layouts, and therefore we can create arbitrarily complex UIs using a combination of layouts.There is a number of layou
3 min read
Android UI LayoutsLayouts in Android define the user interface and hold UI controls or widgets that appear on the screen of an application. Every Android application consists of View and ViewGroup elements. Since an application contains multiple activities—each representing a separate screen—every activity has multip
5 min read
LinearLayout and its Important Attributes with Examples in AndroidLinearLayout is one of the most basic layouts in android studio, that arranges multiple sub-views (UI elements) sequentially in a single direction i.e. horizontal or vertical manner by specifying the android:orientation attribute. If one applies android:orientation="vertical" then elements will be a
3 min read
Android LinearLayout in KotlinLinearLayout in Android is a ViewGroup subclass, used to arrange child view elements one by one in a singular direction either horizontally or vertically based on the orientation attribute. We can specify the linear layout orientation using the android:orientation attribute. All the child elements a
2 min read
Android RelativeLayout in KotlinRelativeLayout in Android is a ViewGroup subclass, that allows users to position child views relative to each other (e.g., view A to the right of view B) or relative to the parent (e.g., aligned to the top of the parent). Instead of using LinearLayout, we have to use RelativeLayout to design the use
4 min read
ConstraintLayout in AndroidConstraintLayout is the most advanced layout in Android that lets you create complex and responsive UIs while minimizing nested views due to its flat view hierarchy. ConstraintLayout is similar to that of other View Groups which we have seen in Android such as RelativeLayout, LinearLayout, and many
6 min read
TextView widget in Android with ExamplesWidget refers to the elements of the UI (User Interface) that help the user interact with the Android App. TextView is one of many such widgets which can be used to improve the UI of the app. TextView refers to the widget which displays some text on the screen based on the layout, size, colour, etc
5 min read
TextView in KotlinAndroid TextView is simply a view that are used to display the text to the user and optionally allow us to modify or edit it. First of all, open Kotlin project in Android Studio. Following steps are used to create Steps to Implement TextViewSteps by Step implementation for creating an application wh
3 min read
Working With the TextView in AndroidTextView in Android is one of the basic and important UI elements. This plays a very important role in the UI experience and depends on how the information is displayed to the user. This TextView widget in Android can be dynamized in various contexts. For example, if the important part of the inform
7 min read
Autosizing TextView in AndroidIf the user is giving the input and the input needs to be shown as TextView and if the user inputs the stuff which can go out of the screen, then in this case the font TextView should be decreased gradually. So, in this article, it has been discussed how the developer can reduce the size of TextView
6 min read
Button
Intent and Intent Filters
What is Intent in Android?In Android, it is quite usual for users to witness a jump from one application to another as a part of the whole process, for example, searching for a location on the browser and witnessing a direct jump into Google Maps or receiving payment links in Messages Application (SMS) and on clicking jumpin
4 min read
Implicit and Explicit Intents in Android with ExamplesPre-requisites: Android App Development Fundamentals for Beginners Guide to Install and Set up Android Studio Android | Starting with the first app/android project Android | Running your first Android app This article aims to tell about the Implicit and Explicit intents and how to use them in an and
6 min read
How to Send Data From One Activity to Second Activity in Android?This article aims to tell and show how to "Send the data from one activity to second activity using Intent" . In this example, we have two activities, activity_first which are the source activity, and activity_second which is the destination activity. We can send the data using the putExtra() method
7 min read
How to open dialer in Android through Intent?The phone dialer is an activity available with the Android operating system to call a number. Usually, such activity may or may not have an EditText, for taking the number as input, and a Call button. When the user presses the Call button, it invokes the dialer app activity. Use of 'tel:' prefix is
3 min read
Creating Multiple Screen Applications in AndroidThis article shows how to create an android application to move from one activity to another using the concept of Explicit Intents. Below are the steps for Creating a Simple Android Application to move from one activity to another activity.Step By Step ImplementationStep 1: Create a New Project in A
6 min read
How to Open Camera Through Intent and Display Captured Image in Android?The purpose of this article is to show how to open a Camera from inside an App and click the image and then display this image inside the same app. An android application has been developed in this article to achieve this. The opening of the Camera from inside our app is achieved with the help of th
6 min read
Toast & RecyclerView
Toasts for Android StudioA toast provides a simple popup message that is displayed on the current activity UI screen (e.g. Main Activity). Example: Syntax:// To get ContextContext context = getApplicationContext(); // Message to displayString text = "Toast message"; // Toast time duration, can also set manual value int dura
2 min read
What is Toast and How to Use it in Android with Examples?Pre-requisites: Android App Development Fundamentals for BeginnersGuide to Install and Set up Android StudioAndroid | Starting with the first app/android projectAndroid | Running your first Android appWhat is Toast in Android? A Toast is a feedback message. It takes a very little space for displayin
6 min read
Android Toast in KotlinA Toast is a short alert message shown on the Android screen for a short interval of time. Android Toast is a short popup notification which is used to display information when we perform any operation in our app. In this tutorial, we shall not just limit ourselves by creating a lame toast but also
3 min read
How to Change Toast font in Android?A Toast is a feedback message. It takes a very little space for displaying while overall activity is interactive and visible to the user. It disappears after a few seconds. It disappears automatically. If user wants permanent visible message, Notification can be used. Note: Toast disappears automati
3 min read
How to add a custom styled Toast in AndroidA Toast is a feedback message. It takes very little space for displaying and it is displayed on top of the main content of an activity, and only remains visible for a short time period. This article explains how to create Custom Toast messages, which has custom background, image, icon, etc, which ar
4 min read
RecyclerView in Android with ExampleRecyclerView is a ViewGroup added to the android studio as a successor of the GridView and ListView. It is an improvement on both of them and can be found in the latest v-7 support packages. It has been created to make possible construction of any lists with XML layouts as an item which can be custo
7 min read
Android | Horizontal RecyclerView with ExamplesRecycler View is a ViewGroup added to Android Studio as a successor of the GridView and ListView. It is an improvement on both of them and can be found in the latest v-7 support packages. It has been created to make possible construction of any lists with XML layouts as an item which can be customiz
4 min read
How to create a nested RecyclerView in AndroidA nested RecyclerView is an implementation of a RecyclerView within a RecyclerView. An example of such a layout can be seen in a variety of apps such as the Play Store, where the outer (parent) RecyclerView is of vertical orientation, whereas the inner (child) RecyclerViews are of horizontal orienta
5 min read
How to Create RecyclerView with Multiple ViewType in Android?RecyclerView forms a crucial part of the UI in Android app development. It is especially important to optimize memory consumption when displaying a long list of items. A RecyclerView inflates a customized list of items, which can have either similar layouts or multiple distinct layouts. Here, we dev
6 min read
RecyclerView using ListView in Android With ExampleRecyclerView is a more flexible and advanced version of ListView and GridView. RecyclerView is used for providing a limited window to a large data set, which means it is used to display a large amount of data that can be scrolled very efficiently by maintaining a limited number of Views. In Recycler
5 min read