How to Create a Form in Excel - A Step by Step Guide
Last Updated :
12 Apr, 2025
Creating forms in Excel is an efficient way to capture and organize data, whether you’re tracking inventory, collecting survey responses, or entering client information. Excel forms are customizable and easy to use, making data entry faster and more organized, especially when handling large datasets. In this guide, you’ll learn various ways to create forms in Excel, including how to create a basic data entry form, build an interactive form with dropdowns, and develop more advanced forms using VBA.
Additionally, we’ll explore how to create an online form linked to Excel using Microsoft Forms, offering even more flexibility for collecting data. By the end of this article, you’ll have the skills to create a range of forms in Excel tailored to your needs.
How to Create a Basic Data Entry Form
In the below steps, you will learn how to create a Basic form in Excel:
Step 1: Prepare Your Data Table
- Create a table with headers for your form fields (e.g., Name, Email, Age).
- Go to Insert > Table to convert your data into a structured table.
 Enter Data >> Go to Insert Tab >> Select Table>> Select the Range >> Press OK >> Preview your Table
Step 2: Enable the Form Tool
- Click on File > Options > Customize Ribbon.
- Under "Choose commands from," select Commands Not in the Ribbon.
- Add the Form tool to the Quick Access Toolbar.
 File >> Options >> Customize the Ribbon >> Choose " Commands Not in the Ribbon" >> Select "Form">> Click on Add>> Press OK
If you can't add the Form command button or option directly, follow these steps:
- Click on New Tab and then Rename it >> Enter the name "Form" and click OK.
- Click on New Group and then click Add.
Ensure the Form option is selected before clicking Add.
Step 3: Open the Form
- Select any cell within your table.
- Click the Form button from the Quick Access Toolbar.
- A data entry form will appear, allowing you to add, delete, or navigate records.
 Open the Form and Enter the Data
 How to Create an Interactive Form with Dropdowns
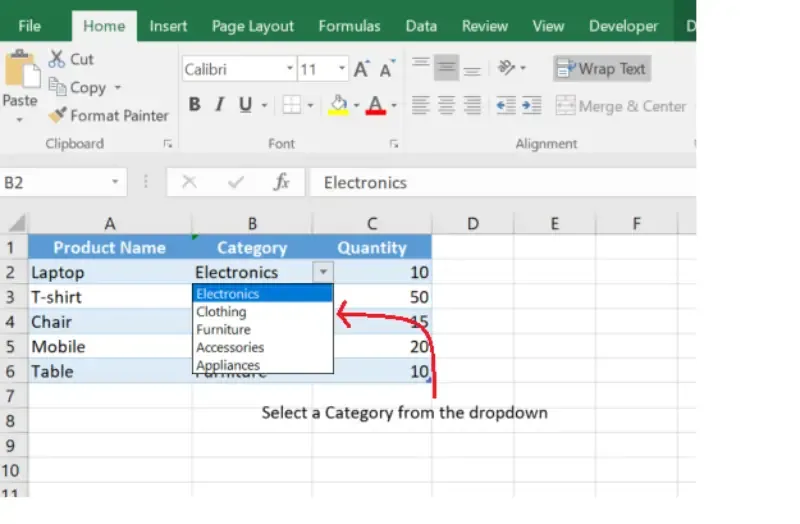
Creating an interactive form with dropdowns in Excel makes data entry more user-friendly and accurate. Follow the below steps to create an Interactive Forms with Dropdowns:
Step 1: Set Up Your Data
 Prepare your Data
 Step 2: Insert Dropdowns
- Select the Cell for the Dropdown:
- On your primary sheet, select the cell where you want the dropdown (e.g., the "Category" column in your form).
- Open the Data Validation Tool:
- Go to the Data tab on the ribbon.
- Click Data Validation in the Data Tools group.
- Configure the Dropdown in the Data Validation Dialog Box:
- In the Settings tab:
- Choose List from the "Allow" dropdown menu.
- In the "Source" field, enter the range or reference to your list.
- (This assumes your dropdown options are in cells A1:A5 on the "Dropdown Data" sheet.)
- Click OK to apply the dropdown.
 Select a Cell>> Go to Data Tab>>Select Data Validation>>Choose Options>> Click OK
Step 3: Customize the Form
- Format the Form:
- Highlight the form area and apply borders, background colors, or shading to make it visually distinct.
- Use bold headers and consistent fonts for readability.
- Add Labels and Instructions:
- Include clear instructions near the dropdowns or form fields (e.g., "Select a Category from the dropdown").
- You can use a text box (Insert > Text Box) to provide additional guidance.
- Add Conditional Formatting (Optional):
- Use Conditional Formatting to highlight specific cells based on the data entered.
- For example, mark quantities below a certain threshold with a red fill.
 Customize the Form
Step 4: Protect and Share the Form (Optional)
- Lock the Dropdown Cells:
- Protect the worksheet to prevent users from editing dropdown options or structure.
- Go to Review > Protect Sheet and set a password.
- Share the Form:
- Save the file and share it with users for interactive data entry.
How to Create an Advanced Form with VBA
For more functionality, such as automated buttons for submitting or clearing data, you can use VBA (Visual Basic for Applications).
Step 1: Enable the Developer Tab
- Go to File > Options > Customize Ribbon.
- Check the Developer tab.
 Go to File>> Click on Options >>Check the Developer Tab>> Click ok
 Step 2: Add Form Controls
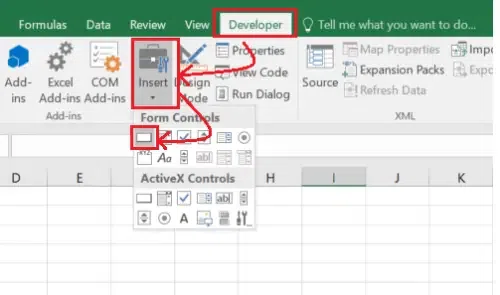
- Go to Developer > Insert > Form Controls.
- Add buttons, checkboxes, or text boxes to your form.
 Go to Developer Tab>> Click on Insert >> Select the Icon
Step 3: Write VBA Code
- Click on Developer > Visual Basic to open the VBA editor.
- Write macros to perform actions like saving data or clearing fields.
Example VBA Code:
Sub SubmitForm()
Dim ws As Worksheet
Dim lastRow As Long
' Ensure the worksheet exists
On Error Resume Next
Set ws = ThisWorkbook.Sheets("Sheet6")
On Error GoTo 0
If ws Is Nothing Then
MsgBox "Worksheet 'Sheet6' does not exist!", vbExclamation
Exit Sub
End If
' Find the last row and add data
lastRow = ws.Cells(ws.Rows.Count, 1).End(xlUp).Row + 1
ws.Cells(lastRow, 1).Value = "Your Value 1" ' Replace with actual value
ws.Cells(lastRow, 2).Value = "Your Value 2" ' Replace with actual value
MsgBox "Data Submitted!", vbInformation
End Sub
Step 4: Assign Macros to Buttons
- Right-click the button and choose Assign Macro.
- Select the macro you want to link.
 Right-Click , Select Assign Macro>> Select the Saved Macro>>Press ok
It will display a Message of "Data Submitted".
If you want a cloud-based form, you can use Microsoft Forms and link it to Excel.
Step 1: Go to Microsoft Forms
Step 2: Create a Form
- Click on New Form and add questions (e.g., Name, Email, Feedback).
Step 3: Link to Excel
- Once the form is complete, click on Responses > Open in Excel.
- Responses will automatically populate an Excel sheet.
Types of Forms You Can Create in Excel
- Basic Data Entry Form: Simplifies entering data into rows and columns.
- Interactive Form with Dropdowns: Provides predefined options for better data accuracy.
- Advanced Form with VBA: Includes automation and custom actions like submitting or clearing data.
- Online Forms with Excel: Integrates with Microsoft Forms for cloud-based data collection.
Practical Applications of Excel Forms
- Employee Feedback: Collect feedback from team members.
- Inventory Management: Track stock and quantities.
- Expense Tracking: Record expenses and calculate totals.
- Project Management: Log tasks, deadlines, and status updates.
- Customer Surveys: Collect customer feedback and suggestions.
Conclusion
Now that you know how to create a form in Excel, you can begin designing forms that make data collection easier and more organized, whether for personal use, business applications, or interactive surveys. From the basic data entry form to more advanced forms using VBA or online integration via Microsoft Forms, Excel offers a variety of tools to suit your specific needs. By applying the techniques in this guide, you’ll be able to create efficient, user-friendly forms that improve your workflow and ensure more accurate data entry.
Similar Reads
How to Create Flowchart in Excel: Step-by-Step Guide
A Flowchart is a valuable tool for visualizing processes, workflows, or decision-making paths, making it easier to communicate ideas and identify improvements. This article provides a clear, step-by-step guide on how to create a Flowchart in Excel, using its shapes and formatting tools to design cus
6 min read
How to Create a Gantt Chart in Excel: A Step-by-Step Guide
A Gantt chart in Excel is an essential tool for organizing and visualizing project timelines and milestones. This guide will show you how to create a Gantt chart in Excel using simple steps and a free Excel Gantt chart template, making it accessible for both beginners and professionals. Whether plan
6 min read
How to Create a Graph in Excel: A Step-by-Step Guide for Beginners
Anyone who wants to quickly make observations and represent them graphically should know how to create graphs with Excel. Whether it is the preparation of business analysis papers, academic research documents or financial reports among other things, learning how to make graphs in Excel can significa
8 min read
How to Add a Column in Excel: Step-by-Step Guide
Need to organize your data better in Excel but unsure how to add a column without disrupting your existing setup? Whether you’re working with a simple list or a complex table, inserting columns is a fundamental skill that increases productivity and keeps your data structured. This guide covers 4 eas
6 min read
How to Make a Calendar in Excel: Step by Step Guide
Creating a calendar in Excel is a practical solution for personal and professional scheduling, offering flexibility and customization options. Whether you want to use built-in Excel Calendar 2025 templates or design a dynamic calendar with formulas, PivotTables, or VBA calendar creation, Excel provi
6 min read
How to Insert a Checkbox in Excel: Step-by-Step Guide
How to Add Checkboxes in Excel: Quick Steps Enable the Developer Tab >>Go to Developer TabControl Group >> Click InsertSelect Checkboxes >>Place the CheckboxesLink the Checkbox to a CellCreating a checklist or adding interactive elements to your spreadsheet in Excel becomes much ea
8 min read
How to Create an Array Formula in Excel?
Array formulas in excel are important tools. A single formula can perform multiple calculations and replace thousand of useful formulas. Most of us have never used array functions in our excel sheet just because we don't know how to use these formulas. Array formulas is one of the most confusing exc
10 min read
How to Create a Budget in Excel: Step by Step Tutorial
How to Make a Budget in Excel: Quick StepsSet up categories>>Enter Data Use Formulas >>Format the sheetCreate chartsPreview ResultsBudgeting is one of the most effective ways to take control of your finances, whether for personal or business use. Without a clear plan, expenses can quickl
4 min read
How to Create a Step Chart in Excel
A step chart is used to represent data that changes irregularly between time intervals. Now, Excel doesn't have a feature to create a Step Chart like the one shown below but we can create one by making some changes in our data. What is a Step Chart in ExcelA Step chart is the same as a Line Chart. T
4 min read
How to Create Survey in Google Forms (8 Easy Steps)
Creating a survey with Google Forms is a straightforward process that allows you to gather valuable information efficiently. Whether you're collecting feedback, conducting research, or organizing an event, Google Forms is a versatile tool that enables users to design customized surveys, quizzes, and
6 min read