How to Reset/Repair an App on Windows 11?
Last Updated :
23 Jul, 2025
Facing issues with an app on your Windows PC? No need to worry! Resetting or repairing an app on Windows 11 is a simple process that can fix many common problems without requiring a full reinstall. Whether an app is not responding or behaving strangely, learning how to reset or repair apps on Windows 11 will help you resolve these issues.
How to Reset/Repair an App on Windows 11?
This guide will show you how to quickly repair apps on Windows 11 or perform a full Windows 11 app reset to restore normal functionality.
Method 1: Reset/Repair an App on Windows 11 Using Settings App
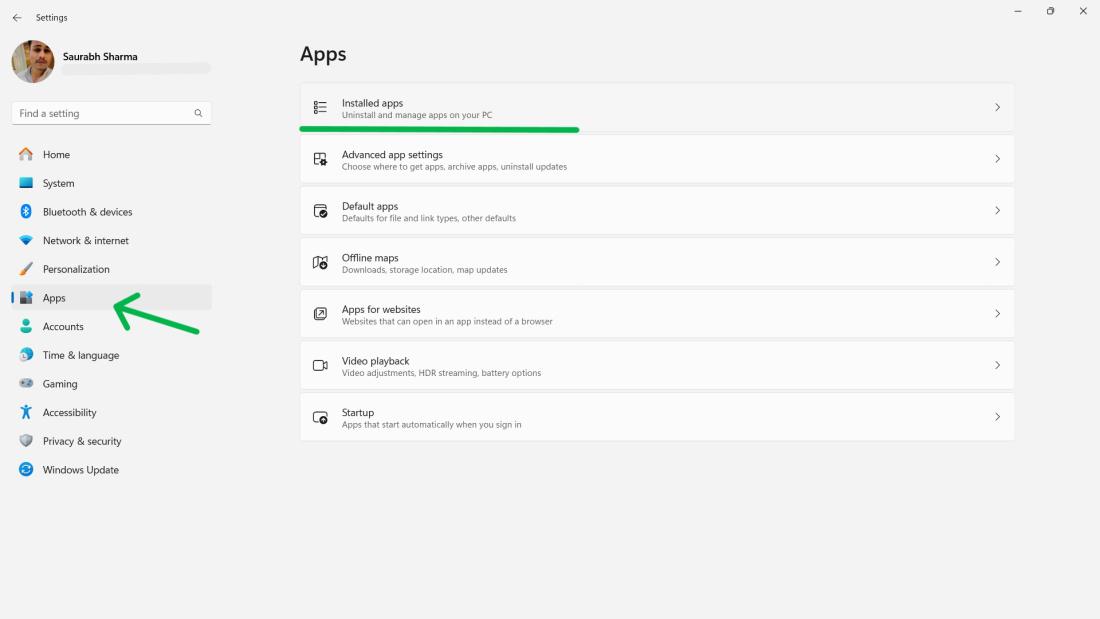
Step 1: Press Win + I to open Settings.
Step 2: In the Settings app, click on Apps on the left sidebar, and then click on Installed Apps on the right pane.
Step 3: On the right panel of your screen you will find a list of installed apps or programs, on your computer. Locate the desired app that needs resetting and/or repairing and click on the three-dot icon located in its app list. Then select "Advanced Options."

Step 4: Scroll down to the Reset section of the Advanced Options page. You will see two buttons: Repair and Reset.
- If you want the repair the app, click Repair.
- If you want to get rid of the app’s data and change it back to its original settings, click on Reset.

Method 2: Resetting and Relaunching Apps on Windows 11
Step 1: Locate the app icon on the taskbar.
Step 2: Right-click on the app icon.
Step 3: Choose "Close window" to shut down the app completely.

Step 4: Open the Start menu and relaunch the app.
Step 5: This straightforward process can often resolve temporary issues without the need for extensive troubleshooting.
Method 3: How to Reset/Repair an App on Windows 11 Using Task Manager
Step 1: Right-click on the taskbar and select "Task Manager" or use the shortcut (Ctrl + Shift + Esc).

Step 2: In Task Manager, Click on the Processes tab. Right-click your preferred app for reset or repair, and locate it. Then, click on End task.

Step 3: Relaunch the app from the Start menu or desktop.
Conclusion
Knowing how to reset or repair an app on Windows 11 can save you from the hassle of uninstalling and reinstalling apps. By following these steps, you can easily fix apps on Windows 11 and get them working properly again. Whether it's a minor glitch or a persistent error, the Windows 11 app reset and repair features provide convenient solutions for troubleshooting without losing your app data.
Also Read
Similar Reads
How to Factory Reset a Windows 11 PC? In the ever-evolving landscape of technology, there comes a time when you may need to factory reset a Windows 11 PC. Whether you're troubleshooting issues, preparing to sell your device, or simply looking to start fresh, a factory reset can restore your computer to its original state, wiping out all
4 min read
How to Resolve Windows 10 Automatic Repair Loop? Windows 10 comes with an inbuilt feature that detects any potential problem in the device that might cause an issue while normally booting up the device. So, the Automatic Repair feature gets activated & while restarting the device, the problem gets fixed. But what happens if the solution provid
5 min read
How to Restart a Windows 11? The new operating system by Microsoft, Windows 11, also provides an easy-to-use interface. Knowing how to restart your system is something every experienced Windows user should know and it would also be vital for new users of the OS. We are going to examine different ways of bringing Windows 11 back
3 min read
How to Reset Windows Admin Password? If you forgot your Windows administrator password, you might be locked out of your computer and unable to access your files and settings. However, there are some ways to reset your password without losing your data or reinstalling Windows. In this article, we will show you how to reset your Windows
5 min read
How to Create a System Restore Point in Windows 11? Windows 11's System Restore function is a helpful tool that lets you go back to the time-situated service module and restore your all internally situated computer's system files and settings. If your system starts having problems after installing new software via any applications, drivers, or update
4 min read
How to Reset All Audio Settings in Windows 11? If you're experiencing audio issues on your Windows 11 computer, resetting all audio settings might be the solution you need. This process can help resolve common sound problems such as distorted audio, missing sound, or issues with specific applications. In this guide, we’ll walk you through the st
4 min read