Junit Test with Selenium WebDriver
Last Updated :
21 Jun, 2024
Selenium is a browser automation tool that is used for testing purposes while Junit is a unit testing framework and by integrating them both we can write an automation test that will give the direct result of assertions. Junit is used with Java applications and Java also supports Selenium thus, we can easily integrate it into our code.
Let's say we want to test our UI, but for that, we don't want to sit and see issues. So, we can write a Unit test for it and when those sets are complete, it will give us the problem while testing.
Features of JUnit
- Unit Testing Framework: Junit is a unit testing framework used in Java to write unit tests for the logic written in code. It is an Open source testing framework.
- Assertions: Junit provides us annotations and using that we can create tests. The goal of unit testing is to assert the program logic using the assertion methods provided by it.
- Visual Feedback: In Junit, we have two kinds of checkmarks one is red which shows that the test fails, and the Green one shows a test pass.
- Flexibility: Using JUnit we can test different functionality in units and this makes testing more easier and more flexible.
- Annotations: JUnit uses annotations to define test methods and control test execution. It includes @Test, @Before, @After.
- Test Suite: To make the group of tests into a test suite, enabling the execution of multiple test classes together. @RunWith(Suite.class) and @Suite.SuiteClasses are used.
Features of Selenium
- Automation Tool: Selenium is an automation tool used for UI testing. Its work is to mimic the normal user and to take the idea of whether the UI is working fine or not. While doing this if any error occurs it can also throw an error for better understanding.
- Cross-Language Capability: Many languages have compatibility with them so we can use selenium with them very easily.
- Simple Commands: Selenium comes with very simple commands and a huge set of functions which we can be used to manipulate DOM.
- Functional Testing: Selenium can be used to submit the form, or click on the button. Also, we can search for something on the browser using it.
- Cross Browser Testing: Selenium has cross browser testing ability which means we can write the code for one browser and that can be used for all other browser as well.
- Selenium WebDriver: This is important and most used functionality of selenium it provides as the APIs to work with Selenium using which we can call the normal function and by that we can easily interact with browser.
What is JUnit in Selenium?
In this integration, we will try to take the features of both frameworks. From Junit, we will take the features of assertions and exception handling, and from Selenium, we will take the features of automation, DOM manipulation, and UI handling. So, we will write the selenium code into the Junit test and then wait for the result and when the result will arrive, we will check it into the JUnit with assertion. With Selenium, we will give the required output and wait for the selenium to run the whole test and after that, if it returns what is expected we will return true and if didn't match, then it will return false.
Example: We can test whether the login functionality is working fine or not using this. We can write the selenium test in the Junit test and it will return the Home page when the user logs in successfully. Then, when we submit the form, we will check whether the Home page is displayed. If yes, then either we pass the test or fail the test.
JUnit Test with Selenium WebDriver
Step:1 Creating Application and Add Dependencies
We will create a Java project in Maven and once the project will get initialized then we will add the dependencies. In pom.xml we will add dependencies for Selenium and Junit.
XML
<?xml version="1.0" encoding="UTF-8"?>
<project xmlns="http://maven.apache.org/POM/4.0.0"
         xmlns:xsi="http://www.w3.org/2001/XMLSchema-instance"
         xsi:schemaLocation="http://maven.apache.org/POM/4.0.0 http://maven.apache.org/xsd/maven-4.0.0.xsd">
    <modelVersion>4.0.0</modelVersion>

    <groupId>org.example</groupId>
    <artifactId>Junit-Test-with-Selenium</artifactId>
    <version>1.0-SNAPSHOT</version>

    <properties>
        <maven.compiler.source>17</maven.compiler.source>
        <maven.compiler.target>17</maven.compiler.target>
        <project.build.sourceEncoding>UTF-8</project.build.sourceEncoding>
    </properties>

  <!--Remember to use the updated dependencies based on your version-->
    <dependencies>
      <!--Dependency for Junit-->
        <dependency>
            <groupId>junit</groupId>
            <artifactId>junit</artifactId>
            <version>4.13.2</version>
            <scope>test</scope>
        </dependency>

      <!--Dependency for Selenium-->
        <dependency>
            <groupId>org.seleniumhq.selenium</groupId>
            <artifactId>selenium-java</artifactId>
            <version>4.21.0</version>
        </dependency>

    </dependencies>
</project>
Step 2: Create Basic JUnit Test Class
Now in the test folder we will add one new file for Unit testing.
 Folder Structure for JUnit Test Class
So, now we will add the basic test to understand the flow of the code:
Java
import org.junit.After;
import org.junit.Before;
import org.junit.Test;

import static org.junit.Assert.*;

public class Selenium_Test {

    //This will be Executed before any Test runs in the Class
    @Before
    public void CreateConnection(){
        System.out.println("Hello");
    }

    //Actual Test Method
    //In this we will add Selenium Code
    @Test
    public void Assert(){
        System.out.println("Into the Test");
        assertTrue(true);
    }

    //This will be Executed after any Test runs in the Class
    @After
    public void CloseConnection()
    {
        System.out.println("Hello End");
    }
}
Output
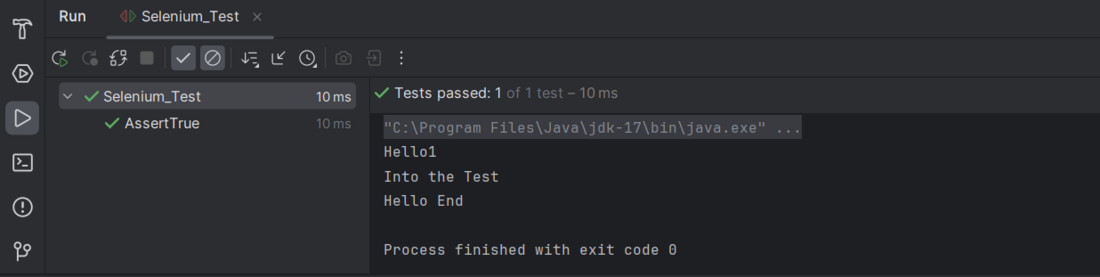 Output of Above Code
So from this we can understand that with below mentioned attributes how we can manage selenium code.
- Before: In before we can create the Connection with browser and load the site.
- Test: Over here we will write the Actual logic of the Test. Whether it is of calling a page or submitting the form.
- After: In this we will disconnect the connection.
Step 3: Add Selenium Code
After that we will write the following code for the Unit testing with Selenium:
Java
import org.junit.After;
import org.junit.Before;
import org.junit.Test;
import org.openqa.selenium.By;
import org.openqa.selenium.JavascriptExecutor;
import org.openqa.selenium.WebDriver;
import org.openqa.selenium.WebElement;
import org.openqa.selenium.chrome.ChromeDriver;
import org.openqa.selenium.support.ui.WebDriverWait;

import java.time.Duration;
import java.time.temporal.TemporalAmount;

import static org.junit.Assert.*;

public class Selenium_Test {

    WebDriver driver;
    WebDriverWait wait;

    //This will be Executed before any Test runs in the Class
    @Before
    public void CreateConnection(){

          //Set the property for using the Chrome Webdriver.
          System.setProperty("webdriver.chrome.driver", "\\path\\chromedriver.exe");

        // Create a new instance of ChromeDriver
        driver = new ChromeDriver();

        // Navigate to the specified URL
        driver.get("https://auth.geeksforgeeks.org/?to=https://www.geeksforgeeks.org/");

        //wait Instance
        wait = new WebDriverWait(driver, Duration.ofSeconds(20));
    }

    //Actual Test Method
    //In this we will add Selenium Code
    @Test
    public void Assert() throws InterruptedException {
        WebElement userName = driver.findElement(By.id("luser"));

        //Sending the Keystrokes
        userName.sendKeys("email");

        //Initilisation JavascriptExecutor to change the style of elements.
        JavascriptExecutor j = (JavascriptExecutor) driver;

        //Using above object we are changing the color of 'luser' to transparent
        //Also we are applying textShadow.
        j.executeScript ("document.getElementById('luser').style.color='transparent';");
        j.executeScript ("document.getElementById('luser').style.textShadow='0 0 5px rgba(0,0,0,0.5)';");

        // Find the input element with the ID "password"
        WebElement password = driver.findElement(By.id("password"));

        //Sending the Keystrokes
        password.sendKeys("password");

        //Finding the Form using its id 'Login'
        WebElement form = driver.findElement(By.id("Login"));

        //Submitting the form using submit Function.
        form.submit();

        Thread.sleep(5000);

          //This will return the Road_Block which is shown after logged in and it will be bool.
        var isDisplayed = driver.findElement(By.id("modal_content")).isDisplayed();

          //If IsDisplayed is true then it pass the test else it will fail the test.
          assertTrue(isDisplayed);
    }

    //This will be Executed after any Test runs in the Class
    @After
    public void CloseConnection()
    {
        driver.quit();
    }
}
So, in above code we have:
- CreateConnection - We set the property of chrome driver location to use it afterwards. Also in that we are creating new instance of Chromedriver and then we are going to the location of our site.
- Assert - In this method we are writing the actual logic of the test.
- First we find the elements using Id by "luser" and "password".
- Then we sent the keys of our Email and Password
- Then submit the form using submit function
- We will wait for a while to process it so that we can run our next script.
- Then we checked that whether roadblock is loaded or not. If it is visible then test will be passed, otherwise it will fail.
- CloseConnection - In that we have successfully closed the connection.
Output
Conclusion
In Conclusion, by using two different frameworks we can achieve one of the tough work to automate the tests and achieve only the result rather than walking through whole execution. This will be used in early stage of development and frameworks like MVC where a single developer has been working on both part this would be very helpful.
Similar Reads
Selenium Webdriver submit() vs click()
When working with Selenium WebDriver for web automation, you often need to interact with web elements like forms and buttons. Two commonly used methods for triggering actions in Selenium are submit() and click(). Understanding the differences between submit() and click() is crucial for effective tes
5 min read
Run Selenium Tests with Gauge
Gauge is an open-source framework for test automation that is especially useful for Behavior Driven Development (BDD). It is characterized by its simplicity, scalability, and compatibility with other languages, such as Java, C#, and JavaScript. Gauge and Selenium work together to provide reliable, u
5 min read
Shadow DOM in Selenium WebDriver
The Shadow DOM lets developers create a hidden, isolated DOM inside an element. It encapsulates styles and scripts, preventing them from affecting the main page. This is mainly used in web components for better modularity and reusability. Shadow DOM is primarily used for the encapsulation. It provid
4 min read
Selenium with Java Tutorial
Deep dive into the powerful world of automated web testing and learn how to harness the capabilities of Selenium with Java, from setting up your environment to writing effective test scripts. Whether you're new to automated testing or looking to upscale your skills, this Selenium with Java tutorial
8 min read
Selenium WebDriver Event Listener
Testing Websites often includes testing multiple pages in the website. "Selenium" is one of the most popular test automated frameworks used to test multiple web pages provides numerous functionalities and enables the interaction between web pages. The name "Listeners" suggests that they can listen t
5 min read
Selenium WebDriver-Installation
Selenium WebDriver is a powerful tool for automating web applications for testing purposes. It allows developers and testers to write automated tests in various programming languages like Java, Python, C#, etc. Also, it supports different browsers like Firefox, Chrome, Edge, etc. for testing. Approa
2 min read
Applications and Uses of Selenium WebDriver
Selenium Webdriver is a powerful tool for controlling web browser through program. It is functional for all browsers, works on all major OS and its scripts are written in various languages i.e Python, Java, C#, etc. Selenium Webdriver is a primary automation tool used by developers all around the wo
3 min read
How to check if an element exists with Selenium WebDriver?
Selenium is one of the most popular tools for automating web applications. Selenium is not a single tool but rather a set of tools that helps QA testers and developers to automate web applications. It is widely used to automate user interactions on a web page like filling out web forms, clicking on
7 min read
Limitations of Selenium Webdriver
Selenium is a powerful tool for controlling web browser through program. It is functional for all browsers, works on all major OS and its scripts are written in various languages i.e Python, Java, C#, etc but it has some disadvantages and limitations such as it doesn't support Windows or Desktop app
2 min read
How to hide Firefox window (Selenium WebDriver)?
In situations where you might wish to execute tests without a visible browser window, while automating web tests with Selenium WebDriver; it is possible for one to run headless browsers for example which will help save resources and speed up the execution of these tests. This article will cover how
3 min read