How to MLA format in Google Docs: Step by Step Guide
Last Updated :
23 Sep, 2024
Mastering MLA format a Google Docs is a game-changer for students and researchers eager to streamline their academic documentation. When it comes to creating professional, compliant, and visually appealing scholarly papers, understanding how to expertly apply the Modern Language Association (MLA) guidelines within Google Docs can save you not only time but also a lot of stress. In this article you will learn the steps to ensure your documents adhere to these widely recognized formatting standards, enabling you to focus more on content quality and less on formatting intricacies. Get into the seamless integration of MLA formatting in Google Docs, simplifying your writing process and boosting your academic productivity.
 How to MLA format in Google Docs
MLA style, or MLA format is a set of guidelines developed by the Modern Language Association for writing research papers. It is widely used in humanities, especially in writing on language and literature. The most current MLA format, the 9th edition, emphasizes consistency and clarity in document formatting, including specifics such as font size, spacing, and citation style.
Google Docs offers a flexible and accessible platform for document creation with features that support MLA formatting seamlessly. Whether you're working on a school project or preparing a paper for publication, Google Docs enables real-time collaboration and easy-to-use formatting tools.
Here’s how to format your document according to MLA guidelines:
- Set one-inch margins on all sides of your document.
- Start every paragraph with a half-inch indentation.
- Use Times New Roman font in size 12 for all text.
- Indent quotations that are set off from the main text by one inch.
- Double-space throughout the entire document.
- Include your last name and page number in the top right corner of every page.
- At the top of the first page, list your full name, your instructor's name, the course name, and the due date.
- Center the title of the paper on the first page.
- End the document with a Works Cited page that lists all sources formatted according to MLA guidelines..
If you do not wish to use templates for your formatting then you can also do this. MLA formatting in Google Docs is possible without Templates also. However, this will be a little elaborate to do so.
Step 1: Open New Document
Open Google Docs on your computer or laptop. Open the new document or an already existing one where you want to apply MLA Formatting.
 Open New Document
Step 2: Select Font Type and Size
Choose your font type to be Times New Roman and then change the font size to 12 points.
 Select Font Type and Size
Click on the Insert tab and then select the option of headers and footers and then header.
 Insert> Headers and Footers> Header.
(Make sure the font is the same as selected earlier.)
Step 4: Select Alignment
Select right align and type your last name.
 Select Alignment
Step 5: Click on Page Numbers and Select desired Page
Then click Insert, page numbers, and add the one that displays.
 Click on Page Numbers and Select desired Page
Step 6: Set the margin
Then, go to file, page set up, and then set the margin to 1 inch or 2.54 cm.
 Set the margin
 Note: Usually, margins are set to 1 inch by default, but we recommend to check it once.
Step 7: Go to Line & Paragraph Spacing and Select Double
Click on-line spacing, a dropdown menu will appear, select double among the given options and also if there are spaces after paragraph then in the same dropdown also select remove space after paragraph.
.webp) Go to Line & Paragraph Spacing and Select Double
Go to Line & Paragraph Spacing and Select DoubleStep 8: Enter Details of the Report
On the MLA heading include your name, the professor's name, the course name, and the due date of the assignment all on separate lines. Press enter on the keyboard once, then write the tittle of the text.
Keep the text simple and classy, no need to use bold or italics or underline. Capitalize all words in the title except for small words like articles, prepositions, and conjunctions.
Step 9: Change Alignment and Indentation
Press enter on the keyboard, and then align the text to the left. Indent the sentences, by dragging the ruler on top of the document. After this drag the rectangle to half an inch or 1.27 cm.
.webp) Change Alignment and Indentation
Change Alignment and IndentationStep 10: Go to Insert, Click on Break and Select Page Break
Access the Insert Tab. A dropdown will appear. Click on break, and then select Page Break from the further displayed dropdown.
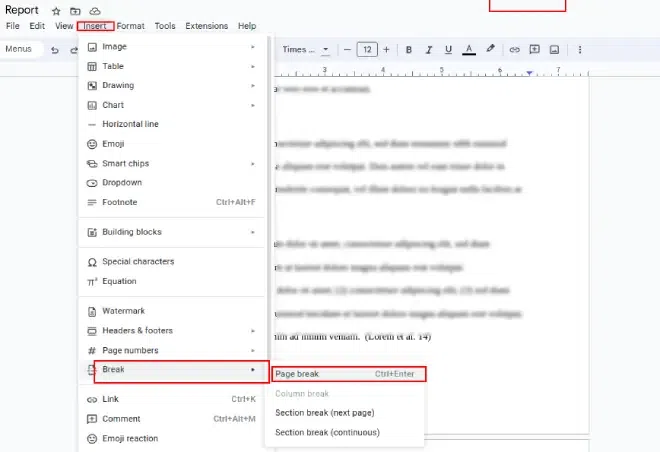 Go to Insert, Click on Break and Select Page Break
MLA formatting in Google Docs can be done by using the MLA template which is available in Google Docs itself. These templates are easy to use as the format is already designed. You just have to select the template of your choice and then can easily change the words of the template with your own words.
It is an easy method to write assignments in MLA format by just using the template.
Step 1: Open Google Docs
Open Google Docs on your browser and go to its home page by signing in.
.webp) Open Google Docs
Open Google Docs Step 2: Click on Template Gallery
After logging in the Google Docs, find the template gallery option shown in the top right corner and click on it.
 Click on Template Gallery
Step 3: Select Report Template
As you click on the template gallery, you will find lots of template options provided by Google. Select the Report MLA template from those and open it. Now the header will be available.
 Select Report Template
Type your last name beyond the page number. Replace the name, professor's name, subject name, and date on the template according to you.
 Type your the Last Name and Replace Other Information
 Step 5: Replace the Text
Replace the whole text on the template with your text.
.webp) Replace the Text
Replace the TextStep 6: Make Changes in Work Cited
As you scroll down, you will see the work cited section, change the sample text to the citation information for the sources that are used in the paper. It includes the author's last name, comma first name, and the medium of the paper.
 Make Changes in Work Cited
How Do You Cite in Google Docs
Citing sources in Google Docs is straightforward thanks to the built-in citation feature that helps you format your citations according to different styles, including MLA, APA, and Chicago. Here’s how to use it:
Citations should include the author's last name followed by a comma and the first name. If the author uses their first name in publications, include that as well. Additionally, the citation must specify the medium of the publication.
Step 1: Open your Google Docs
Go to Tools in the Top Menu and Click on Citations from the Options
 Tools>>Citations
Step 3: Click on Plus (+) icon to add Citation Source
Add a source by clicking on the “+ Add citation source” button.
 Click on Plus (+) icon to add Citation Source
Fill in the source information such as the author’s name, title of the source, container (like a book or journal), publication date, publisher, etc.
 Plus Icon >>Fill in the source information
Step 7: Insert the citation
Insert the citation into your document by clicking on the “Cite” button next to the source.
 Fill all the Required Information
Step 8: Google Docs will automatically create and insert a formatted in-text citation
Google Docs will automatically create and insert a formatted in-text citation in your document where your cursor is placed.
Step 9: Automatically generate a Works Cited or References page
Automatically generate a Works Cited or References page at the end of your document with all the sources you've cited.
Conclusion
MLA formatting is needed very often in our work reports and projects. It is a modern language to submit information and gather it in an organized manner and a unique way of formatting papers and creating citations. To get handy with this formatting is very useful in daily life and can save a lot of time making reports, thesis, and assignments easily.
It can be done with or without a template however, using a template makes it an easier assignment as it can be simply done by replacing the sample text with your text. It is a unique way of formatting papers and creating citations.
Similar Reads
How to Make a Gantt Chart in Google Docs: Step by Step Guide
Are you looking to enhance your project management skills and streamline your workflow? Creating Gantt charts in Google Docs is an excellent way to visualize project timelines, allocate resources effectively, and ensure everyone stays on track. Gantt charts are powerful tools that allow teams to see
5 min read
How to Make a Timeline in Google Docs: Step by Step Guide
Creating a timeline in Google Docs is an excellent way to organize and visually present events, tasks, or milestones over time. Whether you're planning a project, documenting a series of historical events, or outlining a business strategy, a timeline can simplify complex information and make it easi
5 min read
How to Add Bullet List in Google Docs (Step-by-Step Guide)
Using bullet lists in Google Docs is an effective way to organize information and present content in a clean and structured format. Whether you're creating notes, drafting documents, or preparing presentations, bullet lists can make your content more readable and impactful. Adding these lists in Goo
8 min read
How to Name Versions in Google Docs: A Step-by-Step Guide
Keeping track of revisions in collaborative projects can be challenging without proper organization. Google Docs offers a helpful version control feature that allows you to name versions of your document for better identification. Assigning clear and descriptive names to versions makes it easier to
6 min read
How to use Bookmark in Google Docs: Step by Step Guide
Bookmarks in Google Docs are a helpful way to quickly navigate through long documents or reference specific sections of your work. Whether you’re writing a report, an essay, or any other long document, using bookmarks allows for smoother navigation, saving time and improving the overall reading expe
6 min read
How to Create an Outline in Google Docs: A Step-by-Step Guide
Outlines in Google Docs - Quick Steps to CreateOpen Google Docs >> Choose a DocumentSelect Text for Heading >> Apply Heading StyleClick on the View tab >> Select Add Outline Outline Added Creating an outline in Google Docs is a great way to organize your content, improve readabilit
9 min read
How to Add Code Block in Google Docs: Step by Step Guide
When you're writing technical documents, tutorials, or sharing code snippets in Google Docs, presenting your code clearly is key to helping your readers understand it. While Google Docs doesn't have a dedicated feature for adding code blocks, there are several easy methods you can use to format your
5 min read
How to Insert a Checkbox in Google Docs: A Step-by-Step Guide
Check box Google Docs - Quick StepsOpen Google Docs >> Select the textGo to “Format†>> Select “Bullets & numbering.Click on “Checklist†>> Checkboxes will appear Select a checkbox >> Mark it as checked or unchecked as neededAdding checkboxes in Google Docs is an easy way
10 min read
How to Change Page Orientation in Google Docs: Step-by-Step Guide
Want to adjust your document's layout in Google Docs? Whether you're working on a project that requires wider tables, larger images, or a creative design, changing the page orientation from portrait to landscape mode is easy. In this article, you will learn how to change page orientation in Google D
6 min read
How to Use the Approve Function in Google Docs – A Step-by-Step Guide
Efficient collaboration often requires a clear and structured process for reviewing and finalizing documents. Google Docs offers an Approve Function, a handy feature that simplifies the approval process in Google Docs for teams. This function allows approvers to review and approve or reject changes,
8 min read