
Python Image Editor Using Python
You can create a simple image editor using Python by using libraries like Pillow(PIL) which will provide a wide range of image-processing capabilities. In this article, we will learn How to create a simple image editor that can perform various operations like opening an image, resizing it, blurring the image, flipping and rotating the image, and so on.
Prerequisites -
Before getting started, You need to install the latest version of Python. Refer to this article to install Python
After the successful installation of Python, We need to install some Python libraries: Pillow - Image processing, Tkinter - Graphical User Interface. To install these libraries you need to run this command in the terminal.
pip install pillow
pip install Tkinter
By combining these two libraries, we are going to create an image editor that provides a graphical interface for users to easily enhance and manipulate their images.
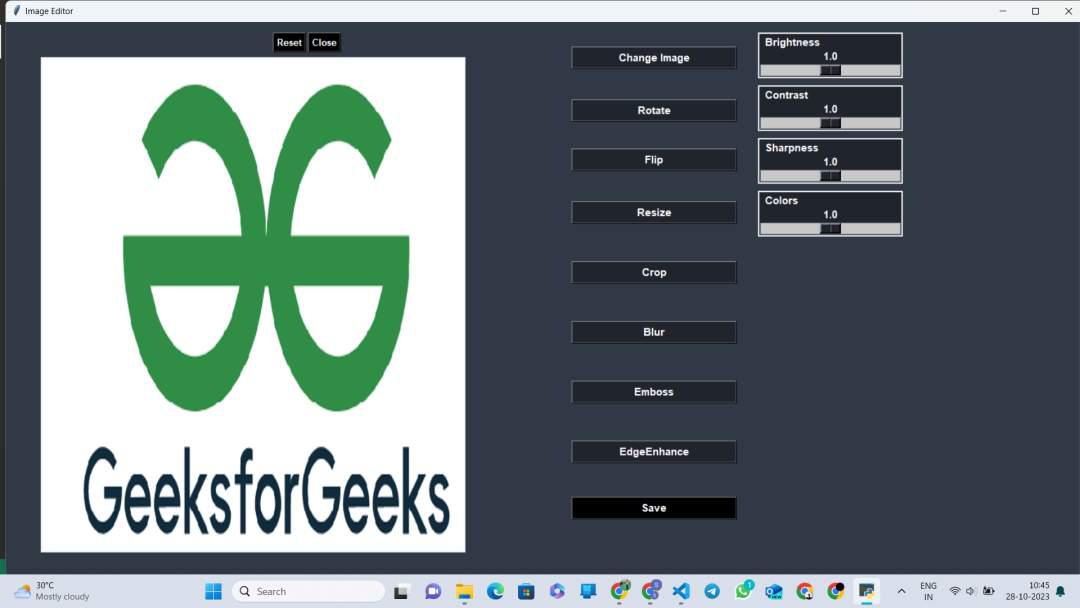
By the end of the completion of our image editor, we will get a user interface as shown below:
Getting Started
Below code describes how to upload image and creating buttons like Reset, close, Rotate, flip, Resize, Crop, Blur, Emboss, Edge Enhance , save to edit images.
#importing the required modules
from tkinter import *      # importing the tkinter module
from tkinter import ttk
# importing the PIL i.e pillow module
from PIL import ImageTK, Image, ImageEnhance, ImageFilter
from tkinter import filedialog
import os

# Calling the TK
mains = Tk()

# creating a string of 215 space characters
space = (" ")*215

# It retrieves the screen width of the user's display
screen_width = mains.winfo_screenwidth()

# It retrieves the screen height of the user's display
screen_height = mains.winfo_screenheight()

#Using an f-string to construct the window size in the
#format width x height
mains.geometry(f"{screen_width}x{screen_height}")

#setting the title for the window
mains.title(f"{space}Image Editor")

#setting the background color of the window
mains.configure(bg = '#323946')

#Creating Default image
img = Image.open("logo.png")
# "logo.png" image will be available after this code
# To run this code, this image must be saved in your PC's or you should change
# the "logo.png" to your image name in this code.

#resizing the image to 600 x 700
img = img.resize((600,700))

#creating the label widget
panel = Label(mains)
panel.grid(row = 0, column = 0, rowspan = 12, padx = 50, pady = 50)

#calling a function named 'displayimage' with
#an argument 'img'
displayimage(img)

#brightnessSlider stores the scale widget
#Inside the widget,
#sets the label next to the slider
#from_ = 0, to = 2 specifies the brightness range
#length determines the length of the slider
brightnessSlider = Scale(mains, label = "Brightness", from_ = 0, to = 2, orient = HORIZONTAL,
                         length = 200, resolution = 0.1, command = brightness_callback, bg = '#1f242d')
#initially, brightness position set to 1
brightnessSlider.set(1)

#setting the font style, font size, weight
brightnessSlider.configure(font=('poppins',11,'bold'),foreground='white')
brightnessSlider.place(x=1070,y=15)

#contrastSlider stores the scale widget
#Inside the widget,
#sets the label next to the slider
#from_ = 0, to = 2 specifies the contrast range
#length determines the length of the slider
contrastSlider = Scale(mains, label="Contrast", from_=0, to=2, orient=HORIZONTAL, length=200,
                       command=contrast_callback, resolution=0.1, bg="#1f242d")
#initially, contrast position set to 1
contrastSlider.set(1)
#setting the font style, font size, weight
contrastSlider.configure(font=('poppins',11,'bold'),foreground='white')
contrastSlider.place(x=1070,y=90)

#sets the label next to the slider
#from_ = 0, to = 2 specifies the sharpness range
#length determines the length of the slider
sharpnessSlider = Scale(mains, label="Sharpness", from_=0, to=2, orient=HORIZONTAL, length=200,
                        command=sharpen_callback, resolution=0.1, bg="#1f242d")
#initially, sharpness position set to 1
sharpnessSlider.set(1)
#setting the font style, font size, weight
sharpnessSlider.configure(font=('poppins',11,'bold'),foreground='white')
sharpnessSlider.place(x=1070,y=165)

#colorSlider stores the scale widget
#Inside the widget,
#sets the label next to the slider
#from_ = 0, to = 2 specifies the color range
#length determines the length of the slider
colorSlider = Scale(mains, label="Colors", from_=0, to=2, orient=HORIZONTAL, length=200,
                    command=color_callback, resolution=0.1, bg="#1f242d")
#initially, color position set to 1
colorSlider.set(1)
#setting the font style, font size, weight
colorSlider.configure(font=('poppins',11,'bold'),foreground='white')
colorSlider.place(x=1070,y=240)

#rotate button
#btnrotate stores the Button widget for rotating an image
#Inside the widget,
#setting the text displayed on the button
#setting the width of the button
#adding the command that indicates the rotate function
#will be executed when the button is clicked
btnRotate = Button(mains, text='Rotate', width=25, command=rotate, bg="#1f242d")
btnRotate.configure(font=('poppins',11,'bold'),foreground='white')
btnRotate.place(x=805,y=110)

#reset button
#reset_button stores the Button widget for reseting the image

reset_button=Button(mains,text="Reset",command=reset,bg="black",activebackground="ORANGE")
reset_button.configure(font=('poppins',10,'bold'),foreground='white')
reset_button.place(x=380,y=15)

#Image changing button
#btnchaImg stores the Button widget for changing the image

btnChaImg = Button(mains, text='Change Image', width=25,command=ChangeImg,bg="#1f242d",activebackground="ORANGE")
btnChaImg.configure(font=('poppins',11,'bold'),foreground='white')
btnChaImg.place(x=805,y=35)

#flip button
#btnFlip stores the Button widget to flip the image
#Inside the widget,
btnFlip = Button(mains, text='Flip', width=25, command=flip, bg="#1f242d")
btnFlip.configure(font=('poppins',11,'bold'),foreground='white')
btnFlip.place(x=805,y=180)
#setting the width of the button
#adding the command that indicates the resize function
#will be executed when the button is clicked
btnResize = Button(mains, text='Resize', width=25, command=resize, bg="#1f242d")
btnResize.configure(font=('poppins',11,'bold'),foreground='white')
btnResize.place(x=805,y=255)

#Crop button
#btnCrop stores the Button widget to crop the image
#Inside the widget,
#setting the text displayed on the button
#setting the width of the button
#adding the command that indicates the crop function
#will be executed when the button is clicked
btnCrop = Button(mains, text='Crop', width=25, command=crop, bg="#1f242d")
btnCrop.configure(font=('poppins',11,'bold'),foreground='white')
btnCrop.place(x=805,y=340)

#Blur button
#btnBlur stores the Button widget to blur the image
#Inside the widget,
#setting the text displayed on the button
#setting the width of the button
#adding the command that indicates the blurr function
#will be executed when the button is clicked
btnBlur = Button(mains, text='Blur', width=25, command=blurr, bg="#1f242d")
btnBlur.configure(font=('poppins',11,'bold'),foreground='white')
btnBlur.place(x=805,y=425)

#Emboss button
#btnEmboss stores the Button widget for Embossing an image
#Inside the widget,
#setting the text displayed on the button
#setting the width of the button
#adding the command that indicates the emboss function
#will be executed when the button is clicked
btnEmboss = Button(mains, text='Emboss', width=25, command=emboss, bg="#1f242d")
btnEmboss.configure(font=('poppins',11,'bold'),foreground='white')
btnEmboss.place(x=805,y=510)

#Edge Enhance button
#btnEdgeEnhance stores the Button widget for enhancing an image
#Inside the widget,
#setting the text displayed on the button
#setting the width of the button
#adding the command that indicates the edgenhance function
#will be executed when the button is clicked
btnEdgeEnhance = Button(mains, text='EdgeEnhance', width=25, command=edgeEnhance, bg="#1f242d")
btnEdgeEnhance.configure(font=('poppins',11,'bold'),foreground='white')
btnEdgeEnhance.place(x=805,y=595)
btnSave = Button(mains, text='Save', width=25, command=save, bg="black")
btnSave.configure(font=('poppins',11,'bold'),foreground='white')
btnSave.place(x=805,y=675)
#adding the command that indicates the close function
#will be executed when the button is clicked
btnClose = Button(mains, text='Close', command=close, bg="black",activebackground="ORANGE")
btnClose.configure(font=('poppins',10,'bold'),foreground='white')
btnClose.place(x=430,y=15)

mains.mainloop()
Resources Used:
Below code describes the actions that are performed on image when we click the buttons in image editor.
# function to display this image
# it convberts a pillow image into a format
# that Tkinter can display
# and updating the panel widget to show this image
def displayimage(img):
    dispimage = ImageTk.PhotoImage(img)
    panel.configure(image=dispimage)
    panel.image = dispimage

#this function adjusts the brightness of an image
#based on the brightness_pos value from a slider
#uses the pillow library to enhance the image brightness
#and updates outputImage
def brightness_callback(brightness_pos):
    brightness_pos = float(brightness_pos)
    global outputImage
    enhancer = ImageEnhance.Brightness(img)
    outputImage = enhancer.enhance(brightness_pos)
    displayimage(outputImage)


# This function modifies an image's contrast
# based on the contrast_pos value from a slider
# and updates the output image
def contrast_callback(contrast_pos):
    contrast_pos = float(contrast_pos)
    global outputImage
    enhancer = ImageEnhance.Contrast(img)
    outputImage = enhancer.enhance(contrast_pos)
    displayimage(outputImage)


#This function adjusts the sharpness of an image
#based on the sharpness_pos vale from the slider
#and updates the outputImage
def sharpen_callback(sharpness_pos):
    sharpness_pos = float(sharpness_pos)
    global outputImage
    enhancer = ImageEnhance.Sharpness(img)
    outputImage = enhancer.enhance(sharpness_pos)
    displayimage(outputImage)


# This function modifies the color intensity of an image
# based on value from the slider
# and updates the outputImage
def color_callback(Color_pos):
    Color_pos = float(Color_pos)
    global outputImage
    enhancer = ImageEnhance.Color(img)
    outputImage = enhancer.enhance(Color_pos)
    displayimage(outputImage)


# This function rotates the image by 90 degrees clockwise
# updates the img variable
#displays the image using the 'displayimage' function
def rotate():
    global img
    img = img.rotate(90)
    displayimage(img)


# this function flips the image
# horizontally from left to right
# updates the img variable
#displays the image using the 'displayimage' function
def flip():
    global img
    img = img.transpose((Image.FLIP_LEFT_RIGHT))
    displayimage(img)


# This function applies a blur filter to the image
# updates the img variable
#displays the image using the 'displayimage' function
def blurr():
    global img
    img = img.filter(ImageFilter.BLUR)
    displayimage(img)


# this function applies a emboss filter to the image
# updates the img variable
#displays the image using the 'displayimage' function
def emboss():
    global img
    img = img.filter(ImageFilter.EMBOSS)
    displayimage(img)

# this function enhances the edges of the image using a filter
# updates the img variable
#displays the image using the 'displayimage' function
def edgeEnhance():
    global img
    img = img.filter(ImageFilter.FIND_EDGES)
    displayimage(img)

# This function resizes the image to 200 x 300
# updates the img variable
#displays the image using the 'displayimage' function
def resize():
    global img
    img = img.resize((200, 300))
    displayimage(img)


# this function extracts the portion of the image from
# coordinates (100,100) to (400,400)
# updates the img variable
#displays the image using the 'displayimage' function
def crop():
    global img
    img = img.crop((100, 100, 400, 400))
    displayimage(img)

# this function closes the current tkinter window
def reset():
    mains.destroy()
    os.popen("main.py")

# this function allows user to change the image
# if an image is selected, it's opened, resized to 600x600
# updates the img variable
#displays the image using the 'displayimage' function
def ChangeImg():
    global img
    imgname = filedialog.askopenfilename(title="Change Image")
    if imgname:
        img = Image.open(imgname)
        img = img.resize((600, 600))
        displayimage(img)


# this function allows user to save the currently displayed image
# the outputImage is then saved to the selected file.
def save():
    global img
    savefile = filedialog.asksaveasfile(defaultextension=".png")
    outputImage.save(savefile)

#this function is to close the main tkinter window.
def close():
    mains.destroy()

