Ruby and Rails is a powerful web software framework that simplifies database control and interactions. right database setup is crucial for any Rails utility, as it guarantees efficient information garage and retrieval. This guide will walk you through putting in databases on your Rails application, specializing in famous databases like MySQL and PostgreSQL. whether you’re beginning a brand new undertaking or configuring a present one, knowledge of the database setup technique in Rails is crucial for building strong and scalable programs.
Table of Content
- Database Setup for MySQL
- Step1: Installing MySQL
- Step2: Creating a MySQL Database
- Step3: Configuring Rails to Use MySQL
- Step 4: Installing the MySQL Gem
- Step 5: Running Migrations
- Step 6: Database Setup for PostgreSQL
- Step 7: Creating a PostgreSQL Database
- Step 8: Configuring Rails to Use PostgreSQL
- Step 9: Installing the PostgreSQL Gem
- Step 10: Running Migrations
- Key Terminologies
- Conclusion
- FAQs
Database Setup for MySQL
Step1: Installing MySQL
Before setting up MySQL with Rails, you would need to have MySQL installed on your system. Here is how to install it:
On macOS: Use Homebrew to install MySQL.
brew install mysql

On Ubuntu: Install MySQL using APT.
sudo apt-get install mysql-server
After installation, start the MySQL service:
brew services start mysql

Step2: Creating a MySQL Database
Create a Database for Your Rails Application, you can refer: How to Connect MySQL with Ruby on Rails?
To create a database for your Rails application, log in to the MySQL console and fire up the following commands:
mysql -u root -p

//sql
CREATE DATABASE my_rails_app_development;
CREATE DATABASE my_rails_app_test;
CREATE DATABASE my_rails_app_production;

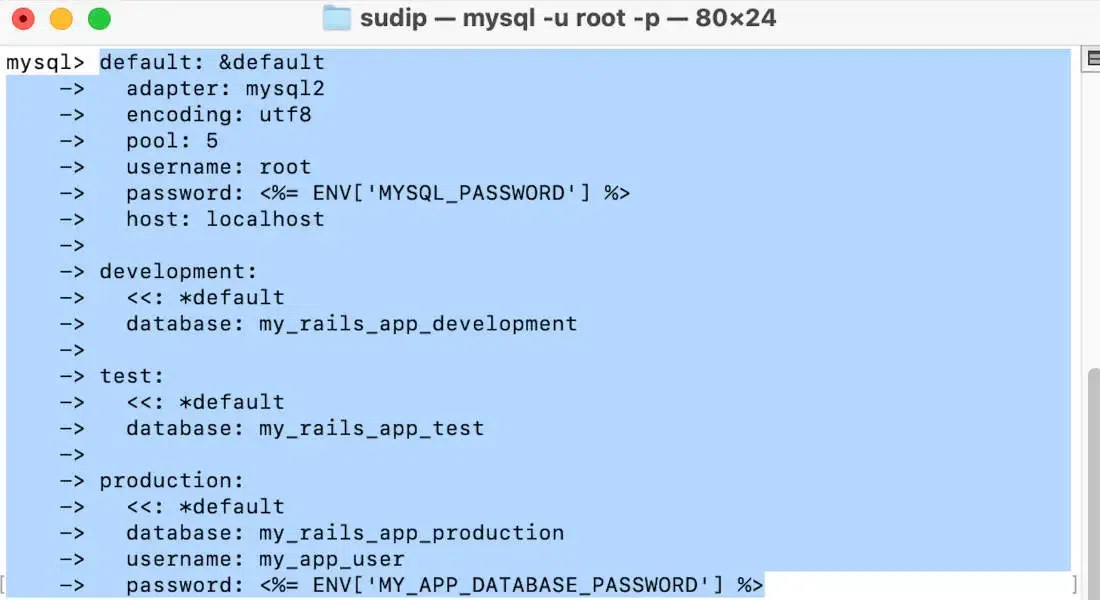
Step3: Configuring Rails to Use MySQL
Setup your application to use the MySQL database by editing config/database.yml:
//yaml
default: &default
adapter: mysql2
encoding: utf8
pool: 5
username: root
password: <%= ENV['MYSQL_PASSWORD'] %>
host: localhost
development:
<<: *default
database: my_rails_app_development
test:
<<: *default
database: my_rails_app_test
production:
<<: *default
database: my_rails_app_production
username: my_app_user
password: <%= ENV['MY_APP_DATABASE_PASSWORD'] %>
Write this SQL command to see Databases.
SHOW DATABASES;

Step 4: Installing the MySQL Gem
Add the mysql2 gem to your Gemfile to enable Rails to communicate with MySQL:
gem 'mysql2'

Then, run bundle install to install the gem.
bundle install

Step 5: Running Migrations
Finally, create the database and run the migrations to set up the database schema:
rails db:create
rails db:migrate

Alt tag: Terminal showing the process of creating and migrating PostgreSQL databases.
Step 6: Database Setup for PostgreSQL
To use PostgreSQL with Rails, you first need to install it On macOS: Do an installing of PostgreSQL via Homebrew.
brew install postgresql

Start the PostgreSQL service:
brew services start postgresql@14

Step 7: Creating a PostgreSQL Database
Log in to the PostgreSQL console and create a new database:
psql -d postgres

//sql CREATE DATABASE my_rails_app_development; CREATE DATABASE my_rails_app_test; CREATE DATABASE my_rails_app_production; CREATE USER my_app_user WITH PASSWORD 'password'; GRANT ALL PRIVILEGES ON DATABASE my_rails_app_development TO my_app_user; GRANT ALL PRIVILEGES ON DATABASE my_rails_app_test TO my_app_user; GRANT ALL PRIVILEGES ON DATABASE my_rails_app_production TO my_app_user;

Step 8: Configuring Rails to Use PostgreSQL
Next, configure your Rails software to connect to the PostgreSQL database with the aid of editing the config/database.yml document:
//yaml default: &default adapter: postgresql encoding: unicode pool: 5 username: my_app_user password: <%= ENV['PG_PASSWORD'] %> host: localhost development: <<: *default database: my_rails_app_development test: <<: *default database: my_rails_app_test production: <<: *default database: my_rails_app_production username: my_app_user password: <%= ENV['MY_APP_DATABASE_PASSWORD'] %>

Exit 'psql':
\q
Step 9: Installing the PostgreSQL Gem
Add the pg gem to your Gemfile to allow Rails to work with PostgreSQL:
gem 'pg'

Run bundle install to install the gem.
bundle install
Step 10: Running Migrations
Create the database structure by running the following commands:
rails db:create
rails db:migrate
Key Terminologies
Here’s a breakdown of the key terms used in the database setup:
- adapter: Specifies which database engine Rails should use. For MySQL, the adapter is mysql2, and for PostgreSQL, it’s postgresql.
- encoding: Defines the character encoding used by the database. UTF-8 (utf8 or unicode) is commonly used to support various languages and special characters.
- pool: Determines the number of database connections Rails can maintain in a pool. This is useful for handling multiple simultaneous requests.
- username and password: These fields specify the database user's credentials that Rails will use to connect to the database. It’s a best practice to store these in environment variables.
- host: The host specifies the server where the database is located. Typically, it’s set to localhost for local development environments.
- database.yml: this is the configuration report in which Rails shops database settings for distinct environments (improvement, test, and manufacturing).
- package deal install: A command that installs all the gem stones indexed for your Gemfile, which include the database adapter gemstones.
- rails db: This command creates the databases laid out in your database.yml document.
Conclusion
In conclusion, we covered the essential steps for setting up a database in Ruby on Rails. From configuring your database to creating and managing migrations, you now have a solid foundation for integrating Active Record into your applications. Understanding relationships and best practices for database management will help ensure your app is efficient and maintainable. With this knowledge, you're well-equipped to build powerful web applications using Ruby on Rails.