Tables in MS Word are arrangements of data in rows and columns that help present text, numbers, or images in a clear and professional way. They can be created, modified, and customized with features like layout changes, merging or splitting cells, applying styles, inserting images, converting text to tables, and performing calculations.
Tables in MS Word can be created in the following two ways:
- Using the Grid
- Using Table Dialogue Box
Using the Grid
The following are the steps of creating a table using the grid provided in MS Word:
Step 1: Go to the Insert tab and click on the Table button.

Step 2: In the dropdown menu, select the number of rows and columns from the Grid.

Using Table Dialogue Box
Following are the steps of creating a table using Table Dialogue Box in MS Word:
Step 1: Go to the Insert tab and click on the Table button.
Step 2: Under the grid, you will see an Insert Table button. Click on it.
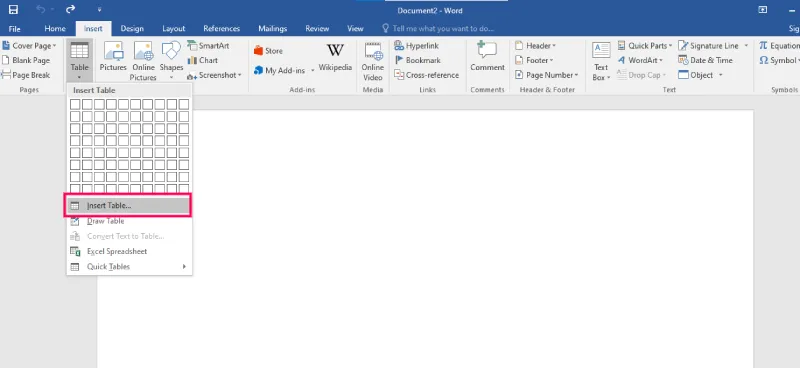
Step 3: In the Insert Table Dialogue box, mention the number of rows and number of columns as per the requirement and click on OK button.

How to Modify a Table?
We can also edit/modify a table to make it more creative. Multiple operations can be performed on a table like changing the layout, splitting of cells, merging the cells, applying borders, etc. Here, we will see some of the operations performed on a table in MS Word.
Changing Layout of a Table
Changing the layout of a table can be done with the help of the following steps:
Step 1: Select the table for which the layout is to be changed. Go to the design tab.
Step 2: Click on the dropdown menu to get various different types of layouts for your table.
Step 3: Select any layout as per the need.

Splitting the Cell
Splitting of a cell can be done with the help of the following steps:
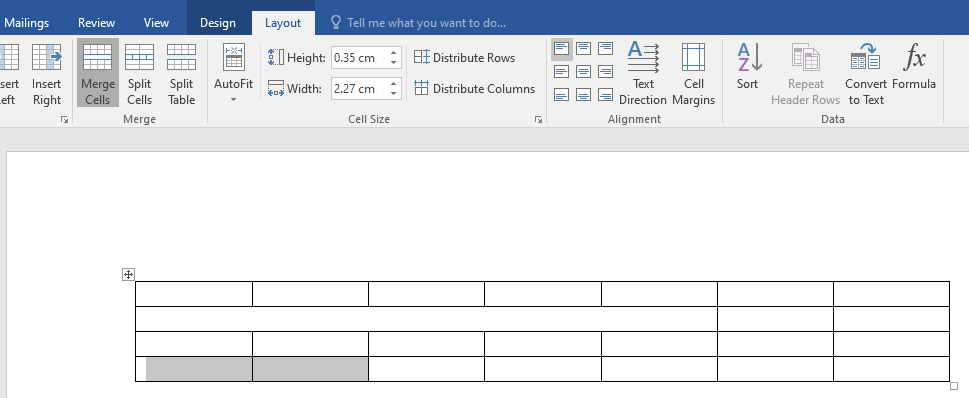
Step 1: Select the cell that you want to split into multiple cells. Then go to the Layout tab and click on the Split Cells button.

Step 2: In the dialogue box, mention the new dimensions as per the requirement.

Step 3: Click on the Ok button.
Merging the Cells
Merging of various cells can be done by the following steps:
Step 1: Select all the cells that are to be merged into a single cell. Then go over the layout tab, and you will see a Merge Cell button.
Step 2: Now click on the Merge Cell button and the selected cells will be merged.
Applying Borders and Styles on a Table
Borders and styles can also be applied to a table in a similar way as the layout of a table is changed. Go through the following steps to do the same:
Step 1: Select the entire table and go over the design tab.
Step 2: Select the style that you want to apply to your table.
Converting Text to a Table
MS Word allows the conversion of existing text into a table with the help of the following steps:
Step 1: Select the text that is to be converted into the table. Now go to the Insert Tab and you will see a Table button.

Step 2: Click on the Insert Table button and in the drop-down menu, click on the Convert Text to Table button.

Step 3: In the dialogue box, mention the dimensions of the required table and other data that is required.

Step 4: Click on the OK button and the selected text will be converted to a Table.

Inserting Images in a Table
MS Word allows adding images inside the table cells. To insert an image in a table, go through the following steps:
Step 1: Select the cell in which you want to add the Image. Go to the Insert tab and select the Pictures button.

Step 2: You can either choose a picture from your device or select one online.
Step 3: Choose a picture from the browser window and click on the Insert button.
Step 4: Selected Image will be added in the cell selected.

Mathematical calculations can also be performed on the values present in the table. Microsoft provides various formulas to perform these operations. By default, the sum of the values lying in the rows to the left or column lying above are calculated by Word. Following are the steps to do the same:
Step 1: Select the cell in which the result of the mathematical operations is required.
Step 2: Now go to the Layout tab and select the formula button.

Step 3: In the dialogue box, define the formula for the mathematical operation, the default formula is the sum of the values to the left or above.
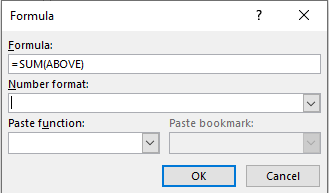
Step 4: After defining the formula, click on the OK button to apply the formula on the cells given in the formula.
