EC2 builder is a tool provided by AWS cloud providers to create, customize, manage, and distribute EC2 images(AMIs). This is like a one-stop shop for everything you want to do using AWS AMIs. In this article, we will see how to create an EC2 Build pipeline and how to create an AMI using it.
AMI stands for Amazon Machin Image. According to AWS's official documentation,
An Amazon Machine Image (AMI) is an image provided by AWS that provides the information required to launch an instance. You must specify an AMI when you launch an instance. You can launch multiple instances from a single AMI when you require multiple instances with the same configuration. You can use different AMIs to launch instances when you require instances with different configurations.
An AMI contains all the information necessary to launch an instance, such as:
- The root volume's operating system and application software.
- Launch permissions to control which AWS accounts can use the AMI to launch instances.
- Block device mapping to specify the volumes to attach to the instance when it's launched.
An AMI helps with the following:
- Launch instances with the same configuration.
- Scale instances up or down based on the load.
- Quickly deploy applications without needing to configure them from scratch.
So in simple words, let's say we have an EC2 server on AWS(which you have created manually or using AWS public image) and you can take a snapshot of its state like OS, hardware (storage) type as listed above. Store this snapshot and then use this to turn up more servers that are exactly like your first server. You have an additional option to edit this configuration for the new servers during their creation.
Amazon provides several types of AMIs, including:
- Public AMIs: Provided by AWS and the community.
- Paid AMIs: Provided by third-party vendors and typically include software that is licensed for use.
- Private AMIs: Created by users like us for their own use.
AMIs save a lot of time the user spends manually configuring all these specifications for each server.
2. Prerequisite:
We assume that you already have an AWS account. If not, go ahead and create an account from here: https://aws.amazon.com/console/
- Basic familiarity with AWS EC2 instances, and their management, IAM roles
- If you are a student or someone using your personal AWS account, you might want to add budget and alerts for your consumption and free-tier limits
3. Step-By-Step Guide to Use EC2 Image Builder
Step 1: Log in to the AWS console.
Step 2: Navigate to the EC2 home page. Then you will be able to see the available services under EC2, under the Images section in the side navigation bar, you will be able to see the text AMIs as shown below. Click on it.

Step 3: You will be redirected to the view where the available images are displayed by default and then on the top you will see an option called EC2 Image Builder, you can refer the below image for reference

Login > EC2 Home page > Images (sidenav menu) > EC2 Image Builder
Now you will be re-directed to the EC2 Image Builder home screen.
This screen provides lot of information about how EC2 Image builder pipeline works on an overall level, some usecases that we might be interested. Please feel free to give it a read before clicking on Create image pipeline.
To proceed further we need an IAM(Identity and Access Management) role with access to EC2 and Image building services. You can duplicate the tab or open a new tab, navigate to AWS console and follow along.
Step 4: Create an IAM Role
You can type IAM in the top left search bar available in the AWS console. Click on IAM and then you will be re-directed to IAM dashboard. Then you need to click on Roles in the left side navigation bar under Access Management.
Then you will see Roles Dashboard as shown below:
 Roles home page
Click on Create Role, then you will see the below view.

Role creation is done in 3 stages as shown
- Entity details: There are a few options here for different use cases, we will go with the first one which is AWS service, this allows access to AWS services like EC2, Lambda, or others to perform actions in this account.
- Add Permissions: Here under Use case select EC2. Click on next to select the permissions. Select EC2FullAcess and AmazonSSMFullAccess here as shown.

Click on Next and enter the remaining details as shown in the below image

3. click on Create Role, then GFGIAMForEC2ImageBuilder role is created.

Step 5: Now we resume to EC2 Image Builder screen. We will chose the public AMI provided by AWS market place in our EC2 Builder pipeline flow. As discussed in Step 3, when you click on Create image pipeline, you will see the below view, where you can enter pipeline line and configure how you want to run the pipeline.

Enter the pipeline name as GFGImagePipeline, you can paste the same in the description too, if you scroll down a little you will see Build schedule. Select Manual for now as we are going to run it manually. We can choose to run it at regular intervals, or run at some point in the future once. But for now, lets go with Manual. Click on Next.
Now, we need to choose a recipe. Select Create new recipe. One good thing about cloud providers like this is we can get basic understanding of each service during their creation itself. If you observe in this view, you see the definition for the recipe which is "An image recipe is a document that defines the components to be applied to the base images to create the desired configuration for the output image". So pay close attention to the views when you are on the console.
Select Image Type as AMI, Amazon Machine Image. You can experiment with Docker Image too, but that's topic for some other day.
Now, if you scroll down a little you will see a section called General, under this you need to type your recipe name, enter GFGImageRecipe and version as 1.0.0. Scoll down a little bit further, under Base Image choose select managed images, and select Amzon Linux 2 x86 as the operating system.
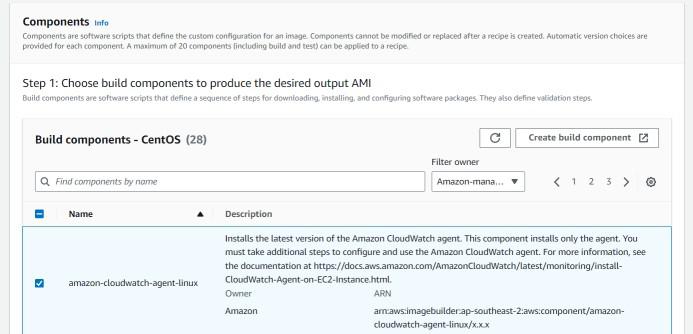
Now if you scroll down further you will see the Components section, here you can select any additional tools or services you want, refer the above image for details. All the selected components will be visible at one place if you scroll down more.
Don't forget to add anything required here as recipe once created can't be edited. We need to create a new recipe if any changes are needed.
I have selected the following two.

I selected the following for test component to test the image boot status. This step is completely optional but its good to have this checked.

Leave the other values of storage as it is and click on Next, followed by Default workflows also, click Next.

Step 6: Now we need to configure the infrastructure, means VPC(Virtual Private Cloud). Enter the name of the VPC as GFGConfigVPC and select the IAM role we created in step 4 here.

Now select the instant type as t2.micro and then click Next. The next two steps are also optional, then click on Create pipeline.
It might take a while, but once the pipeline is created, you can see it in the EC2 Image Builder > Image pipelines.
4. Run Pipeline

You can select the pipeline that we just created and click on Actions, choose Run Pipeline. It might take more than 15 mins for this action's completion. You can click on the pipeline name and get more details like the status of the pipeline, you will see the status as building or pending initially.
If you navigate to EC2 dashboard, you will be able to see an EC2 instance that got created by the image pipeline we just created above.

After roughly around 15 mins, the pipeline state changed to testing, at this point you will be able to see the below two instances, one for the actual image which gets terminated and the other one for testing.

Now after roughly about 10 mins, the pipeline status changed to distributing, and the Test Instance status will be changed to Terminated.
Now the final part where we check if our image that we created through pipeline is available or not. Navigate to EC2 home page and click on Launch Instances, you will see the below option once you click on My AMIs.

if you are able to see this, Congratulations! you have successfully created an AMI using EC2 Image Builder.
The same recipe can be used to create more pipelines, and this image can be used to create as many EC2 instances as required, rather than we manually creat images, we can run this pipeline and a new image will be created for us whenever needed, we can edit this pipeline as and when we want.
6. Pricing
Using EC2 Image Builder to create custom AMIs is free of charge, however the following are not.
- Launching an EC2 instance, storing logs on Amazon S3
- Storing Amazon EBS Snapshots for your AMIs, storing container images in Amazon ECR
- Pushing and pulling container images into and out of Amazon ECR and few others.
visit the official website for more up to date and accurate details as these values tend to change over time
7. Conclusion
EC2 Image Builder is an amazing tool, even though it is free to use, but still it incurs costs for other services that are being used as part of the pipeline. So, analyse your use cases and plan your pipeline stages accordingly.
Similar Reads
Non-linear Components In electrical circuits, Non-linear Components are electronic devices that need an external power source to operate actively. Non-Linear Components are those that are changed with respect to the voltage and current. Elements that do not follow ohm's law are called Non-linear Components. Non-linear Co
11 min read
Spring Boot Tutorial Spring Boot is a Java framework that makes it easier to create and run Java applications. It simplifies the configuration and setup process, allowing developers to focus more on writing code for their applications. This Spring Boot Tutorial is a comprehensive guide that covers both basic and advance
10 min read
Class Diagram | Unified Modeling Language (UML) A UML class diagram is a visual tool that represents the structure of a system by showing its classes, attributes, methods, and the relationships between them. It helps everyone involved in a project—like developers and designers—understand how the system is organized and how its components interact
12 min read
Python Variables In Python, variables are used to store data that can be referenced and manipulated during program execution. A variable is essentially a name that is assigned to a value. Unlike many other programming languages, Python variables do not require explicit declaration of type. The type of the variable i
6 min read
Spring Boot Interview Questions and Answers Spring Boot is a Java-based framework used to develop stand-alone, production-ready applications with minimal configuration. Introduced by Pivotal in 2014, it simplifies the development of Spring applications by offering embedded servers, auto-configuration, and fast startup. Many top companies, inc
15+ min read
Backpropagation in Neural Network Back Propagation is also known as "Backward Propagation of Errors" is a method used to train neural network . Its goal is to reduce the difference between the model’s predicted output and the actual output by adjusting the weights and biases in the network.It works iteratively to adjust weights and
9 min read
Polymorphism in Java Polymorphism in Java is one of the core concepts in object-oriented programming (OOP) that allows objects to behave differently based on their specific class type. The word polymorphism means having many forms, and it comes from the Greek words poly (many) and morph (forms), this means one entity ca
7 min read
CTE in SQL In SQL, a Common Table Expression (CTE) is an essential tool for simplifying complex queries and making them more readable. By defining temporary result sets that can be referenced multiple times, a CTE in SQL allows developers to break down complicated logic into manageable parts. CTEs help with hi
6 min read
What is an Operating System? An Operating System is a System software that manages all the resources of the computing device. Acts as an interface between the software and different parts of the computer or the computer hardware. Manages the overall resources and operations of the computer. Controls and monitors the execution o
9 min read
3-Phase Inverter An inverter is a fundamental electrical device designed primarily for the conversion of direct current into alternating current . This versatile device , also known as a variable frequency drive , plays a vital role in a wide range of applications , including variable frequency drives and high power
13 min read