 Data Structure
 Networking
 RDBMS
RDBMS Operating System
 Java
Java MS Excel
 iOS
iOS HTML
HTML CSS
CSS Android
 Python
 C Programming
 C++
C++ C#
C# MongoDB
 MySQL
MySQL Javascript
 PHP
PHP
- Selected Reading
- UPSC IAS Exams Notes
- Developer's Best Practices
- Questions and Answers
- Effective Resume Writing
- HR Interview Questions
- Computer Glossary
- Who is Who
How To Create A Dynamic Monthly Calendar In Excel?
Excel is a powerful tool that can help you organize and manage your tasks, events, and appointments. One of the most useful features of Excel is the ability to create dynamic calendars that update automatically as you make changes to your schedule. A dynamic monthly calendar can help you stay on top of your schedule and ensure that you never miss an important appointment or event. With Excel's powerful tools and features, you can easily create a calendar that suits your needs, whether you need to track your personal schedule, manage a team's schedule, or keep track of deadlines and milestones.
In this tutorial, we will walk you through the process of creating a dynamic monthly calendar in Excel. We will cover everything from setting up the basic calendar structure to adding events and appointments, customizing the look and feel of your calendar, and using Excel's built-in tools to make your calendar even more powerful and effective. By the end of this tutorial, you will have a fully functional monthly calendar that you can use to manage your schedule and stay on top of your tasks and appointments. So let's get started!
Create A Dynamic Monthly Calendar
Here we will first insert a form control combo box, then make changes to it, and finally use the formula to complete the task. So let us see a simple process to know how you can create a dynamic monthly calendar in Excel.
Step 1
Consider any Excel sheet. First click on developer, then click on insert and select a combo box from form controls, then draw a box.
Developer > Insert > Combo Box > Draw.

Step 2
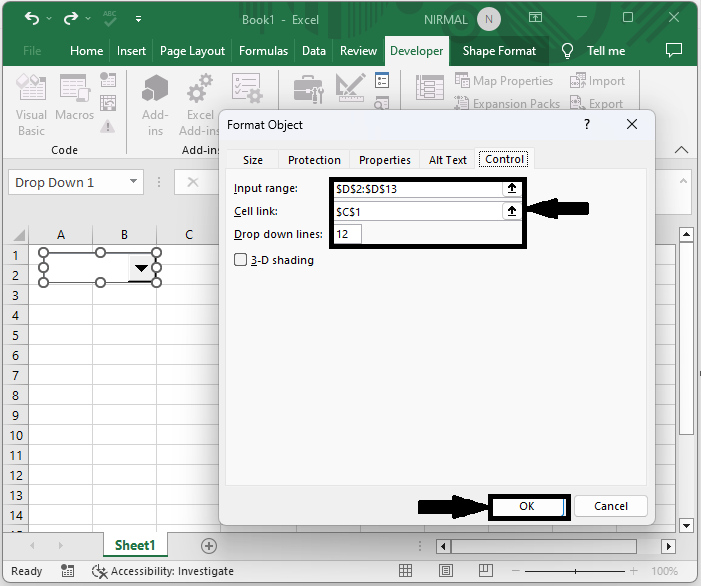
Now right-click on the combo box and select Format Control to open the pop-up. In the pop-up window, click on Control, then specify the input range, cell link, and number of values in the list, and click OK.
Right click > Format control > Control > Input range > Cell Link > Number of values.

Step 3
Then click on an empty cell, enter the formula as =DATE(C2,C1,1) and click Enter. C2 is the address of the year, and C1 is the address of the month in the formula.
Empty cell > Formula > Enter.

Step 4
Now click on the below cell of the formula; in our case, cell F4. Enter the formula as =F3+1 and click Enter.
Empty cell > Formula > Enter.

Then finally, we can drag down using the auto-fill handle to complete the task.
Conclusion
In this tutorial, we have used a simple example to demonstrate how you can create a dynamic monthly calendar in Excel to highlight a particular set of data.

