- Spring MVC - Home
- Spring MVC - Overview
- Spring MVC - Environment Setup
- Spring MVC - Hello World Example
Spring MVC - Form Handling
Spring MVC - Form Tag library
- Spring MVC - Textbox
- Spring MVC - Password
- Spring MVC - Textarea
- Spring MVC - Checkbox
- Spring MVC - Checkboxes
- Spring MVC - Radiobutton
- Spring MVC - Radiobuttons
- Spring MVC - Dropdown
- Spring MVC - Listbox
- Spring MVC - Hidden
- Spring MVC - Errors
- Spring MVC - Upload
Spring MVC - Handler Mapping
Spring MVC - Controller
- Spring MVC - Multi Action Controller
- Properties Method Name Resolver
- Parameter Method Name Resolver
- Parameterizable View Controller
Spring MVC - View Resolver
- Internal Resource View Resolver
- Spring MVC - Xml View Resolver
- Resource Bundle View Resolver
- Multiple Resolver Mapping
Spring MVC - Integration
- Spring MVC - Hibernate Validator
- Spring MVC - Generate RSS Feed
- Spring MVC - Generate XML
- Spring MVC - Generate JSON
- Spring MVC - Generate Excel
- Spring MVC - Generate PDF
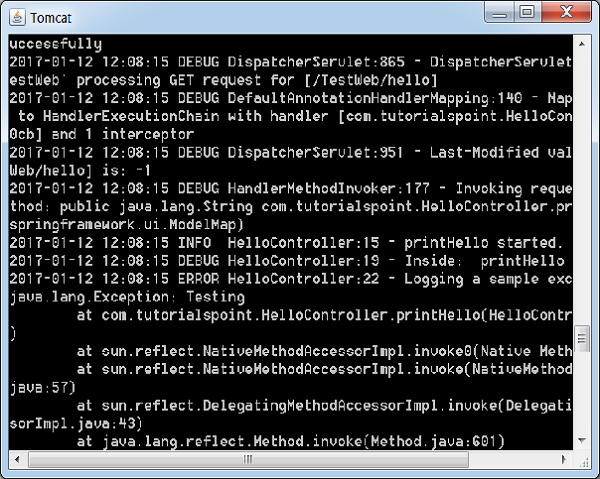
- Spring MVC - Using log4j
Spring Q & A
Spring MVC Useful Resources
Spring MVC - Quick Guide
Spring MVC - Overview
The Spring Web MVC framework provides a model-view-controller architecture and ready components that can be used to develop flexible and loosely coupled web applications. The MVC pattern results in separating the different aspects of the application (input logic, business logic, and UI logic), while providing a loose coupling between these elements.
The Model encapsulates the application data and in general, they will consist of POJO.
The View is responsible for rendering the model data and in general, it generates HTML output that the client's browser can interpret.
The Controller is responsible for processing User Requests and Building Appropriate Model and passes it to the view for rendering.
The DispatcherServlet
The Spring Web model-view-controller (MVC) framework is designed around a DispatcherServlet that handles all the HTTP requests and responses. The request processing workflow of the Spring Web MVC DispatcherServlet is shown in the following illustration.
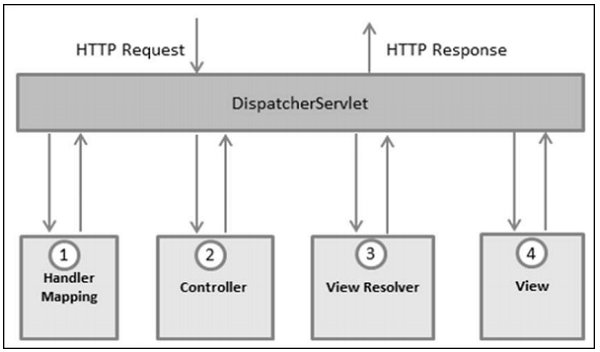
Following is the sequence of events corresponding to an incoming HTTP request to DispatcherServlet −
After receiving an HTTP request, DispatcherServlet consults the HandlerMapping to call the appropriate Controller.
The Controller takes the request and calls the appropriate service methods based on used GET or POST method. The service method will set model data based on defined business logic and returns view name to the DispatcherServlet.
The DispatcherServlet will take help from ViewResolver to pick up the defined view for the request.
Once view is finalized, The DispatcherServlet passes the model data to the view, which is finally rendered, on the browsers.
All the above-mentioned components, i.e. HandlerMapping, Controller and ViewResolver are parts of WebApplicationContext, which is an extension of the plain ApplicationContext with some extra features necessary for web applications.
Required Configuration
We need to map requests that you want the DispatcherServlet to handle, by using a URL mapping in the web.xml file. The following is an example to show declaration and mapping for HelloWeb DispatcherServlet −
<web-app id = "WebApp_ID" version = "2.4"
   xmlns = "http://java.sun.com/xml/ns/j2ee"
   xmlns:xsi = "http://www.w3.org/2001/XMLSchema-instance"
   xsi:schemaLocation = "http://java.sun.com/xml/ns/j2ee
   http://java.sun.com/xml/ns/j2ee/web-app_2_4.xsd">

   <display-name>Spring MVC Application</display-name>

   <servlet>
      <servlet-name>HelloWeb</servlet-name>
      <servlet-class>
         org.springframework.web.servlet.DispatcherServlet
      </servlet-class>
      <load-on-startup>1</load-on-startup>
   </servlet>

   <servlet-mapping>
      <servlet-name>HelloWeb</servlet-name>
      <url-pattern>*.jsp</url-pattern>
   </servlet-mapping>
</web-app>
The web.xml file will be kept in the WebContent/WEB-INF directory of your web application. Upon initialization of the HelloWeb DispatcherServlet, the framework will try to load the application context from a file named [servlet-name]-servlet.xml located in the application's WebContent/WEB-INF directory. In this case, our file will be HelloWeb-servlet.xml.
Next, the <servlet-mapping> tag indicates which URLs will be handled by which DispatcherServlet. Here, all the HTTP requests ending with .jsp will be handled by the HelloWeb DispatcherServlet.
If you do not want to go with the default filename as [servlet-name]-servlet.xml and default location as WebContent/WEB-INF, you can customize this file name and location by adding the servlet listener ContextLoaderListener in your web.xml file as follows −
<web-app...>

   <!-------- DispatcherServlet definition goes here----->
   ....
   <context-param>
      <param-name>contextConfigLocation</param-name>
      <param-value>/WEB-INF/HelloWeb-servlet.xml</param-value>
   </context-param>

   <listener>
      <listener-class>
         org.springframework.web.context.ContextLoaderListener
      </listener-class>
   </listener>
</web-app>
Now, let us check the required configuration for HelloWeb-servlet.xml file, placed in your web application's WebContent/WEB-INF directory.
<beans xmlns = "http://www.springframework.org/schema/beans"
   xmlns:context = "http://www.springframework.org/schema/context"
   xmlns:xsi = "http://www.w3.org/2001/XMLSchema-instance"
   xsi:schemaLocation = "
   http://www.springframework.org/schema/beans
   http://www.springframework.org/schema/beans/spring-beans-3.0.xsd
   http://www.springframework.org/schema/context
   http://www.springframework.org/schema/context/spring-context-3.0.xsd">

   <context:component-scan base-package = "com.tutorialspoint" />

   <bean class = "org.springframework.web.servlet.view.InternalResourceViewResolver">
      <property name = "prefix" value = "/WEB-INF/jsp/" />
      <property name = "suffix" value = ".jsp" />
   </bean>

</beans>
Following are some important points about HelloWeb-servlet.xml file −
The [servlet-name]-servlet.xml file will be used to create the beans defined, overriding the definitions of any beans defined with the same name in the global scope.
The <context:component-scan...> tag will be used to activate the Spring MVC annotation scanning capability, which allows to make use of annotations like @Controller and @RequestMapping, etc.
The InternalResourceViewResolver will have rules defined to resolve the view names. As per the above-defined rule, a logical view named hello is delegated to a view implementation located at /WEB-INF/jsp/hello.jsp.
Let us now understand how to create the actual components i.e., Controller, Model and View.
Defining a Controller
The DispatcherServlet delegates the request to the controllers to execute the functionality specific to it. The @Controller annotation indicates that a particular class serves the role of a controller. The @RequestMapping annotation is used to map a URL to either an entire class or a particular handler method.
@Controller
@RequestMapping("/hello")
public class HelloController{

   @RequestMapping(method = RequestMethod.GET)
   public String printHello(ModelMap model) {
      model.addAttribute("message", "Hello Spring MVC Framework!");
      return "hello";
   }

}
The @Controller annotation defines the class as a Spring MVC controller. Here, the first usage of @RequestMapping indicates that all handling methods on this controller are relative to the /hello path.
The next annotation @GetMapping () is used to declare the printHello() method as the controller's default service method to handle HTTP GET request. We can define another method to handle any POST request at the same URL.
We can also write the above controller in another form, where we can add additional attributes in the @GetMapping as follows −
@Controller
public class HelloController{

   @GetMapping(value = "/hello")
   public String printHello(ModelMap model) {
      model.addAttribute("message", "Hello Spring MVC Framework!");
      return "hello";
   }

}
The value attribute indicates the URL to which the handler method is mapped and the method attribute defines the service method to handle the HTTP GET request.
Following are some important points to be noted regarding the controller defined above −
You will define the required business logic inside a service method. You can call another method inside this method as per the requirement.
Based on the business logic defined, you will create a model within this method. You can set different model attributes and these attributes will be accessed by the view to present the result. This example creates a model with its attribute "message".
A defined service method can return a String, which contains the name of the view to be used to render the model. This example returns "hello" as the logical view name.
Creating JSP Views
Spring MVC supports many types of views for different presentation technologies. These include - JSPs, HTML, PDF, Excel Worksheets, XML, Velocity Templates, XSLT, JSON, Atom and RSS feeds, JasperReports, etc. However, the most common ones are the JSP templates written with JSTL. So, let us write a simple hello view in /WEB-INF/hello/hello.jsp −
<html>
   <head>
      <title>Hello Spring MVC</title>
   </head>
   <body>
      <h2>${message}</h2>
   </body>
</html>
Here ${message} Here is the attribute, which we have setup inside the Controller. You can have multiple attributes to be displayed inside your view.
Spring MVC - Environment Setup
This chapter will guide you on how to prepare a development environment to start your work with Spring MVC. It will also teach you how to set up JDK on your machine before you set up spring MVC −
Setup Java Development Kit (JDK)
You can download the latest version of SDK from Oracle's Java site − Java SE Downloads. You will find instructions for installing JDK in downloaded files, follow the given instructions to install and configure the setup. Finally set PATH and JAVA_HOME environment variables to refer to the directory that contains java and javac, typically java_install_dir/bin and java_install_dir respectively.
If you are running Windows and have installed the JDK in C:\jdk-24, you would have to put the following line in your C:\autoexec.bat file.
set PATH=C:\jdk-24;%PATH%
set JAVA_HOME=C:\jdk-24
Alternatively, on Windows NT/2000/XP, you will have to right-click on My Computer, select Properties → Advanced → Environment Variables. Then, you will have to update the PATH value and click the OK button.
On Unix (Solaris, Linux, etc.), if the SDK is installed in /usr/local/jdk-24 and you use the C shell, you will have to put the following into your .cshrc file.
setenv PATH /usr/local/jdk-24/bin:$PATH
setenv JAVA_HOME /usr/local/jdk-24
Alternatively, if you use an Integrated Development Environment (IDE) like Borland JBuilder, Eclipse, IntelliJ IDEA, or Sun ONE Studio, you will have to compile and run a simple program to confirm that the IDE knows where you have installed Java. Otherwise, you will have to carry out a proper setup as given in the document of the IDE.
Popular Java Editors
To write your Java programs, you need a text editor. There are many sophisticated IDEs available in the market. But for now, you can consider one of the following −
Notepad − On Windows machine, you can use any simple text editor like Notepad (Recommended for this tutorial), TextPad.
Netbeans − It is a Java IDE that is open-source and free, which can be downloaded from www.netbeans.org/index.html.
Eclipse − It is also a Java IDE developed by the eclipse open-source community and can be downloaded from www.eclipse.org.
Install Eclipse
In this chapter, we will explain how to set Spring environment in Eclipse IDE. Before proceeding with the installation, make sure that you already have Eclipse installed in your system. If not, download and install Eclipse.
For more information on Eclipse, please refer our Eclipse Tutorial
Set Maven
In this tutorial, we are using maven to run and build the spring based examples. Follow the Maven - Environment Setup to install maven.
Spring MVC - Hello World Example
The following example shows how to write a simple web based Hello World application using the Spring MVC Framework. To start with, let us have a working Eclipse IDE in place and follow the subsequent steps to develop a Maven based Web Application using the Spring Web Framework.
| Step | Description |
|---|---|
| 1 | Create a Maven Based Project using maven-archetype-webapp archetype with a groupid com.tutorialspoint, artifactid hello. |
| 2 | Create a Java class HelloController under the com.tutorialspoint package. |
| 3 | Create Spring configuration files web.xml and HelloWeb-servlet.xml under the WEB-INF folder. |
| 4 | Create a sub-folder with a name jsp under the webapp folder. Create a view file hello.jsp under this sub-folder. |
| 5 | The final step is to create the content of the source and configuration files and export the application as explained below. |
pom.xml
<?xml version="1.0" encoding="UTF-8"?>
<project xmlns="http://maven.apache.org/POM/4.0.0" xmlns:xsi="http://www.w3.org/2001/XMLSchema-instance"
   xsi:schemaLocation="http://maven.apache.org/POM/4.0.0 http://maven.apache.org/xsd/maven-4.0.0.xsd">
   <modelVersion>4.0.0</modelVersion>
   <groupId>com.tutorialspoint</groupId>
   <artifactId>hello</artifactId>
   <version>0.0.1-SNAPSHOT</version>
   <packaging>war</packaging>
   <name>hello Maven Webapp</name>
   <url>http://www.tutorialspoint.com</url>
   <properties>
      <project.build.sourceEncoding>UTF-8</project.build.sourceEncoding>
      <maven.compiler.source>24</maven.compiler.source>
      <maven.compiler.target>24</maven.compiler.target>
      <org.springframework.version>7.0.0-M9</org.springframework.version>
   </properties>
   <dependencies>
      <dependency>
         <groupId>junit</groupId>
         <artifactId>junit</artifactId>
         <version>4.13.1</version>
         <scope>test</scope>
      </dependency>
      <dependency>
         <groupId>jakarta.servlet</groupId>
         <artifactId>jakarta.servlet-api</artifactId>
         <version>6.0.0</version>
         <scope>provided</scope>
      </dependency>
      <dependency>
         <groupId>org.springframework</groupId>
         <artifactId>spring-context</artifactId>
         <version>${org.springframework.version}</version>
         <scope>compile</scope>
      </dependency>
      <dependency>
         <groupId>org.springframework</groupId>
         <artifactId>spring-webmvc</artifactId>
         <version>${org.springframework.version}</version>
         <scope>compile</scope>
      </dependency>
   </dependencies>
   <build>
      <finalName>hello</finalName>
      <pluginManagement>
         <plugins>
            <plugin>
               <artifactId>maven-clean-plugin</artifactId>
               <version>3.4.0</version>
            </plugin>
            <plugin>
               <artifactId>maven-resources-plugin</artifactId>
               <version>3.3.1</version>
            </plugin>
            <plugin>
               <artifactId>maven-compiler-plugin</artifactId>
               <version>3.13.0</version>
            </plugin>
            <plugin>
               <artifactId>maven-surefire-plugin</artifactId>
               <version>3.3.0</version>
            </plugin>
            <plugin>
               <artifactId>maven-war-plugin</artifactId>
               <version>3.4.0</version>
            </plugin>
            <plugin>
            <artifactId>maven-install-plugin</artifactId>
               <version>3.1.2</version>
            </plugin>
            <plugin>
               <artifactId>maven-deploy-plugin</artifactId>
               <version>3.1.2</version>
            </plugin>
         </plugins>
      </pluginManagement>
   </build>
</project>
HelloController.java
package com.tutorialspoint;

import org.springframework.stereotype.Controller;
import org.springframework.ui.ModelMap;
import org.springframework.web.bind.annotation.GetMapping;
import org.springframework.web.bind.annotation.RequestMapping;

@Controller
@RequestMapping("/hello")
public class HelloController{

   @GetMapping
   public String printHello(ModelMap model) {
      model.addAttribute("message", "Hello Spring MVC Framework!");
      return "hello";
   }
}
web.xml
<?xml version="1.0" encoding="UTF-8"?>
<web-app version="4.0"
   xmlns="http://xmlns.jcp.org/xml/ns/javaee"
   xmlns:javaee="http://xmlns.jcp.org/xml/ns/javaee"
   xmlns:xml="http://www.w3.org/XML/1998/namespace"
   xmlns:xsi="http://www.w3.org/2001/XMLSchema-instance"
   xsi:schemaLocation="http://xmlns.jcp.org/xml/ns/javaee http://xmlns.jcp.org/xml/ns/javaee/web-app_4_0.xsd">
   <display-name>Spring MVC Application</display-name>

   <servlet>
      <servlet-name>hello</servlet-name>
      <servlet-class>
         org.springframework.web.servlet.DispatcherServlet
      </servlet-class>
      <load-on-startup>1</load-on-startup>
   </servlet>

   <servlet-mapping>
      <servlet-name>hello</servlet-name>
      <url-pattern>/</url-pattern>
   </servlet-mapping>
</web-app>
hello-servlet.xml
<beans xmlns = "http://www.springframework.org/schema/beans"
   xmlns:context = "http://www.springframework.org/schema/context"
   xmlns:xsi = "http://www.w3.org/2001/XMLSchema-instance"
   xsi:schemaLocation = "
   http://www.springframework.org/schema/beans
   http://www.springframework.org/schema/beans/spring-beans-3.0.xsd
   http://www.springframework.org/schema/context
   http://www.springframework.org/schema/context/spring-context-3.0.xsd">

   <context:component-scan base-package = "com.tutorialspoint" />

   <bean class = "org.springframework.web.servlet.view.InternalResourceViewResolver">
      <property name = "prefix" value = "/WEB-INF/jsp/" />
      <property name = "suffix" value = ".jsp" />
   </bean>

</beans>
hello.jsp
<%@ page contentType = "text/html; charset = UTF-8" %>
<html>
   <head>
      <title>Hello World</title>
   </head>
   <body>
      <h2>${message}</h2>
   </body>
</html>
Once you are done with creating source and configuration files, create the war file using maven install command and save your hello.war file available in /target folder in Tomcat's webapps folder.
Now start your Tomcat server and make sure you are able to access other webpages from webapps folder using a standard browser. Now, try to access the URL − http://localhost:8080/hello/hello. If everything is fine with the Spring Web Application, we will see the following screen.
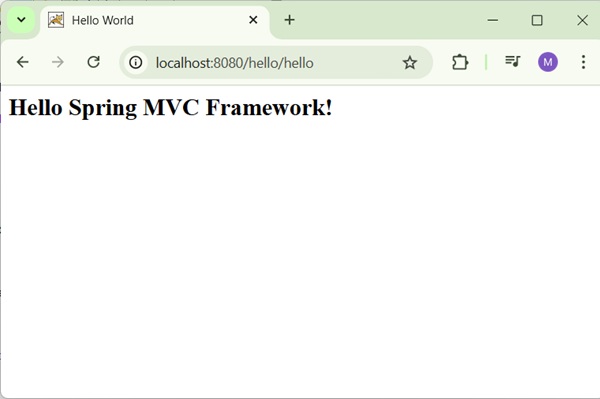
You should note that in the given URL, hello is the application name and hello is the virtual subfolder, which we have mentioned in our controller using @GetMapping("/hello"). You can use direct root while mapping your URL using @GetMapping(), in this case you can access the same page using short URL http://localhost:8080/hello/, but it is advised to have different functionalities under different folders.
Spring MVC - Form Handling Example
The following example shows how to write a simple web based Hello World application using the Spring MVC Framework. To start with, let us have a working Eclipse IDE in place and follow the subsequent steps to develop a Web Application using the Spring Web Framework.
| Step | Description |
|---|---|
| 1 | Create a project with a name hello under a package com.tutorialspoint as explained in the Spring MVC - Hello World Example chapter. |
| 2 | Create Java classes Student, StudentController under the com.tutorialspoint package. |
| 3 | Create view files student.jsp, result.jsp under the jsp sub-folder. |
| 4 | The final step is to create the content of the source and configuration files and export the application as explained below. |
Student.java
package com.tutorialspoint;

public class Student {
   private Integer age;
   private String name;
   private Integer id;

   public void setAge(Integer age) {
      this.age = age;
   }
   public Integer getAge() {
      return age;
   }

   public void setName(String name) {
      this.name = name;
   }
   public String getName() {
      return name;
   }

   public void setId(Integer id) {
      this.id = id;
   }
   public Integer getId() {
      return id;
   }
}
StudentController.java
package com.tutorialspoint;

import org.springframework.stereotype.Controller;
import org.springframework.ui.ModelMap;
import org.springframework.web.bind.annotation.GetMapping;
import org.springframework.web.bind.annotation.ModelAttribute;
import org.springframework.web.bind.annotation.PostMapping;
import org.springframework.web.servlet.ModelAndView;

@Controller
public class StudentController {

   @GetMapping(value = "/student")
   public ModelAndView student() {
      return new ModelAndView("student", "command", new Student());
   }

   @PostMapping(value = "/addStudent")
   public String addStudent(@ModelAttribute("SpringWeb")Student student,
   ModelMap model) {
      model.addAttribute("name", student.getName());
      model.addAttribute("age", student.getAge());
      model.addAttribute("id", student.getId());

      return "result";
   }
}
Here, the first service method student(), we have passed a blank Studentobject in the ModelAndView object with name "command". This is done because the spring framework expects an object with name "command", if we use <form:form> tags in the JSP file. So, when the student() method is called, it returns student.jsp view.
The second service method addStudent() will be called against a POST method on the hello/addStudent URL. You will prepare your model object based on the submitted information. Finally, a "result" view will be returned from the service method, which will result in rendering result.jsp.
student.jsp
<%@taglib uri="http://www.springframework.org/tags/form" prefix = "form"%>
<html>
   <head>
      <title>Spring MVC Form Handling</title>
   </head>

   <body>
      <h2>Student Information</h2>
      <form:form method = "POST" action = "/hello/addStudent">
         <table>
            <tr>
               <td><form:label path = "name">Name</form:label></td>
               <td><form:input path = "name" /></td>
            </tr>
            <tr>
               <td><form:label path = "age">Age</form:label></td>
               <td><form:input path = "age" /></td>
            </tr>
            <tr>
               <td><form:label path = "id">id</form:label></td>
               <td><form:input path = "id" /></td>
            </tr>
            <tr>
               <td colspan = "2">
                  <input type = "submit" value = "Submit"/>
               </td>
            </tr>
         </table>
      </form:form>
   </body>
</html>
result.jsp
<%@taglib uri = "http://www.springframework.org/tags/form" prefix = "form"%>
<html>
<head>
<title>Spring MVC Form Handling</title>
</head>
<body>
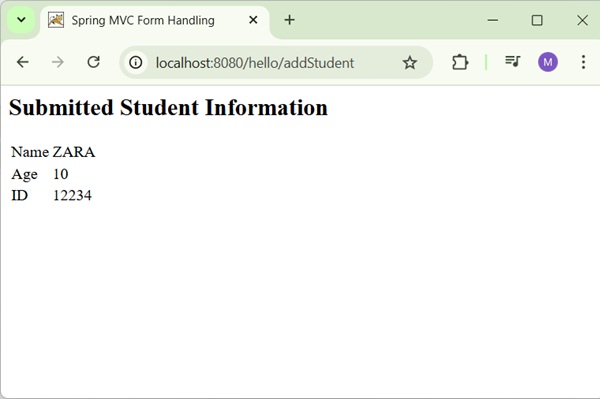
<h2>Submitted Student Information</h2>
<table>
<tr>
<td>Name</td>
<td>${name}</td>
</tr>
<tr>
<td>Age</td>
<td>${age}</td>
</tr>
<tr>
<td>ID</td>
<td>${id}</td>
</tr>
</table>
</body>
</html>
Once we are done with creating source and configuration files, export your application. Right click on your application, use Run As → Maven Install option and save the hello.war file in Tomcat's webapps folder.
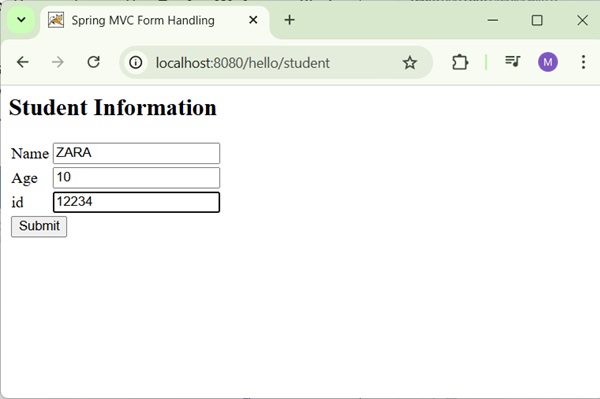
Now, start the Tomcat server and make sure you are able to access other webpages from the webapps folder using a standard browser. Now, try a URL http://localhost:8080/hello/student and you should see the following screen if everything is fine with the Spring Web Application.
After submitting the required information, click on the submit button to submit the form. You should see the following screen, if everything is fine with your Spring Web Application.
Spring MVC - Page Redirection Example
The following example shows how to write a simple web based application, which makes use of redirect to transfer an http request to another page. To start with, let us have a working Eclipse IDE in place and consider the following steps to develop a Dynamic Form based Web Application using Spring Web Framework −
| Step | Description |
|---|---|
| 1 | Create a project with a name hello under a package com.tutorialspoint as explained in the Spring MVC - Hello World Example chapter. |
| 2 | Create Java class WebController under the com.tutorialspoint package. |
| 3 | Create view files index.jsp, final.jsp under the jsp sub-folder. |
| 4 | The final step is to create the content of the source and configuration files and export the application as explained below. |
WebController.java
package com.tutorialspoint;

import org.springframework.stereotype.Controller;
import org.springframework.web.bind.annotation.GetMapping;

@Controller
public class WebController {

   @GetMapping(value = "/index")
   public String index() {
	   return "index";
   }

   @GetMapping(value = "/redirect")
   public String redirect() {
      return "redirect:finalPage";
   }

   @GetMapping(value = "/finalPage")
   public String finalPage() {
      return "final";
   }
}
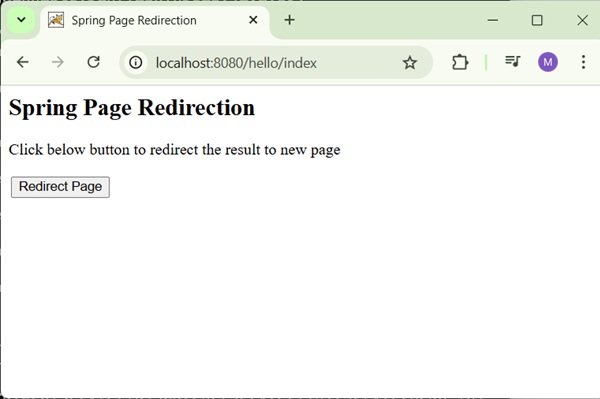
Following is the content of Spring view file index.jsp. This will be a landing page, this page will send a request to the access-redirect service method, which will redirect this request to another service method and finally a final.jsp page will be displayed.
index.jsp
<%@taglib uri = "http://www.springframework.org/tags/form" prefix = "form"%>
<html>
   <head>
      <title>Spring Page Redirection</title>
   </head>
   <body>
      <h2>Spring Page Redirection</h2>
      <p>Click below button to redirect the result to new page</p>
      <form:form method = "GET" action = "/hello/redirect">
         <table>
            <tr>
               <td>
                  <input type = "submit" value = "Redirect Page"/>
               </td>
            </tr>
         </table>
      </form:form>
   </body>
</html>
final.jsp
<%@taglib uri = "http://www.springframework.org/tags/form" prefix = "form"%>
<html>
<head>
<title>Spring Page Redirection</title>
</head>
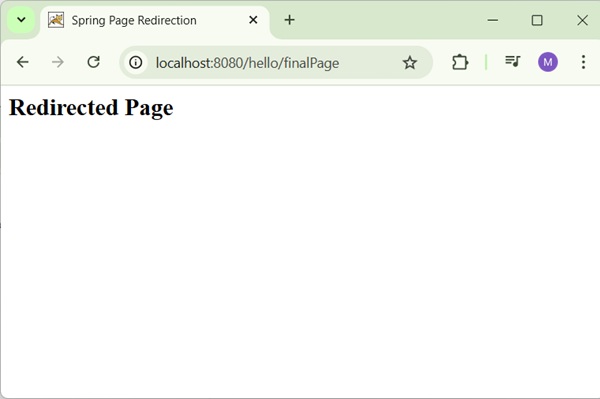
<body>
<h2>Redirected Page</h2>
</body>
</html>
Once you are done with creating source and configuration files, export your application. Right click on your application, use Run As → Maven Install option and save your hello.war file in Tomcat's webapps folder.
Now, start your Tomcat server and make sure you are able to access other webpages from webapps folder using a standard browser. Try a URL http://localhost:8080/hello/index and you should see the following screen if everything is fine with the Spring Web Application.
Now click on the "Redirect Page" button to submit the form and to get to the final redirected page. We should see the following screen, if everything is fine with our Spring Web Application −
Spring MVC - Static Pages Example
The following example shows how to write a simple web based application using Spring MVC Framework, which can access static pages along with dynamic pages with the help of a <mvc:resources> tag.
To start with, let us have a working Eclipse IDE in place and consider the following steps to develop a Dynamic Form based Web Application using Spring Web Framework −
| Step | Description |
|---|---|
| 1 | Create a project with a name hello under a package com.tutorialspoint as explained in the Spring MVC - Hello World Example chapter. |
| 2 | Create Java class WebController under the com.tutorialspoint package. |
| 3 | Create a static file final.htm under the pages sub-folder in WEB-INF folder. |
| 4 | The final step is to create the content of the source and configuration files and export the application as explained below. |
WebController.java
package com.tutorialspoint;

import org.springframework.stereotype.Controller;
import org.springframework.web.bind.annotation.GetMapping;

@Controller
public class WebController {

   @GetMapping(value = "/index")
   public String index() {
	   return "index";
   }

   @GetMapping(value = "/staticPage")
   public String redirect() {
      return "redirect:/pages/final.htm";
   }
}
hello-servlet.xml
<beans xmlns = "http://www.springframework.org/schema/beans"
   xmlns:context = "http://www.springframework.org/schema/context"
   xmlns:xsi = "http://www.w3.org/2001/XMLSchema-instance"
   xmlns:mvc = "http://www.springframework.org/schema/mvc"
   xsi:schemaLocation = "
   http://www.springframework.org/schema/beans
   http://www.springframework.org/schema/beans/spring-beans-3.0.xsd
   http://www.springframework.org/schema/mvc
   http://www.springframework.org/schema/mvc/spring-mvc-3.0.xsd
   http://www.springframework.org/schema/context
   http://www.springframework.org/schema/context/spring-context-3.0.xsd">

   <context:component-scan base-package = "com.tutorialspoint" />

   <bean class = "org.springframework.web.servlet.view.InternalResourceViewResolver">
      <property name = "prefix" value = "/WEB-INF/jsp/" />
      <property name = "suffix" value = ".jsp" />
   </bean>
   <mvc:resources mapping = "/pages/**" location = "/WEB-INF/pages/" />
   <mvc:annotation-driven/>

</beans>
Here, the <mvc:resources..../> tag is being used to map static pages. The mapping attribute must be an Ant pattern that specifies the URL pattern of an http requests. The location attribute must specify one or more valid resource directory locations having static pages including images, stylesheets, JavaScript, and other static content. Multiple resource locations may be specified using a comma-separated list of values.
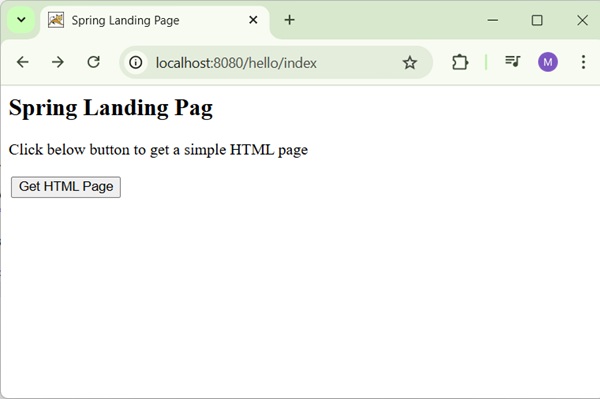
Following is the content of Spring view file WEB-INF/jsp/index.jsp. This will be a landing page; this page will send a request to access the staticPage service method, which will redirect this request to a static page available in WEB-INF/pages folder.
index.jsp
<%@taglib uri = "http://www.springframework.org/tags/form" prefix = "form"%>
<html>
   <head>
      <title>Spring Landing Page</title>
   </head>
   <body>
      <h2>Spring Landing Page</h2>
      <p>Click below button to get a simple HTML page</p>
      <form:form method = "GET" action = "/hello/staticPage">
         <table>
            <tr>
               <td>
                  <input type = "submit" value = "Get HTML Page"/>
               </td>
            </tr>
         </table>
      </form:form>
   </body>
</html>
final.htm
<html>
   <head>
      <title>Spring Static Page</title>
   </head>
   <body>
      <h2>A simple HTML page</h2>
   </body>
</html>
Output
Once you are done with creating source and configuration files, export your application. Right click on your application, use Run As → Maven Install option and save your hello.war file in Tomcat's webapps folder.
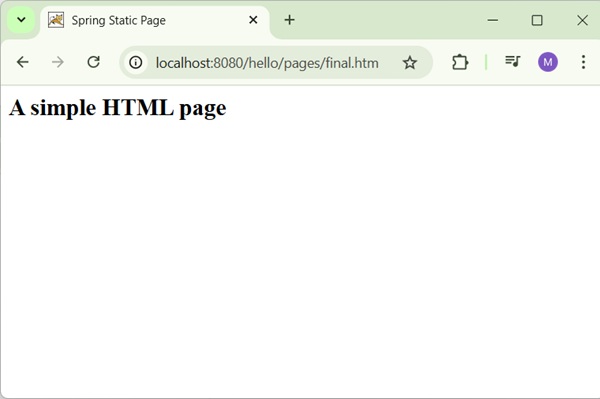
Now, start your Tomcat server and make sure you are able to access other webpages from webapps folder using a standard browser. Try a URL http://localhost:8080/hello/index and you should see the following screen if everything is fine with the Spring Web Application.
Click on "Get HTML Page" button to access a static page mentioned in the staticPage service method. If everything is fine with your Spring Web Application, we will see the following screen.
Spring MVC - Text Box Example
The following example shows how to use Text boxes in forms using the Spring Web MVC framework.
To start with, let us have a working Eclipse IDE in place and consider the following steps to develop a Dynamic Form based Web Application using Spring Web Framework −
| Step | Description |
|---|---|
| 1 | Create a project with a name hello under a package com.tutorialspoint as explained in the Spring MVC - Hello World Example chapter. |
| 2 | Create Java class Student and StudentController under the com.tutorialspoint package. |
| 3 | Create view files student.jsp and result.jsp under the jsp sub-folder in WEB-INF folder. |
| 4 | The final step is to create the content of the source and configuration files and export the application as explained below. |
Student.java
package com.tutorialspoint;

public class Student {
   private Integer age;
   private String name;
   private Integer id;

   public void setAge(Integer age) {
      this.age = age;
   }
   public Integer getAge() {
      return age;
   }

   public void setName(String name) {
      this.name = name;
   }
   public String getName() {
      return name;
   }

   public void setId(Integer id) {
      this.id = id;
   }
   public Integer getId() {
      return id;
   }
}
StudentController.java
package com.tutorialspoint;

import org.springframework.stereotype.Controller;
import org.springframework.web.bind.annotation.ModelAttribute;
import org.springframework.web.bind.annotation.RequestMapping;
import org.springframework.web.bind.annotation.RequestMethod;
import org.springframework.web.servlet.ModelAndView;
import org.springframework.ui.ModelMap;

@Controller
public class StudentController {

   @RequestMapping(value = "/student", method = RequestMethod.GET)
   public ModelAndView student() {
      return new ModelAndView("student", "command", new Student());
   }

   @RequestMapping(value = "/addStudent", method = RequestMethod.POST)
   public String addStudent(@ModelAttribute("SpringWeb")Student student,
      ModelMap model) {
      model.addAttribute("name", student.getName());
      model.addAttribute("age", student.getAge());
      model.addAttribute("id", student.getId());

      return "result";
   }
}
Here, the first service method student(), we have passed a blank Studentobject in the ModelAndView object with name "command", because the spring framework expects an object with name "command", if you are using <form:form> tags in your JSP file. So, when the student() method is called it returns student.jsp view.
The second service method addStudent() will be called against a POST method on the hello/addStudent URL. You will prepare your model object based on the submitted information. Finally, a "result" view will be returned from the service method, which will result in rendering result.jsp.
student.jsp
<%@taglib uri = "http://www.springframework.org/tags/form" prefix = "form"%>
<html>
   <head>
      <title>Spring MVC Form Handling</title>
   </head>
   <body>

      <h2>Student Information</h2>
      <form:form method = "POST" action = "/hello/addStudent">
         <table>
            <tr>
               <td><form:label path = "name">Name</form:label></td>
               <td><form:input path = "name" /></td>
            </tr>
            <tr>
               <td><form:label path = "age">Age</form:label></td>
               <td><form:input path = "age" /></td>
            </tr>
            <tr>
               <td><form:label path = "id">id</form:label></td>
               <td><form:input path = "id" /></td>
            </tr>
            <tr>
               <td colspan = "2">
                  <input type = "submit" value = "Submit"/>
               </td>
            </tr>
         </table>
      </form:form>
   </body>
</html>
Here, we are using <form:input /> tag to render an HTML text box. For example −
<form:input path = "name" />
It will render following HTML content.
<input id = "name" name = "name" type = "text" value = ""/>
result.jsp
<%@taglib uri = "http://www.springframework.org/tags/form" prefix = "form"%>
<html>
   <head>
      <title>Spring MVC Form Handling</title>
   </head>
   <body>

      <h2>Submitted Student Information</h2>
      <table>
         <tr>
            <td>Name</td>
            <td>${name}</td>
         </tr>
         <tr>
            <td>Age</td>
            <td>${age}</td>
         </tr>
         <tr>
            <td>ID</td>
            <td>${id}</td>
         </tr>
      </table>
   </body>
</html>
Output
Once you are done with creating source and configuration files, export your application. Right click on your application, use Run As → Maven Install option and save your hello.war file in Tomcat's webapps folder.
Now, start the Tomcat server and make sure you are able to access other webpages from the webapps folder using a standard browser. Try a URL http://localhost:8080/hello/student and we will see the following screen if everything is fine with the Spring Web Application.
After submitting the required information, click on the submit button to submit the form. We should see the following screen, if everything is fine with the Spring Web Application.
Spring MVC - Password Example
The following example shows how to use Password box in forms using the Spring Web MVC framework.
To start with, let us have a working Eclipse IDE in place and consider the following steps to develop a Dynamic Form based Web Application using Spring Web Framework −
| Step | Description |
|---|---|
| 1 | Create a project with a name hello under a package com.tutorialspoint as explained in the Spring MVC - Hello World Example chapter. |
| 2 | Create Java class User and UserController under the com.tutorialspoint package. |
| 3 | Create view files user.jsp and users.jsp under the jsp sub-folder in WEB-INF folder. |
| 4 | The final step is to create the content of the source and configuration files and export the application as explained below. |
User.java
package com.tutorialspoint;

public class User {

   private String username;
   private String password;

   public String getUsername() {
      return username;
   }
   public void setUsername(String username) {
      this.username = username;
   }

   public String getPassword() {
      return password;
   }
   public void setPassword(String password) {
      this.password = password;
   }
}
UserController.java
package com.tutorialspoint;

import org.springframework.stereotype.Controller;
import org.springframework.ui.ModelMap;
import org.springframework.web.bind.annotation.GetMapping;
import org.springframework.web.bind.annotation.ModelAttribute;
import org.springframework.web.bind.annotation.PostMapping;
import org.springframework.web.servlet.ModelAndView;

@Controller
public class UserController {

   @GetMapping(value = "/user")
   public ModelAndView user() {
      return new ModelAndView("user", "command", new User());
   }

   @PostMapping(value = "/addUser")
   public String addUser(@ModelAttribute("SpringWeb")User user,
      ModelMap model) {
      model.addAttribute("username", user.getUsername());
      model.addAttribute("password", user.getPassword());

      return "users";
   }
}
Here, the first service method user(), we have passed a blank User object in the ModelAndView object with name "command", because the spring framework expects an object with name "command", if you are using <form:form> tags in your JSP file. So, when the user() method is called it returns user.jsp view.
The Second service method addUser() will be called against a POST method on the hello/addUser URL. You will prepare your model object based on the submitted information. Finally, the "users" view will be returned from the service method, which will result in rendering the users.jsp.
user.jsp
<%@taglib uri = "http://www.springframework.org/tags/form" prefix = "form"%>
<html>
   <head>
      <title>Spring MVC Form Handling</title>
   </head>
   <body>

      <h2>User Information</h2>
      <form:form method = "POST" action = "/hello/addUser">
         <table>
            <tr>
               <td><form:label path = "username">User Name</form:label></td>
               <td><form:input path = "username" /></td>
            </tr>
            <tr>
               <td><form:label path = "password">Age</form:label></td>
               <td><form:password path = "password" /></td>
            </tr>
            <tr>
               <td colspan = "2">
                  <input type = "submit" value = "Submit"/>
               </td>
            </tr>
         </table>
      </form:form>
   </body>
</html>
Here, we are using <form:password /> tag to render an HTML password box. For example −
<form:password path = "password" />
It will render following HTML content.
<input id = "password" name = "password" type = "password" value = ""/>
users.jsp
<%@taglib uri = "http://www.springframework.org/tags/form" prefix = "form"%>
<html>
   <head>
      <title>Spring MVC Form Handling</title>
   </head>
   <body>
      <h2>Submitted User Information</h2>
      <table>
         <tr>
            <td>Username</td>
            <td>${username}</td>
         </tr>
         <tr>
            <td>Password</td>
            <td>${password}</td>
         </tr>
      </table>
   </body>
</html>
Output
Once you are done with creating source and configuration files, export your application. Right click on your application, use Run As → Maven Install option and save your hello.war file in Tomcat's webapps folder.
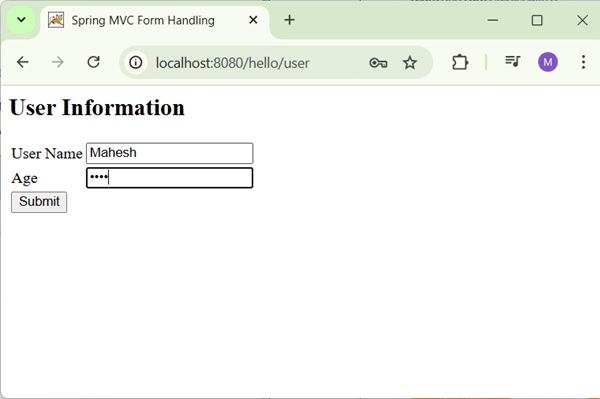
Now, start your Tomcat server and make sure you are able to access other webpages from the webapps folder using a standard browser. Try a URL http://localhost:8080/hello/user and we will see the following screen if everything is fine with the Spring Web Application.
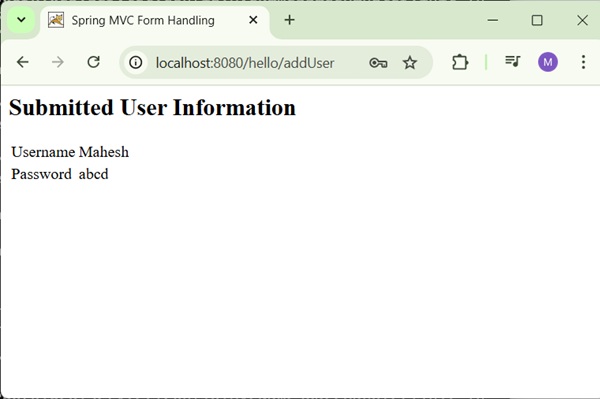
After submitting the required information, click on the submit button to submit the form. We will see the following screen, if everything is fine with the Spring Web Application.
Spring MVC - TextArea Example
The following example shows how to use TextArea in forms using the Spring Web MVC framework.
To start with, let us have a working Eclipse IDE in place and consider the following steps to develop a Dynamic Form based Web Application using Spring Web Framework −
| Step | Description |
|---|---|
| 1 | Create a project with a name hello under a package com.tutorialspoint as explained in the Spring MVC - Hello World Example chapter. |
| 2 | Create Java class User and UserController under the com.tutorialspoint package. |
| 3 | Create view files user.jsp and users.jsp under the jsp sub-folder in WEB-INF folder. |
| 4 | The final step is to create the content of the source and configuration files and export the application as explained below. |
User.java
package com.tutorialspoint;

public class User {

   private String username;
   private String password;
   private String address;

   public String getUsername() {
      return username;
   }
   public void setUsername(String username) {
      this.username = username;
   }

   public String getPassword() {
      return password;
   }
   public void setPassword(String password) {
      this.password = password;
   }
   public String getAddress() {
      return address;
   }
   public void setAddress(String address) {
      this.address = address;
   }
}
UserController.java
package com.tutorialspoint;

import org.springframework.stereotype.Controller;
import org.springframework.ui.ModelMap;
import org.springframework.web.bind.annotation.GetMapping;
import org.springframework.web.bind.annotation.ModelAttribute;
import org.springframework.web.bind.annotation.PostMapping;
import org.springframework.web.servlet.ModelAndView;

@Controller
public class UserController {

   @GetMapping(value = "/user")
   public ModelAndView user() {
      return new ModelAndView("user", "command", new User());
   }

   @PostMapping(value = "/addUser")
   public String addUser(@ModelAttribute("SpringWeb")User user,
      ModelMap model) {
      model.addAttribute("username", user.getUsername());
      model.addAttribute("password", user.getPassword());
      model.addAttribute("address", user.getAddress());
      return "users";
   }
}
Here, the first service method user(), we have passed a blank User object in the ModelAndView object with name "command", because the spring framework expects an object with name "command", if you are using <form:form> tags in your JSP file. So, when the user() method is called it returns user.jsp view.
The Second service method addUser() will be called against a POST method on the hello/addUser URL. You will prepare your model object based on the submitted information. Finally, the "users" view will be returned from the service method, which will result in rendering the users.jsp.
user.jsp
<%@taglib uri = "http://www.springframework.org/tags/form" prefix = "form"%>
<html>
   <head>
      <title>Spring MVC Form Handling</title>
   </head>
   <body>

   <h2>User Information</h2>
   <form:form method = "POST" action = "/hello/addUser">
      <table>
         <tr>
            <td><form:label path = "username">User Name</form:label></td>
            <td><form:input path = "username" /></td>
         </tr>
         <tr>
            <td><form:label path = "password">Password</form:label></td>
            <td><form:password path = "password" /></td>
         </tr>
         <tr>
            <td><form:label path = "address">Address</form:label></td>
            <td><form:textarea path = "address" rows = "5" cols = "30" /></td>
         </tr>
         <tr>
            <td colspan = "2">
               <input type = "submit" value = "Submit"/>
            </td>
         </tr>
      </table>
   </form:form>
   </body>
</html>
Here, we are using <form:textarea /> tag to render an HTML text area. For example −
<form:textarea path = "address" rows = "5" cols = "30" />
It will render following HTML content.
<textarea id = "address" name = "address" rows = "5" cols = "30"></textarea>
users.jsp
<%@taglib uri = "http://www.springframework.org/tags/form" prefix = "form"%>
<html>
   <head>
      <title>Spring MVC Form Handling</title>
   </head>
   <body>
      <h2>Submitted User Information</h2>
      <table>
         <tr>
            <td>Username</td>
            <td>${username}</td>
         </tr>
         <tr>
            <td>Password</td>
            <td>${password}</td>
         </tr>
      </table>
   </body>
</html>
Output
Once you are done with creating source and configuration files, export your application. Right click on your application, use Run As → Maven Install option and save your hello.war file in Tomcat's webapps folder.
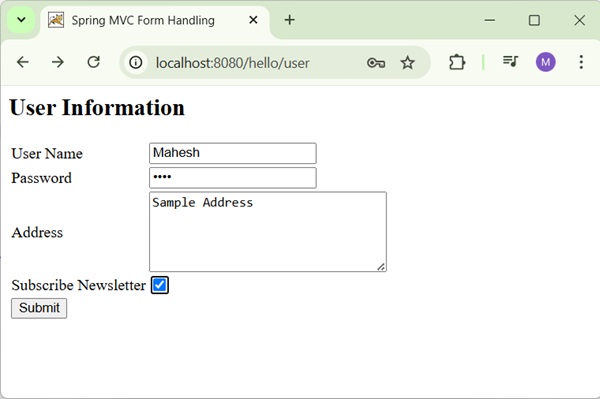
Now, start your Tomcat server and make sure you are able to access other webpages from the webapps folder using a standard browser. Try a URL http://localhost:8080/hello/user and we will see the following screen if everything is fine with the Spring Web Application.
After submitting the required information, click on the submit button to submit the form. We will see the following screen, if everything is fine with the Spring Web Application.
Spring MVC - CheckBox Example
The following example shows how to use single Checkbox in forms using the Spring Web MVC framework.
To start with, let us have a working Eclipse IDE in place and consider the following steps to develop a Dynamic Form based Web Application using Spring Web Framework −
| Step | Description |
|---|---|
| 1 | Create a project with a name hello under a package com.tutorialspoint as explained in the Spring MVC - Hello World Example chapter. |
| 2 | Create Java class User and UserController under the com.tutorialspoint package. |
| 3 | Create view files user.jsp and users.jsp under the jsp sub-folder in WEB-INF folder. |
| 4 | The final step is to create the content of the source and configuration files and export the application as explained below. |
User.java
package com.tutorialspoint;

public class User {

   private String username;
   private String password;
   private String address;
   private boolean receivePaper;

   public String getUsername() {
      return username;
   }
   public void setUsername(String username) {
      this.username = username;
   }

   public String getPassword() {
      return password;
   }
   public void setPassword(String password) {
      this.password = password;
   }
   public String getAddress() {
      return address;
   }
   public void setAddress(String address) {
      this.address = address;
   }
   public boolean isReceivePaper() {
      return receivePaper;
   }
   public void setReceivePaper(boolean receivePaper) {
      this.receivePaper = receivePaper;
   }
}
UserController.java
package com.tutorialspoint;

import org.springframework.stereotype.Controller;
import org.springframework.ui.ModelMap;
import org.springframework.web.bind.annotation.GetMapping;
import org.springframework.web.bind.annotation.ModelAttribute;
import org.springframework.web.bind.annotation.PostMapping;
import org.springframework.web.servlet.ModelAndView;

@Controller
public class UserController {

   @GetMapping(value = "/user")
   public ModelAndView user() {
      return new ModelAndView("user", "command", new User());
   }

   @PostMapping(value = "/addUser")
   public String addUser(@ModelAttribute("SpringWeb")User user,
      ModelMap model) {
      model.addAttribute("username", user.getUsername());
      model.addAttribute("password", user.getPassword());
      model.addAttribute("address", user.getAddress());
      model.addAttribute("receivePaper", user.isReceivePaper());
      return "users";
   }
}
Here, the first service method user(), we have passed a blank User object in the ModelAndView object with name "command", because the spring framework expects an object with name "command", if you are using <form:form> tags in your JSP file. So, when the user() method is called it returns user.jsp view.
The Second service method addUser() will be called against a POST method on the hello/addUser URL. You will prepare your model object based on the submitted information. Finally, the "users" view will be returned from the service method, which will result in rendering the users.jsp.
user.jsp
<%@taglib uri = "http://www.springframework.org/tags/form" prefix = "form"%>
<html>
   <head>
      <title>Spring MVC Form Handling</title>
   </head>
   <body>

      <h2>User Information</h2>
      <form:form method = "POST" action = "/hello/addUser">
         <table>
            <tr>
               <td><form:label path = "username">User Name</form:label></td>
               <td><form:input path = "username" /></td>
            </tr>
            <tr>
               <td><form:label path = "password">Password</form:label></td>
               <td><form:password path = "password" /></td>
            </tr>
            <tr>
               <td><form:label path = "address">Address</form:label></td>
               <td><form:textarea path = "address" rows = "5" cols = "30" /></td>
            </tr>
            <tr>
               <td><form:label path = "receivePaper">Subscribe Newsletter</form:label></td>
               <td><form:checkbox path = "receivePaper" /></td>
            </tr>
            <tr>
               <td colspan = "2">
                  <input type = "submit" value = "Submit"/>
               </td>
            </tr>
         </table>
      </form:form>
   </body>
</html>
Here, we are using <form:checkbox /> tag to render an HTML Checkbox. For example −
<form:checkbox path="receivePaper" />
It will render following HTML content.
<input id="receivePaper1" name = "receivePaper" type = "checkbox" value = "true"/>
<input type = "hidden" name = "_receivePaper" value = "on"/>
users.jsp
<%@taglib uri = "http://www.springframework.org/tags/form" prefix = "form"%>
<html>
   <head>
      <title>Spring MVC Form Handling</title>
   </head>
   <body>

      <h2>Submitted User Information</h2>
      <table>
         <tr>
            <td>Username</td>
            <td>${username}</td>
         </tr>
         <tr>
            <td>Password</td>
            <td>${password}</td>
         </tr>
         <tr>
            <td>Address</td>
            <td>${address}</td>
         </tr>
         <tr>
            <td>Subscribed to Newsletter</td>
            <td>${receivePaper}</td>
         </tr>
      </table>
   </body>
</html>
Output
Once you are done with creating source and configuration files, export your application. Right click on your application, use Run As → Maven Install option and save your hello.war file in Tomcat's webapps folder.
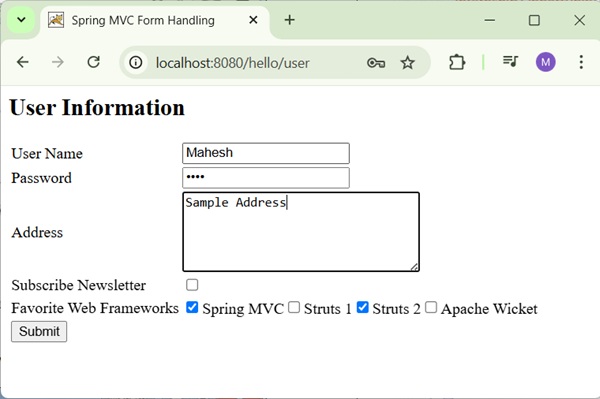
Now, start your Tomcat server and make sure you are able to access other webpages from the webapps folder using a standard browser. Try a URL http://localhost:8080/hello/user and we will see the following screen if everything is fine with the Spring Web Application.
After submitting the required information, click on the submit button to submit the form. We will see the following screen if everything is fine with the Spring Web Application.

Spring MVC - CheckBoxes Example
The following example shows how to use Multiple Checkboxes in forms using the Spring Web MVC framework.
To start with, let us have a working Eclipse IDE in place and consider the following steps to develop a Dynamic Form based Web Application using Spring Web Framework −
| Step | Description |
|---|---|
| 1 | Create a project with a name hello under a package com.tutorialspoint as explained in the Spring MVC - Hello World Example chapter. |
| 2 | Create Java class User and UserController under the com.tutorialspoint package. |
| 3 | Create view files user.jsp and users.jsp under the jsp sub-folder in WEB-INF folder. |
| 4 | The final step is to create the content of the source and configuration files and export the application as explained below. |
User.java
package com.tutorialspoint;

public class User {

   private String username;
   private String password;
   private String address;
   private boolean receivePaper;
   private String [] favoriteFrameworks;

   public String getUsername() {
      return username;
   }
   public void setUsername(String username) {
      this.username = username;
   }

   public String getPassword() {
      return password;
   }
   public void setPassword(String password) {
      this.password = password;
   }
   public String getAddress() {
      return address;
   }
   public void setAddress(String address) {
      this.address = address;
   }
   public boolean isReceivePaper() {
      return receivePaper;
   }
   public void setReceivePaper(boolean receivePaper) {
      this.receivePaper = receivePaper;
   }
   public String[] getFavoriteFrameworks() {
      return favoriteFrameworks;
   }
   public void setFavoriteFrameworks(String[] favoriteFrameworks) {
      this.favoriteFrameworks = favoriteFrameworks;
   }
}
UserController.java
package com.tutorialspoint;

import java.util.ArrayList;
import java.util.List;

import org.springframework.stereotype.Controller;
import org.springframework.web.bind.annotation.ModelAttribute;
import org.springframework.web.bind.annotation.GetMapping;
import org.springframework.web.bind.annotation.PostMapping;
import org.springframework.web.servlet.ModelAndView;
import org.springframework.ui.ModelMap;

@Controller
public class UserController {

   @GetMapping(value = "/user")
   public ModelAndView user() {
      User user = new User();
	  user.setFavoriteFrameworks((new String []{"Spring MVC","Struts 2"}));
	  ModelAndView modelAndView = new ModelAndView("user", "command", user);
	  return modelAndView;
   }

   @PostMapping(value = "/addUser")
   public String addUser(@ModelAttribute("SpringWeb")User user,
      ModelMap model) {
      model.addAttribute("username", user.getUsername());
      model.addAttribute("password", user.getPassword());
      model.addAttribute("address", user.getAddress());
      model.addAttribute("receivePaper", user.isReceivePaper());
	  model.addAttribute("favoriteFrameworks", user.getFavoriteFrameworks());
      return "users";
   }

   @ModelAttribute("webFrameworkList")
   public List<String> getWebFrameworkList() {
      List<String> webFrameworkList = new ArrayList<String>();
      webFrameworkList.add("Spring MVC");
      webFrameworkList.add("Struts 1");
      webFrameworkList.add("Struts 2");
      webFrameworkList.add("Apache Wicket");
      return webFrameworkList;
   }
}
Here, the first service method user(), we have passed a blank User object in the ModelAndView object with name "command", because the spring framework expects an object with name "command", if you are using <form:form> tags in your JSP file. So, when the user() method is called it returns user.jsp view.
The Second service method addUser() will be called against a POST method on the hello/addUser URL. You will prepare your model object based on the submitted information. Finally, the "users" view will be returned from the service method, which will result in rendering the users.jsp.
user.jsp
<%@taglib uri = "http://www.springframework.org/tags/form" prefix = "form"%>
<html>
   <head>
      <title>Spring MVC Form Handling</title>
   </head>
   <body>

      <h2>User Information</h2>
      <form:form method = "POST" action = "/hello/addUser">
         <table>
            <tr>
               <td><form:label path = "username">User Name</form:label></td>
               <td><form:input path = "username" /></td>
            </tr>
            <tr>
               <td><form:label path = "password">Password</form:label></td>
               <td><form:password path = "password" /></td>
            </tr>
            <tr>
               <td><form:label path = "address">Address</form:label></td>
               <td><form:textarea path = "address" rows = "5" cols = "30" /></td>
            </tr>
            <tr>
               <td><form:label path = "receivePaper">Subscribe Newsletter</form:label></td>
               <td><form:checkbox path = "receivePaper" /></td>
            </tr>
            <tr>
               <td><form:label path = "favoriteFrameworks">Favorite Web Frameworks</form:label></td>
               <td><form:checkboxes items = "${webFrameworkList}" path = "favoriteFrameworks" /></td>
            </tr>
            <tr>
               <td colspan = "2">
                  <input type = "submit" value = "Submit"/>
               </td>
            </tr>
         </table>
      </form:form>
   </body>
</html>
Here, we are using <form:checkboxes /> tag to render HTML Checkboxes. For example −
<form:checkboxes items = "${webFrameworkList}" path = "favoriteFrameworks" />
It will render following HTML content.
<span>
   <input id = "favoriteFrameworks1" name = "favoriteFrameworks" type = "checkbox" value = "Spring MVC" checked = "checked"/>
   <label for = "favoriteFrameworks1">Spring MVC</label>
</span>
<span>
   <input id = "favoriteFrameworks2" name = "favoriteFrameworks" type = "checkbox" value = "Struts 1"/>
   <label for = "favoriteFrameworks2">Struts 1</label>
</span>
<span>
   <input id = "favoriteFrameworks3" name = "favoriteFrameworks" type = "checkbox" value = "Struts 2" checked = "checked"/>
   <label for = "favoriteFrameworks3">Struts 2</label>
</span>
<span>
   <input id = "favoriteFrameworks4" name = "favoriteFrameworks" type = "checkbox" value = "Apache Wicket"/>
   <label for = "favoriteFrameworks4">Apache Wicket</label>
</span>
<input type = "hidden" name = "_favoriteFrameworks" value = "on"/>
users.jsp
<%@taglib uri = "http://www.springframework.org/tags/form" prefix = "form"%>
<html>
   <head>
      <title>Spring MVC Form Handling</title>
   </head>
   <body>

      <h2>Submitted User Information</h2>
      <table>
         <tr>
            <td>Username</td>
            <td>${username}</td>
         </tr>
         <tr>
            <td>Password</td>
            <td>${password}</td>
         </tr>
         <tr>
            <td>Address</td>
            <td>${address}</td>
         </tr>
         <tr>
            <td>Subscribed to Newsletter</td>
            <td>${receivePaper}</td>
         </tr>
         <tr>
            <td>Favorite Web Frameworks</td>
            <td> <% String[] favoriteFrameworks = (String[])request.getAttribute("favoriteFrameworks");
            for(String framework: favoriteFrameworks) {
               out.println(framework);
            }
            %></td>
         </tr>
      </table>
   </body>
</html>
Output
Once you are done with creating source and configuration files, export your application. Right click on your application, use Run As → Maven Install option and save your hello.war file in Tomcat's webapps folder.
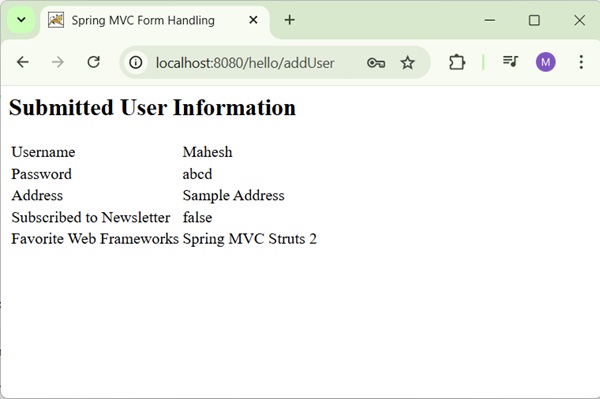
Now, start your Tomcat server and make sure you are able to access other webpages from the webapps folder using a standard browser. Try a URL http://localhost:8080/hello/user and we will see the following screen if everything is fine with the Spring Web Application.
After submitting the required information, click on the submit button to submit the form. We will see the following screen, if everything is fine with your Spring Web Application.
Spring MVC - RadioButton Example
The following example shows how to use RadioButton in forms using the Spring Web MVC framework.
To start with, let us have a working Eclipse IDE in place and consider the following steps to develop a Dynamic Form based Web Application using Spring Web Framework −
| Step | Description |
|---|---|
| 1 | Create a project with a name hello under a package com.tutorialspoint as explained in the Spring MVC - Hello World Example chapter. |
| 2 | Create Java class User and UserController under the com.tutorialspoint package. |
| 3 | Create view files user.jsp and users.jsp under the jsp sub-folder in WEB-INF folder. |
| 4 | The final step is to create the content of the source and configuration files and export the application as explained below. |
User.java
package com.tutorialspoint;

public class User {

   private String username;
   private String password;
   private String address;
   private boolean receivePaper;
   private String [] favoriteFrameworks;
   private String gender;

   public String getUsername() {
      return username;
   }
   public void setUsername(String username) {
      this.username = username;
   }

   public String getPassword() {
      return password;
   }
   public void setPassword(String password) {
      this.password = password;
   }
   public String getAddress() {
      return address;
   }
   public void setAddress(String address) {
      this.address = address;
   }
   public boolean isReceivePaper() {
      return receivePaper;
   }
   public void setReceivePaper(boolean receivePaper) {
      this.receivePaper = receivePaper;
   }
   public String[] getFavoriteFrameworks() {
      return favoriteFrameworks;
   }
   public void setFavoriteFrameworks(String[] favoriteFrameworks) {
      this.favoriteFrameworks = favoriteFrameworks;
   }
   public String getGender() {
      return gender;
   }
   public void setGender(String gender) {
      this.gender = gender;
   }
}
UserController.java
package com.tutorialspoint;

import java.util.ArrayList;
import java.util.List;

import org.springframework.stereotype.Controller;
import org.springframework.web.bind.annotation.ModelAttribute;
import org.springframework.web.bind.annotation.GetMapping;
import org.springframework.web.bind.annotation.PostMapping;
import org.springframework.web.servlet.ModelAndView;
import org.springframework.ui.ModelMap;

@Controller
public class UserController {

   @GetMapping(value = "/user")
   public ModelAndView user() {
      User user = new User();
	  user.setFavoriteFrameworks((new String []{"Spring MVC","Struts 2"}));
	  ModelAndView modelAndView = new ModelAndView("user", "command", user);
	  return modelAndView;
   }

   @PostMapping(value = "/addUser")
   public String addUser(@ModelAttribute("SpringWeb")User user,
      ModelMap model) {
      model.addAttribute("username", user.getUsername());
      model.addAttribute("password", user.getPassword());
      model.addAttribute("address", user.getAddress());
      model.addAttribute("receivePaper", user.isReceivePaper());
	  model.addAttribute("favoriteFrameworks", user.getFavoriteFrameworks());
      model.addAttribute("gender", user.getGender());
      return "users";
   }

   @ModelAttribute("webFrameworkList")
   public List<String> getWebFrameworkList() {
      List<String> webFrameworkList = new ArrayList<String>();
      webFrameworkList.add("Spring MVC");
      webFrameworkList.add("Struts 1");
      webFrameworkList.add("Struts 2");
      webFrameworkList.add("Apache Wicket");
      return webFrameworkList;
   }
}
Here, the first service method user(), we have passed a blank User object in the ModelAndView object with name "command", because the spring framework expects an object with name "command", if you are using <form:form> tags in your JSP file. So, when the user() method is called it returns user.jsp view.
The Second service method addUser() will be called against a POST method on the hello/addUser URL. You will prepare your model object based on the submitted information. Finally, the "users" view will be returned from the service method, which will result in rendering the users.jsp.
user.jsp
<%@taglib uri = "http://www.springframework.org/tags/form" prefix = "form"%>
<html>
   <head>
      <title>Spring MVC Form Handling</title>
   </head>
   <body>

      <h2>User Information</h2>
      <form:form method = "POST" action = "/hello/addUser">
         <table>
            <tr>
               <td><form:label path = "username">User Name</form:label></td>
               <td><form:input path = "username" /></td>
            </tr>
            <tr>
               <td><form:label path = "password">Password</form:label></td>
               <td><form:password path = "password" /></td>
            </tr>
            <tr>
               <td><form:label path = "address">Address</form:label></td>
               <td><form:textarea path = "address" rows = "5" cols = "30" /></td>
            </tr>
            <tr>
               <td><form:label path = "receivePaper">Subscribe Newsletter</form:label></td>
               <td><form:checkbox path = "receivePaper" /></td>
            </tr>
            <tr>
               <td><form:label path = "favoriteFrameworks">Favorite Web Frameworks</form:label></td>
               <td><form:checkboxes items = "${webFrameworkList}" path = "favoriteFrameworks" /></td>
            </tr>
            <tr>
               <td><form:label path = "gender">Gender</form:label></td>
               <td>
                  <form:radiobutton path = "gender" value = "M" label = "Male" />
                  <form:radiobutton path = "gender" value = "F" label = "Female" />
               </td>
            </tr>
            <tr>
               <td colspan = "2">
                  <input type = "submit" value = "Submit"/>
               </td>
            </tr>
         </table>
      </form:form>
   </body>
</html>
Here, we are using <form:radiobutton /> tag to render HTML Radiobutton. For example −
<form:radiobutton path = "gender" value = "M" label = "Male" />
<form:radiobutton path = "gender" value = "F" label = "Female" />
It will render following HTML content.
<input id = "gender1" name = "gender" type = "radio" value = "M" checked = "checked"/><label for = "gender1">Male</label>
<input id = "gender2" name = "gender" type = "radio" value = "F"/><label for = "gender2">Female</label>
users.jsp
<%@taglib uri="http://www.springframework.org/tags/form" prefix="form"%>
<html>
<head>
    <title>Spring MVC Form Handling</title>
</head>
   <body>

      <h2>Submitted User Information</h2>
      <table>
         <tr>
            <td>Username</td>
            <td>${username}</td>
         </tr>

         <tr>
            <td>Password</td>
            <td>${password}</td>
         </tr>

         <tr>
            <td>Address</td>
            <td>${address}</td>
         </tr>

         <tr>
            <td>Subscribed to Newsletter</td>
            <td>${receivePaper}</td>
         </tr>

         <tr>
            <td>Favorite Web Frameworks</td>
            <td> <% String[] favoriteFrameworks = (String[])request.getAttribute("favoriteFrameworks");
               for(String framework: favoriteFrameworks) {
                  out.println(framework);
               }
            %></td>
         </tr>

         <tr>
            <td>Gender</td>
            <td>${(gender=="M"? "Male" : "Female")}</td>
         </tr>
      </table>
   </body>
</html>
Output
Once you are done with creating source and configuration files, export your application. Right click on your application, use Run As → Maven Install option and save your hello.war file in Tomcat's webapps folder.
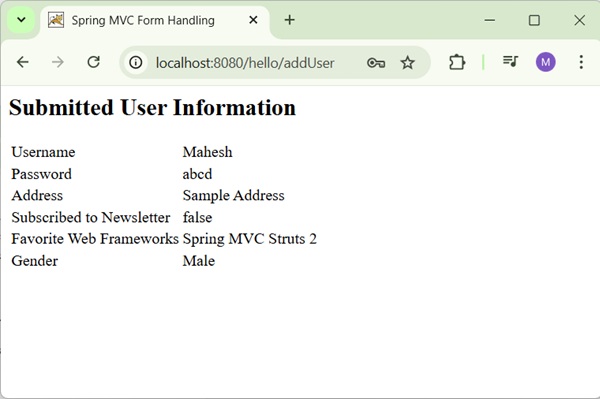
Now, start your Tomcat server and make sure you are able to access other webpages from the webapps folder using a standard browser. Try a URL http://localhost:8080/hello/user and we will see the following screen if everything is fine with the Spring Web Application.
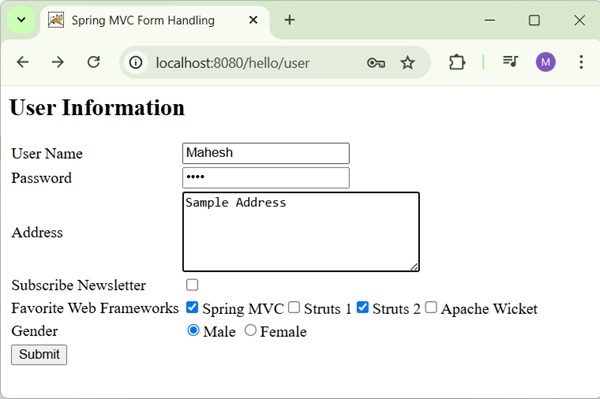
After submitting the required information, click on the submit button to submit the form. We will see the following screen, if everything is fine with the Spring Web Application.
Spring MVC - RadioButtons Example
The following example shows how to use multiple RadioButtons in forms using the Spring Web MVC framework.
To start with, let us have a working Eclipse IDE in place and consider the following steps to develop a Dynamic Form based Web Application using Spring Web Framework −
| Step | Description |
|---|---|
| 1 | Create a project with a name hello under a package com.tutorialspoint as explained in the Spring MVC - Hello World Example chapter. |
| 2 | Create Java class User and UserController under the com.tutorialspoint package. |
| 3 | Create view files user.jsp and users.jsp under the jsp sub-folder in WEB-INF folder. |
| 4 | The final step is to create the content of the source and configuration files and export the application as explained below. |
User.java
package com.tutorialspoint;

public class User {

   private String username;
   private String password;
   private String address;
   private boolean receivePaper;
   private String [] favoriteFrameworks;
   private String gender;
   private String favoriteNumber;

   public String getUsername() {
      return username;
   }
   public void setUsername(String username) {
      this.username = username;
   }

   public String getPassword() {
      return password;
   }
   public void setPassword(String password) {
      this.password = password;
   }
   public String getAddress() {
      return address;
   }
   public void setAddress(String address) {
      this.address = address;
   }
   public boolean isReceivePaper() {
      return receivePaper;
   }
   public void setReceivePaper(boolean receivePaper) {
      this.receivePaper = receivePaper;
   }
   public String[] getFavoriteFrameworks() {
      return favoriteFrameworks;
   }
   public void setFavoriteFrameworks(String[] favoriteFrameworks) {
      this.favoriteFrameworks = favoriteFrameworks;
   }
   public String getGender() {
      return gender;
   }
   public void setGender(String gender) {
      this.gender = gender;
   }
   public String getFavoriteNumber() {
      return favoriteNumber;
   }
   public void setFavoriteNumber(String favoriteNumber) {
      this.favoriteNumber = favoriteNumber;
   }
}
UserController.java
package com.tutorialspoint;

import java.util.ArrayList;
import java.util.List;

import org.springframework.stereotype.Controller;
import org.springframework.web.bind.annotation.ModelAttribute;
import org.springframework.web.bind.annotation.GetMapping;
import org.springframework.web.bind.annotation.PostMapping;
import org.springframework.web.servlet.ModelAndView;
import org.springframework.ui.ModelMap;

@Controller
public class UserController {

   @GetMapping(value = "/user")
   public ModelAndView user() {
      User user = new User();
	  user.setFavoriteFrameworks((new String []{"Spring MVC","Struts 2"}));
	  ModelAndView modelAndView = new ModelAndView("user", "command", user);
	  return modelAndView;
   }

   @PostMapping(value = "/addUser")
   public String addUser(@ModelAttribute("SpringWeb")User user,
      ModelMap model) {
      model.addAttribute("username", user.getUsername());
      model.addAttribute("password", user.getPassword());
      model.addAttribute("address", user.getAddress());
      model.addAttribute("receivePaper", user.isReceivePaper());
	  model.addAttribute("favoriteFrameworks", user.getFavoriteFrameworks());
      model.addAttribute("gender", user.getGender());
      model.addAttribute("favoriteNumber", user.getFavoriteNumber());
      return "users";
   }

   @ModelAttribute("webFrameworkList")
   public List<String> getWebFrameworkList() {
      List<String> webFrameworkList = new ArrayList<String>();
      webFrameworkList.add("Spring MVC");
      webFrameworkList.add("Struts 1");
      webFrameworkList.add("Struts 2");
      webFrameworkList.add("Apache Wicket");
      return webFrameworkList;
   }

   @ModelAttribute("numbersList")
   public List<String> getNumbersList() {
      List<String> numbersList = new ArrayList<String>();
      numbersList.add("1");
      numbersList.add("2");
      numbersList.add("3");
      numbersList.add("4");
      return numbersList;
   }
}
Here, the first service method user(), we have passed a blank User object in the ModelAndView object with name "command", because the spring framework expects an object with name "command", if you are using <form:form> tags in your JSP file. So, when the user() method is called it returns user.jsp view.
The Second service method addUser() will be called against a POST method on the hello/addUser URL. You will prepare your model object based on the submitted information. Finally, the "users" view will be returned from the service method, which will result in rendering the users.jsp.
user.jsp
<%@taglib uri = "http://www.springframework.org/tags/form" prefix = "form"%>
<html>
   <head>
      <title>Spring MVC Form Handling</title>
   </head>
   <body>

      <h2>User Information</h2>
      <form:form method = "POST" action = "/hello/addUser">
         <table>
            <tr>
               <td><form:label path = "username">User Name</form:label></td>
               <td><form:input path = "username" /></td>
            </tr>
            <tr>
               <td><form:label path = "password">Password</form:label></td>
               <td><form:password path = "password" /></td>
            </tr>
            <tr>
               <td><form:label path = "address">Address</form:label></td>
               <td><form:textarea path = "address" rows = "5" cols = "30" /></td>
            </tr>
            <tr>
               <td><form:label path = "receivePaper">Subscribe Newsletter</form:label></td>
               <td><form:checkbox path = "receivePaper" /></td>
            </tr>
            <tr>
               <td><form:label path = "favoriteFrameworks">Favorite Web Frameworks</form:label></td>
               <td><form:checkboxes items = "${webFrameworkList}" path = "favoriteFrameworks" /></td>
            </tr>
            <tr>
               <td><form:label path = "gender">Gender</form:label></td>
               <td>
                  <form:radiobutton path = "gender" value = "M" label = "Male" />
                  <form:radiobutton path = "gender" value = "F" label = "Female" />
               </td>
            </tr>
            <tr>
               <td><form:label path = "favoriteNumber">Favorite Number</form:label></td>
               <td>
                  <form:radiobuttons path = "favoriteNumber" items = "${numbersList}" />
               </td>
            </tr>
            <tr>
               <td colspan = "2">
                  <input type = "submit" value = "Submit"/>
               </td>
            </tr>
         </table>
      </form:form>
   </body>
</html>
Here, we are using <form:radiobuttons /> tag to render HTML Radiobuttons. For example −
<form:radiobuttons path = "favoriteNumber" items="${numbersList}" />
It will render following HTML content.
<span>
   <input id = "favoriteNumber1" name = "favoriteNumber" type = "radio" value = "1"/>
   <label for = "favoriteNumber1">1</label>
</span>
<span>
   <input id = "favoriteNumber2" name = "favoriteNumber" type = "radio" value = "2"/>
   <label for = "favoriteNumber2">2</label>
</span>
<span>
   <input id = "favoriteNumber3" name = "favoriteNumber" type = "radio" value = "3"/>
   <label for = "favoriteNumber3">3</label>
</span>
<span>
   <input id = "favoriteNumber4" name = "favoriteNumber" type = "radio" value = "4"/>
   <label for = "favoriteNumber4">4</label>
</span>
users.jsp
<%@taglib uri = "http://www.springframework.org/tags/form" prefix = "form"%>
<html>
   <head>
      <title>Spring MVC Form Handling</title>
   </head>
   <body>
      <h2>Submitted User Information</h2>
      <table>
         <tr>
            <td>Username</td>
            <td>${username}</td>
         </tr>
         <tr>
            <td>Password</td>
            <td>${password}</td>
         </tr>
         <tr>
            <td>Address</td>
            <td>${address}</td>
         </tr>
         <tr>
            <td>Subscribed to Newsletter</td>
            <td>${receivePaper}</td>
         </tr>
         <tr>
            <td>Favorite Web Frameworks</td>
            <td> <% String[] favoriteFrameworks = (String[])request.getAttribute("favoriteFrameworks");
               for(String framework: favoriteFrameworks) {
                  out.println(framework);
               }
            %></td>
         </tr>
         <tr>
            <td>Gender</td>
            <td>${(gender=="M"? "Male" : "Female")}</td>
         </tr>
         <tr>
            <td>Favourite Number</td>
            <td>${favoriteNumber}</td>
         </tr>
      </table>
   </body>
</html>
Output
Once you are done with creating source and configuration files, export your application. Right click on your application, use Run As → Maven Install option and save your hello.war file in Tomcat's webapps folder.
Now, start your Tomcat server and make sure you are able to access other webpages from the webapps folder using a standard browser. Try a URL http://localhost:8080/hello/user and we will see the following screen if everything is fine with the Spring Web Application.
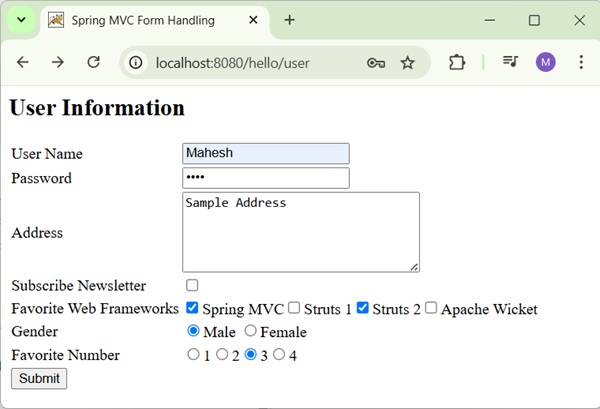
After submitting the required information, click on the submit button to submit the form. We will see the following screen, if everything is fine with your Spring Web Application.
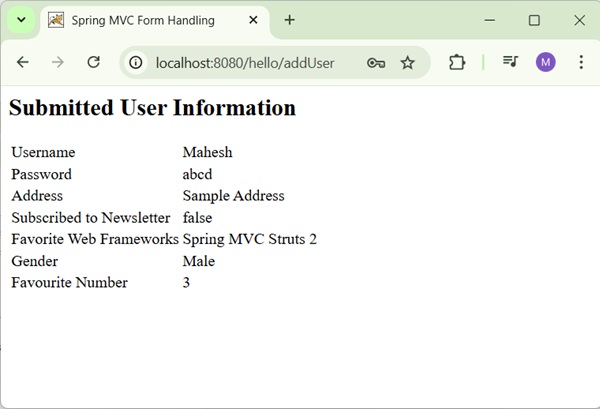
Spring MVC - Dropdown Example
The following example shows how to use Dropdown in forms using the Spring Web MVC framework.
To start with, let us have a working Eclipse IDE in place and consider the following steps to develop a Dynamic Form based Web Application using Spring Web Framework −
| Step | Description |
|---|---|
| 1 | Create a project with a name hello under a package com.tutorialspoint as explained in the Spring MVC - Hello World Example chapter. |
| 2 | Create Java class User and UserController under the com.tutorialspoint package. |
| 3 | Create view files user.jsp and users.jsp under the jsp sub-folder in WEB-INF folder. |
| 4 | The final step is to create the content of the source and configuration files and export the application as explained below. |
User.java
package com.tutorialspoint;

public class User {

   private String username;
   private String password;
   private String address;
   private boolean receivePaper;
   private String [] favoriteFrameworks;
   private String gender;
   private String favoriteNumber;
   private String country;

   public String getUsername() {
      return username;
   }
   public void setUsername(String username) {
      this.username = username;
   }

   public String getPassword() {
      return password;
   }
   public void setPassword(String password) {
      this.password = password;
   }
   public String getAddress() {
      return address;
   }
   public void setAddress(String address) {
      this.address = address;
   }
   public boolean isReceivePaper() {
      return receivePaper;
   }
   public void setReceivePaper(boolean receivePaper) {
      this.receivePaper = receivePaper;
   }
   public String[] getFavoriteFrameworks() {
      return favoriteFrameworks;
   }
   public void setFavoriteFrameworks(String[] favoriteFrameworks) {
      this.favoriteFrameworks = favoriteFrameworks;
   }
   public String getGender() {
      return gender;
   }
   public void setGender(String gender) {
      this.gender = gender;
   }
   public String getFavoriteNumber() {
      return favoriteNumber;
   }
   public void setFavoriteNumber(String favoriteNumber) {
      this.favoriteNumber = favoriteNumber;
   }
   public String getCountry() {
      return country;
   }
   public void setCountry(String country) {
      this.country = country;
   }
}
UserController.java
package com.tutorialspoint;

import java.util.ArrayList;
import java.util.HashMap;
import java.util.List;
import java.util.Map;

import org.springframework.stereotype.Controller;
import org.springframework.ui.ModelMap;
import org.springframework.web.bind.annotation.GetMapping;
import org.springframework.web.bind.annotation.ModelAttribute;
import org.springframework.web.bind.annotation.PostMapping;
import org.springframework.web.servlet.ModelAndView;

@Controller
public class UserController {

   @GetMapping(value = "/user")
   public ModelAndView user() {
      User user = new User();
	  user.setFavoriteFrameworks((new String []{"Spring MVC","Struts 2"}));
	  ModelAndView modelAndView = new ModelAndView("user", "command", user);
	  return modelAndView;
   }

   @PostMapping(value = "/addUser")
   public String addUser(@ModelAttribute("SpringWeb")User user,
      ModelMap model) {
      model.addAttribute("username", user.getUsername());
      model.addAttribute("password", user.getPassword());
      model.addAttribute("address", user.getAddress());
      model.addAttribute("receivePaper", user.isReceivePaper());
	  model.addAttribute("favoriteFrameworks", user.getFavoriteFrameworks());
      model.addAttribute("gender", user.getGender());
      model.addAttribute("favoriteNumber", user.getFavoriteNumber());
      model.addAttribute("country", user.getCountry());
      return "users";
   }

   @ModelAttribute("webFrameworkList")
   public List<String> getWebFrameworkList() {
      List<String> webFrameworkList = new ArrayList<String>();
      webFrameworkList.add("Spring MVC");
      webFrameworkList.add("Struts 1");
      webFrameworkList.add("Struts 2");
      webFrameworkList.add("Apache Wicket");
      return webFrameworkList;
   }

   @ModelAttribute("numbersList")
   public List<String> getNumbersList() {
      List<String> numbersList = new ArrayList<String>();
      numbersList.add("1");
      numbersList.add("2");
      numbersList.add("3");
      numbersList.add("4");
      return numbersList;
   }

   @ModelAttribute("countryList")
   public Map<String, String> getCountryList() {
      Map<String, String> countryList = new HashMap<>();
      countryList.put("US", "United States");
      countryList.put("CH", "China");
      countryList.put("SG", "Singapore");
      countryList.put("MY", "Malaysia");
      return countryList;
   }
}
Here, the first service method user(), we have passed a blank User object in the ModelAndView object with name "command", because the spring framework expects an object with name "command", if you are using <form:form> tags in your JSP file. So, when the user() method is called it returns user.jsp view.
The Second service method addUser() will be called against a POST method on the hello/addUser URL. You will prepare your model object based on the submitted information. Finally, the "users" view will be returned from the service method, which will result in rendering the users.jsp.
user.jsp
<%@taglib uri = "http://www.springframework.org/tags/form" prefix = "form"%>
<html>
   <head>
      <title>Spring MVC Form Handling</title>
   </head>
   <body>

   <h2>User Information</h2>
      <form:form method = "POST" action = "/hello/addUser">
         <table>
            <tr>
               <td><form:label path = "username">User Name</form:label></td>
               <td><form:input path = "username" /></td>
            </tr>
            <tr>
               <td><form:label path = "password">Password</form:label></td>
               <td><form:password path = "password" /></td>
            </tr>
            <tr>
               <td><form:label path = "address">Address</form:label></td>
               <td><form:textarea path = "address" rows = "5" cols = "30" /></td>
            </tr>
            <tr>
               <td><form:label path = "receivePaper">Subscribe Newsletter</form:label></td>
               <td><form:checkbox path = "receivePaper" /></td>
            </tr>
            <tr>
               <td><form:label path = "favoriteFrameworks">Favorite Web Frameworks</form:label></td>
               <td><form:checkboxes items = "${webFrameworkList}" path = "favoriteFrameworks" /></td>
            </tr>
            <tr>
               <td><form:label path = "gender">Gender</form:label></td>
               <td>
                  <form:radiobutton path = "gender" value = "M" label = "Male" />
                  <form:radiobutton path = "gender" value = "F" label = "Female" />
               </td>
            </tr>
            <tr>
               <td><form:label path = "favoriteNumber">Favorite Number</form:label></td>
               <td>
                  <form:radiobuttons path = "favoriteNumber" items = "${numbersList}" />
               </td>
            </tr>
            <tr>
               <td><form:label path = "country">Country</form:label></td>
               <td>
                  <form:select path = "country">
                     <form:option value = "NONE" label = "Select"/>
                     <form:options items = "${countryList}" />
                  </form:select>
               </td>
            </tr>
            <tr>
               <td colspan = "2">
                  <input type = "submit" value = "Submit"/>
               </td>
            </tr>
         </table>
      </form:form>
   </body>
</html>
Here, we are using <form:select /> , <form:option /> and <form:options /> tags to render HTML select. For example −
<form:select path = "country">
   <form:option value = "NONE" label = "Select"/>
   <form:options items = "${countryList}" />
</form:select>
It will render following HTML content.
<select id = "country" name = "country">
   <option value = "NONE">Select</option>
   <option value = "US">United States</option>
   <option value = "CH">China</option>
   <option value = "MY">Malaysia</option>
   <option value = "SG">Singapore</option>
</select>
users.jsp
<%@taglib uri = "http://www.springframework.org/tags/form" prefix = "form"%>
<html>
   <head>
      <title>Spring MVC Form Handling</title>
   </head>
   <body>
      <h2>Submitted User Information</h2>
      <table>
         <tr>
            <td>Username</td>
            <td>${username}</td>
         </tr>
         <tr>
            <td>Password</td>
            <td>${password}</td>
         </tr>
         <tr>
            <td>Address</td>
            <td>${address}</td>
         </tr>
         <tr>
            <td>Subscribed to Newsletter</td>
            <td>${receivePaper}</td>
         </tr>
         <tr>
            <td>Favorite Web Frameworks</td>
            <td> <% String[] favoriteFrameworks = (String[])request.getAttribute("favoriteFrameworks");
               for(String framework: favoriteFrameworks) {
                  out.println(framework);
               }
            %></td>
         </tr>
         <tr>
            <td>Gender</td>
            <td>${(gender=="M"? "Male" : "Female")}</td>
         </tr>
         <tr>
            <td>Favourite Number</td>
            <td>${favoriteNumber}</td>
         </tr>
         <tr>
            <td>Country</td>
            <td>${country}</td>
         </tr>
      </table>
   </body>
</html>
Output
Once you are done with creating source and configuration files, export your application. Right click on your application, use Run As → Maven Install option and save your hello.war file in Tomcat's webapps folder.
Now, start your Tomcat server and make sure you are able to access other webpages from the webapps folder using a standard browser. Try a URL http://localhost:8080/hello/user and we will see the following screen if everything is fine with the Spring Web Application.
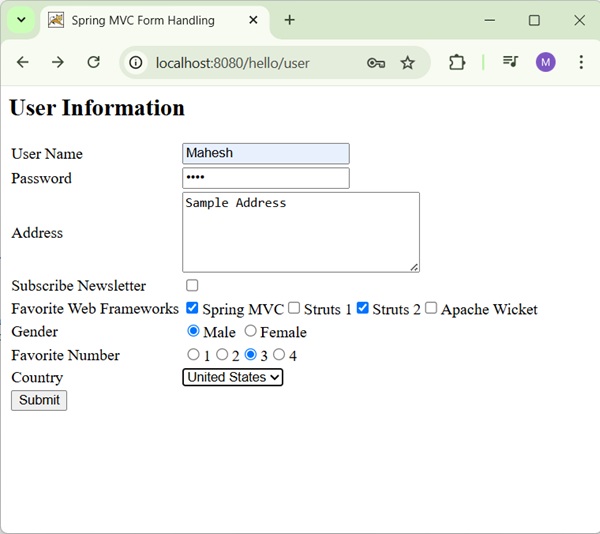
After submitting the required information, click on the submit button to submit the form. You should see the following screen, if everything is fine with your Spring Web Application.
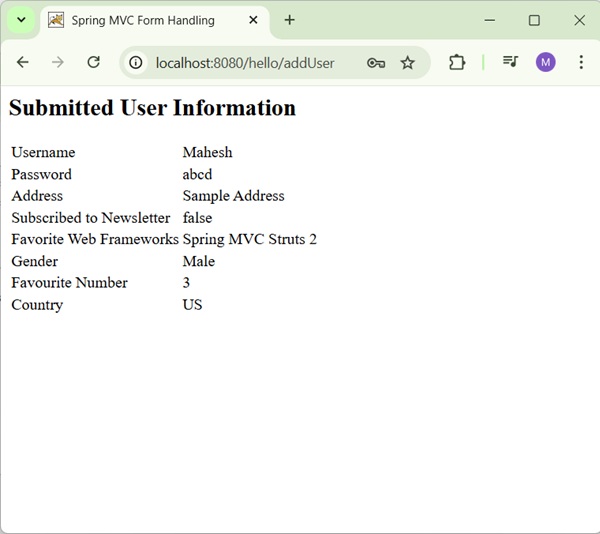
Spring MVC - List Example
The following example shows how to use List in forms using the Spring Web MVC framework.
To start with, let us have a working Eclipse IDE in place and consider the following steps to develop a Dynamic Form based Web Application using Spring Web Framework −
| Step | Description |
|---|---|
| 1 | Create a project with a name hello under a package com.tutorialspoint as explained in the Spring MVC - Hello World Example chapter. |
| 2 | Create Java class User and UserController under the com.tutorialspoint package. |
| 3 | Create view files user.jsp and users.jsp under the jsp sub-folder in WEB-INF folder. |
| 4 | The final step is to create the content of the source and configuration files and export the application as explained below. |
User.java
package com.tutorialspoint;

public class User {

   private String username;
   private String password;
   private String address;
   private boolean receivePaper;
   private String [] favoriteFrameworks;
   private String gender;
   private String favoriteNumber;
   private String country;
   private String [] skills;

   public String getUsername() {
      return username;
   }
   public void setUsername(String username) {
      this.username = username;
   }

   public String getPassword() {
      return password;
   }
   public void setPassword(String password) {
      this.password = password;
   }
   public String getAddress() {
      return address;
   }
   public void setAddress(String address) {
      this.address = address;
   }
   public boolean isReceivePaper() {
      return receivePaper;
   }
   public void setReceivePaper(boolean receivePaper) {
      this.receivePaper = receivePaper;
   }
   public String[] getFavoriteFrameworks() {
      return favoriteFrameworks;
   }
   public void setFavoriteFrameworks(String[] favoriteFrameworks) {
      this.favoriteFrameworks = favoriteFrameworks;
   }
   public String getGender() {
      return gender;
   }
   public void setGender(String gender) {
      this.gender = gender;
   }
   public String getFavoriteNumber() {
      return favoriteNumber;
   }
   public void setFavoriteNumber(String favoriteNumber) {
      this.favoriteNumber = favoriteNumber;
   }
   public String getCountry() {
      return country;
   }
   public void setCountry(String country) {
      this.country = country;
   }
   public String[] getSkills() {
      return skills;
   }
   public void setSkills(String[] skills) {
      this.skills = skills;
   }
}
UserController.java
package com.tutorialspoint;

import java.util.ArrayList;
import java.util.HashMap;
import java.util.List;
import java.util.Map;

import org.springframework.stereotype.Controller;
import org.springframework.ui.ModelMap;
import org.springframework.web.bind.annotation.GetMapping;
import org.springframework.web.bind.annotation.ModelAttribute;
import org.springframework.web.bind.annotation.PostMapping;
import org.springframework.web.servlet.ModelAndView;

@Controller
public class UserController {

   @GetMapping(value = "/user")
   public ModelAndView user() {
      User user = new User();
	  user.setFavoriteFrameworks((new String []{"Spring MVC","Struts 2"}));
	  ModelAndView modelAndView = new ModelAndView("user", "command", user);
	  return modelAndView;
   }

   @PostMapping(value = "/addUser")
   public String addUser(@ModelAttribute("SpringWeb")User user,
      ModelMap model) {
      model.addAttribute("username", user.getUsername());
      model.addAttribute("password", user.getPassword());
      model.addAttribute("address", user.getAddress());
      model.addAttribute("receivePaper", user.isReceivePaper());
	  model.addAttribute("favoriteFrameworks", user.getFavoriteFrameworks());
      model.addAttribute("gender", user.getGender());
      model.addAttribute("favoriteNumber", user.getFavoriteNumber());
      model.addAttribute("country", user.getCountry());
      model.addAttribute("skills", user.getSkills());
      return "users";
   }

   @ModelAttribute("webFrameworkList")
   public List<String> getWebFrameworkList() {
      List<String> webFrameworkList = new ArrayList<String>();
      webFrameworkList.add("Spring MVC");
      webFrameworkList.add("Struts 1");
      webFrameworkList.add("Struts 2");
      webFrameworkList.add("Apache Wicket");
      return webFrameworkList;
   }

   @ModelAttribute("numbersList")
   public List<String> getNumbersList() {
      List<String> numbersList = new ArrayList<String>();
      numbersList.add("1");
      numbersList.add("2");
      numbersList.add("3");
      numbersList.add("4");
      return numbersList;
   }

   @ModelAttribute("countryList")
   public Map<String, String> getCountryList() {
      Map<String, String> countryList = new HashMap<>();
      countryList.put("US", "United States");
      countryList.put("CH", "China");
      countryList.put("SG", "Singapore");
      countryList.put("MY", "Malaysia");
      return countryList;
   }

   @ModelAttribute("skillsList")
   public Map<String, String> getSkillsList() {
      Map<String, String> skillList = new HashMap<String, String>();
      skillList.put("Hibernate", "Hibernate");
      skillList.put("Spring", "Spring");
      skillList.put("Apache Wicket", "Apache Wicket");
      skillList.put("Struts", "Struts");
      return skillList;
   }
}
Here, the first service method user(), we have passed a blank User object in the ModelAndView object with name "command", because the spring framework expects an object with name "command", if you are using <form:form> tags in your JSP file. So, when the user() method is called it returns user.jsp view.
The Second service method addUser() will be called against a POST method on the hello/addUser URL. You will prepare your model object based on the submitted information. Finally, the "users" view will be returned from the service method, which will result in rendering the users.jsp.
user.jsp
<%@taglib uri = "http://www.springframework.org/tags/form" prefix = "form"%>
<html>
   <head>
      <title>Spring MVC Form Handling</title>
   </head>
   <body>

      <h2>User Information</h2>
      <form:form method = "POST" action = "/hello/addUser">
         <table>
            <tr>
               <td><form:label path = "username">User Name</form:label></td>
               <td><form:input path = "username" /></td>
            </tr>
            <tr>
               <td><form:label path = "password">Password</form:label></td>
               <td><form:password path = "password" /></td>
            </tr>
            <tr>
               <td><form:label path = "address">Address</form:label></td>
               <td><form:textarea path = "address" rows = "5" cols = "30" /></td>
            </tr>
            <tr>
               <td><form:label path = "receivePaper">Subscribe Newsletter</form:label></td>
               <td><form:checkbox path = "receivePaper" /></td>
            </tr>
            <tr>
               <td><form:label path = "favoriteFrameworks">Favorite Web Frameworks</form:label></td>
               <td><form:checkboxes items = "${webFrameworkList}" path = "favoriteFrameworks" /></td>
            </tr>
            <tr>
               <td><form:label path = "gender">Gender</form:label></td>
               <td>
                  <form:radiobutton path = "gender" value = "M" label = "Male" />
                  <form:radiobutton path = "gender" value = "F" label = "Female" />
               </td>
            </tr>
            <tr>
               <td><form:label path = "favoriteNumber">Favorite Number</form:label></td>
               <td>
                  <form:radiobuttons path = "favoriteNumber" items = "${numbersList}" />
               </td>
            </tr>
            <tr>
               <td><form:label path = "country">Country</form:label></td>
               <td>
                  <form:select path = "country">
                     <form:option value = "NONE" label = "Select"/>
                     <form:options items = "${countryList}" />
                  </form:select>
               </td>
            </tr>
            <tr>
               <td><form:label path = "skills">Skills</form:label></td>
               <td>
                  <form:select path = "skills" items = "${skillsList}"
                     multiple = "true" />
               </td>
            </tr>
            <tr>
               <td colspan = "2">
                  <input type = "submit" value = "Submit"/>
               </td>
            </tr>
         </table>
      </form:form>
   </body>
</html>
Here, we are using <form:select /> tag with the attribute multiple=true to render an HTML listbox. For example −
<form:select path = "skills" items = "${skillsList}" multiple = "true" />
It will render following HTML content.
<select id = "skills" name = "skills" multiple = "multiple">
   <option value = "Struts">Struts</option>
   <option value = "Hibernate">Hibernate</option>
   <option value = "Apache Wicket">Apache Wicket</option>
   <option value = "Spring">Spring</option>
</select>
<input type = "hidden" name = "_skills" value = "1"/>
users.jsp
<%@taglib uri = "http://www.springframework.org/tags/form" prefix = "form"%>
<html>
   <head>
      <title>Spring MVC Form Handling</title>
   </head>
   <body>

      <h2>Submitted User Information</h2>
      <table>
         <tr>
            <td>Username</td>
            <td>${username}</td>
         </tr>
         <tr>
            <td>Password</td>
            <td>${password}</td>
         </tr>
         <tr>
            <td>Address</td>
            <td>${address}</td>
         </tr>
         <tr>
            <td>Subscribed to Newsletter</td>
            <td>${receivePaper}</td>
         </tr>
         <tr>
            <td>Favorite Web Frameworks</td>
            <td> <% String[] favoriteFrameworks = (String[])request.getAttribute("favoriteFrameworks");
               for(String framework: favoriteFrameworks) {
                  out.println(framework);
               }
            %></td>
         </tr>
         <tr>
            <td>Gender</td>
            <td>${(gender=="M"? "Male" : "Female")}</td>
         </tr>
         <tr>
            <td>Favourite Number</td>
            <td>${favoriteNumber}</td>
         </tr>
         <tr>
            <td>Country</td>
            <td>${country}</td>
         </tr>
         <tr>
            <td>Skills</td>
            <td> <% String[] skills = (String[])request.getAttribute("skills");
            for(String skill: skills) {
               out.println(skill);
            }
            %></td>
         </tr>
      </table>
   </body>
</html>
Output
Once you are done with creating source and configuration files, export your application. Right click on your application, use Run As → Maven Install option and save your hello.war file in Tomcat's webapps folder.
Now, start your Tomcat server and make sure you are able to access other webpages from the webapps folder using a standard browser. Try a URL http://localhost:8080/hello/user and we will see the following screen if everything is fine with the Spring Web Application.
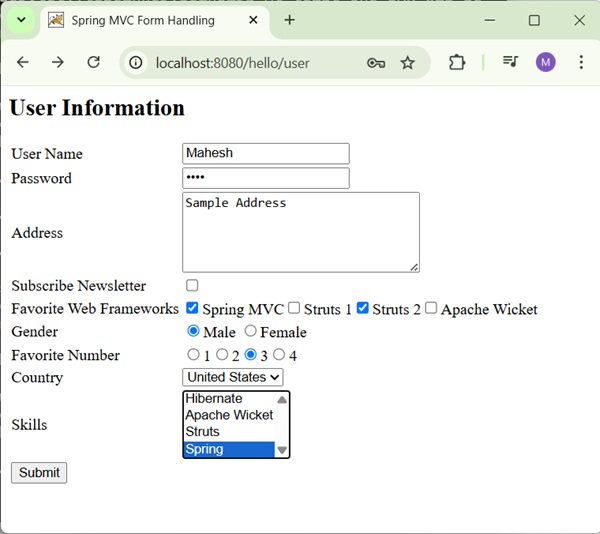
After submitting the required information, click on the submit button to submit the form. You should see the following screen, if everything is fine with your Spring Web Application.
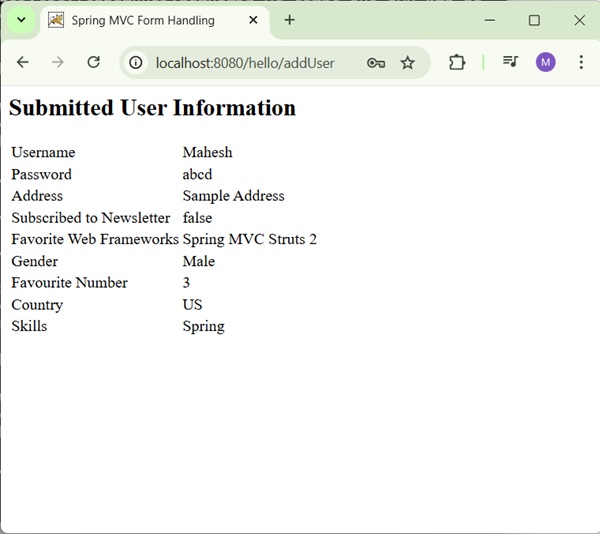
Spring MVC - Hidden Field Example
The following example shows how to use hidden fields in forms using the Spring Web MVC framework.
To start with, let us have a working Eclipse IDE in place and consider the following steps to develop a Dynamic Form based Web Application using Spring Web Framework −
| Step | Description |
|---|---|
| 1 | Create a project with a name hello under a package com.tutorialspoint as explained in the Spring MVC - Hello World Example chapter. |
| 2 | Create Java class Student and StudentController under the com.tutorialspoint package. |
| 3 | Create view files student.jsp and result.jsp under the jsp sub-folder in WEB-INF folder. |
| 4 | The final step is to create the content of the source and configuration files and export the application as explained below. |
Student.java
package com.tutorialspoint;

public class Student {
   private Integer age;
   private String name;
   private Integer id;

   public void setAge(Integer age) {
      this.age = age;
   }
   public Integer getAge() {
      return age;
   }

   public void setName(String name) {
      this.name = name;
   }
   public String getName() {
      return name;
   }

   public void setId(Integer id) {
      this.id = id;
   }
   public Integer getId() {
      return id;
   }
}
StudentController.java
package com.tutorialspoint;

import org.springframework.stereotype.Controller;
import org.springframework.web.bind.annotation.ModelAttribute;
import org.springframework.web.bind.annotation.GetMapping;
import org.springframework.web.bind.annotation.PostMapping;
import org.springframework.web.servlet.ModelAndView;
import org.springframework.ui.ModelMap;

@Controller
public class StudentController {

   @GetMapping(value = "/student")
   public ModelAndView student() {
      return new ModelAndView("student", "command", new Student());
   }

   @PostMapping(value = "/addStudent")
   public String addStudent(@ModelAttribute("SpringWeb")Student student,
      ModelMap model) {
      model.addAttribute("name", student.getName());
      model.addAttribute("age", student.getAge());
      model.addAttribute("id", student.getId());

      return "result";
   }
}
Here, for the first service method student(), we have passed a blank Studentobject in the ModelAndView object with the name "command", because the spring framework expects an object with the name "command", if you are using <form:form> tags in your JSP file. So, when the student() method is called, it returns the student.jsp view.
The second service method addStudent() will be called against a POST method on the HelloWeb/addStudent URL. You will prepare your model object based on the submitted information. Finally, a "result" view will be returned from the service method, which will result in rendering result.jsp
student.jsp
<%@taglib uri = "http://www.springframework.org/tags/form" prefix = "form"%>
<html>
   <head>
      <title>Spring MVC Form Handling</title>
   </head>
   <body>

      <h2>Student Information</h2>
      <form:form method = "POST" action = "/hello/addStudent">
         <table>
            <tr>
              <td><form:label path = "name">Name</form:label></td>
              <td><form:input path = "name" /></td>
            </tr>
            <tr>
              <td><form:label path = "age">Age</form:label></td>
              <td><form:input path = "age" /></td>
            </tr>
            <tr>
              <td>  </td>
              <td><form:hidden path = "id" value = "1" /></td>
            </tr>
            <tr>
              <td colspan = "2">
                  <input type = "submit" value = "Submit"/>
              </td>
            </tr>
         </table>
      </form:form>
   </body>
</html>
Here, we are using the <form:hidden /> tag to render a HTML hidden field.
For example −
<form:hidden path = "id" value = "1"/>
It will render following HTML content.
<input id = "id" name = "id" type = "hidden" value = "1"/>
result.jsp
<%@taglib uri = "http://www.springframework.org/tags/form" prefix = "form"%>
<html>
   <head>
      <title>Spring MVC Form Handling</title>
   </head>
   <body>

      <h2>Submitted Student Information</h2>
      <table>
         <tr>
            <td>Name</td>
            <td>${name}</td>
         </tr>
         <tr>
            <td>Age</td>
            <td>${age}</td>
         </tr>
         <tr>
            <td>ID</td>
            <td>${id}</td>
         </tr>
      </table>
   </body>
</html>
Output
Once you are done with creating source and configuration files, export your application. Right click on your application, use Run As → Maven Install option and save your hello.war file in Tomcat's webapps folder.
Now, start your Tomcat server and make sure you are able to access other webpages from the webapps folder using a standard browser. Try a URL http://localhost:8080/hello/student and we will see the following screen if everything is fine with the Spring Web Application.
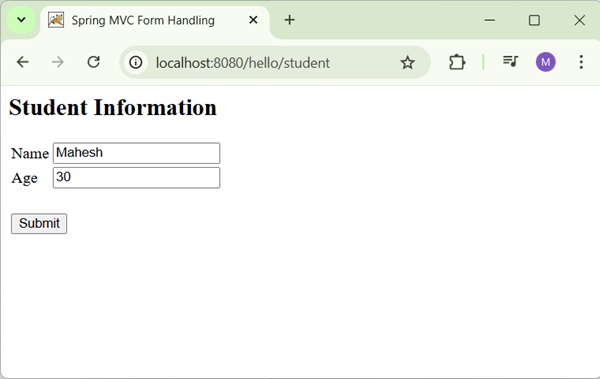
After submitting the required information, click on the submit button to submit the form. You should see the following screen, if everything is fine with your Spring Web Application.
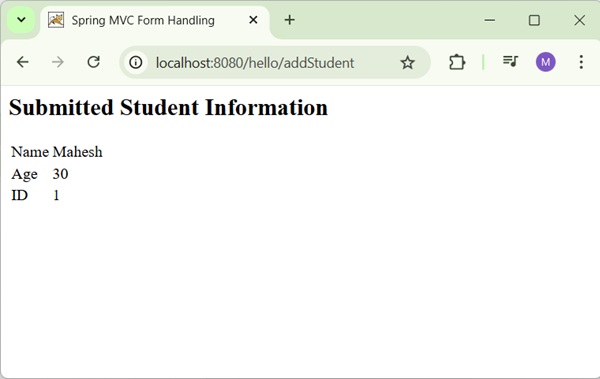
Spring MVC - Error Handling Example
The following example shows how to use Error Handling and Validators in forms using the Spring Web MVC framework.
To start with, let us have a working Eclipse IDE in place and consider the following steps to develop a Dynamic Form based Web Application using Spring Web Framework −
| Step | Description |
|---|---|
| 1 | Create a project with a name hello under a package com.tutorialspoint as explained in the Spring MVC - Hello World Example chapter. |
| 2 | Create Java class Student and StudentController under the com.tutorialspoint package. |
| 3 | Create view files addStudent.jsp and result.jsp under the jsp sub-folder in WEB-INF folder. |
| 4 | The final step is to create the content of the source and configuration files and export the application as explained below. |
Student.java
package com.tutorialspoint;

public class Student {
   private Integer age;
   private String name;
   private Integer id;

   public void setAge(Integer age) {
      this.age = age;
   }
   public Integer getAge() {
      return age;
   }

   public void setName(String name) {
      this.name = name;
   }
   public String getName() {
      return name;
   }

   public void setId(Integer id) {
      this.id = id;
   }
   public Integer getId() {
      return id;
   }
}
StudentValidator.java
package com.tutorialspoint;

import org.springframework.validation.Errors;
import org.springframework.validation.ValidationUtils;
import org.springframework.validation.Validator;

public class StudentValidator implements Validator {

   @Override
   public boolean supports(Class<?> clazz) {
      return Student.class.isAssignableFrom(clazz);
   }

   @Override
   public void validate(Object target, Errors errors) {
      ValidationUtils.rejectIfEmptyOrWhitespace(errors,
         "name", "required.name","Field name is required.");
   }
}
StudentController.java
package com.tutorialspoint;

import org.springframework.beans.factory.annotation.Autowired;
import org.springframework.beans.factory.annotation.Qualifier;
import org.springframework.stereotype.Controller;
import org.springframework.ui.Model;
import org.springframework.validation.BindingResult;
import org.springframework.validation.Validator;
import org.springframework.validation.annotation.Validated;
import org.springframework.web.bind.WebDataBinder;
import org.springframework.web.bind.annotation.GetMapping;
import org.springframework.web.bind.annotation.InitBinder;
import org.springframework.web.bind.annotation.ModelAttribute;
import org.springframework.web.bind.annotation.PostMapping;
import org.springframework.web.servlet.ModelAndView;

@Controller
public class StudentController {

   @Autowired
   @Qualifier("studentValidator")
   private Validator validator;

   @InitBinder
   private void initBinder(WebDataBinder binder) {
      binder.setValidator(validator);
   }

   @GetMapping(value = "/addStudent")
   public ModelAndView student() {
      return new ModelAndView("addStudent", "command", new Student());
   }

   @ModelAttribute("student")
   public Student createStudentModel() {
      return new Student();
   }

   @PostMapping(value = "/addStudent")
   public String addStudent(@ModelAttribute("student") @Validated Student student,
      BindingResult bindingResult, Model model) {

      if (bindingResult.hasErrors()) {
         return "addStudent";
      }
      model.addAttribute("name", student.getName());
      model.addAttribute("age", student.getAge());
      model.addAttribute("id", student.getId());

      return "result";
   }
}
Here, for the first service method student(), we have passed a blank Studentobject in the ModelAndView object with name "command", because the spring framework expects an object with name "command", if you are using <form:form> tags in your JSP file. So, when student() method is called, it returns addStudent.jsp view.
The second service method addStudent() will be called against a POST method on the HelloWeb/addStudent URL. You will prepare your model object based on the submitted information. Finally, a "result" view will be returned from the service method, which will result in rendering the result.jsp. In case there are errors generated using validator then same view "addStudent" is returned, Spring automatically injects error messages from BindingResult in view.
hello-servlet.xml
<beans xmlns = "http://www.springframework.org/schema/beans"
   xmlns:context = "http://www.springframework.org/schema/context"
   xmlns:xsi = "http://www.w3.org/2001/XMLSchema-instance"
   xsi:schemaLocation = "
   http://www.springframework.org/schema/beans
   http://www.springframework.org/schema/beans/spring-beans-3.0.xsd
   http://www.springframework.org/schema/context
   http://www.springframework.org/schema/context/spring-context-3.0.xsd">

   <context:component-scan base-package = "com.tutorialspoint" />

   <bean class = "org.springframework.web.servlet.view.InternalResourceViewResolver">
      <property name = "prefix" value = "/WEB-INF/jsp/" />
      <property name = "suffix" value = ".jsp" />
   </bean>

   <bean id = "studentValidator" class = "com.tutorialspoint.StudentValidator" />
</beans>
addStudent.jsp
<%@taglib uri = "http://www.springframework.org/tags/form" prefix = "form"%>
<html>
   <head>
      <title>Spring MVC Form Handling</title>
   </head>
   <style>
      .error {
         color: #ff0000;
      }

      .errorblock {
         color: #000;
         background-color: #ffEEEE;
         border: 3px solid #ff0000;
         padding: 8px;
         margin: 16px;
      }
   </style>

   <body>
      <h2>Student Information</h2>
      <form:form method = "POST" action = "/hello/addStudent" modelAttribute="student" commandName = "student">
      <form:errors path = "*" cssClass = "errorblock" element = "div" />
         <table>
            <tr>
               <td><form:label path = "name">Name</form:label></td>
               <td><form:input path = "name" /></td>
               <td><form:errors path = "name" cssClass = "error" /></td>
            </tr>
            <tr>
               <td><form:label path = "age">Age</form:label></td>
               <td><form:input path = "age" /></td>
            </tr>
            <tr>
               <td><form:label path = "id">id</form:label></td>
               <td><form:input path = "id" /></td>
            </tr>
            <tr>
               <td colspan = "2">
               <input type = "submit" value = "Submit"/>
               </td>
            </tr>
         </table>
      </form:form>
   </body>
</html>
Here we are using <form:errors /> tag with path="*" to render error messages. For example −
<form:errors path = "*" cssClass = "errorblock" element = "div" />
It will render the error messages for all input validations.
We are using <form:errors /> tag with path="name" to render error message for name field. For example −
<form:errors path = "name" cssClass = "error" />
It will render error messages for the name field validations.
result.jsp
<%@taglib uri = "http://www.springframework.org/tags/form" prefix = "form"%>
<html>
   <head>
      <title>Spring MVC Form Handling</title>
   </head>
   <body>

      <h2>Submitted Student Information</h2>
      <table>
         <tr>
            <td>Name</td>
            <td>${name}</td>
         </tr>
         <tr>
            <td>Age</td>
            <td>${age}</td>
         </tr>
         <tr>
            <td>ID</td>
            <td>${id}</td>
         </tr>
      </table>
   </body>
</html>
Output
Once you are done with creating source and configuration files, export your application. Right click on your application, use Run As → Maven Install option and save your hello.war file in Tomcat's webapps folder.
Now, start your Tomcat server and make sure you are able to access other webpages from the webapps folder using a standard browser. Try a URL http://localhost:8080/hello/addStudent and we will see the following screen if everything is fine with the Spring Web Application.
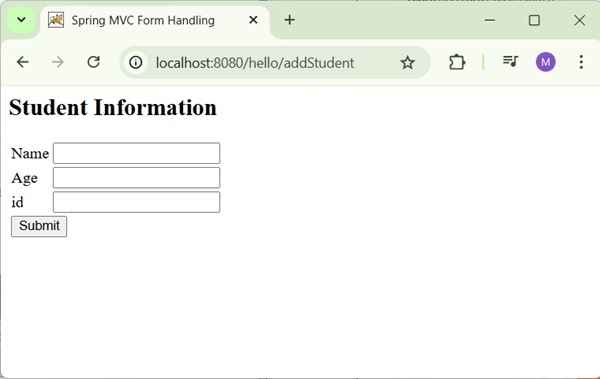
After submitting the required information, click on the submit button to submit the form. You should see the following screen, if everything is fine with the Spring Web Application.
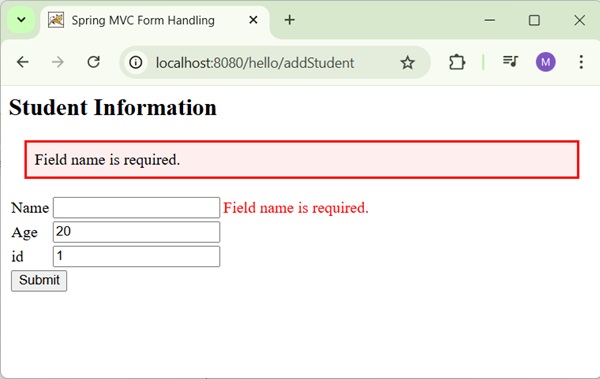
Spring MVC - File Upload Example
The following example shows how to use File Upload Control in forms using the Spring Web MVC framework.
To start with, let us have a working Eclipse IDE in place and consider the following steps to develop a Dynamic Form based Web Application using Spring Web Framework −
| Step | Description |
|---|---|
| 1 | Create a project with a name hello under a package com.tutorialspoint as explained in the Spring MVC - Hello World Example chapter. |
| 2 | Create Java class FileModel and FileUploadController under the com.tutorialspoint package. |
| 3 | Create view files fileUpload.jsp and success.jsp under the jsp sub-folder in WEB-INF folder. |
| 4 | The final step is to create the content of the source and configuration files and export the application as explained below. |
FileModel.java
package com.tutorialspoint;

import org.springframework.web.multipart.MultipartFile;

public class FileModel {
   private MultipartFile file;

   public MultipartFile getFile() {
      return file;
   }

   public void setFile(MultipartFile file) {
      this.file = file;
   }
}
FileUploadController.java
package com.tutorialspoint;

import java.io.File;
import java.io.IOException;
import java.nio.file.Files;
import java.nio.file.Path;
import java.nio.file.Paths;

import org.springframework.beans.factory.annotation.Autowired;
import org.springframework.stereotype.Controller;
import org.springframework.ui.ModelMap;
import org.springframework.util.FileCopyUtils;
import org.springframework.validation.BindingResult;
import org.springframework.validation.annotation.Validated;
import org.springframework.web.bind.annotation.RequestMapping;
import org.springframework.web.bind.annotation.RequestMethod;
import org.springframework.web.multipart.MultipartFile;
import org.springframework.web.servlet.ModelAndView;

import jakarta.servlet.ServletContext;

@Controller
public class FileUploadController {

   @Autowired
   ServletContext context;

   @RequestMapping(value = "/fileUploadPage", method = RequestMethod.GET)
   public ModelAndView fileUploadPage() {
      FileModel file = new FileModel();
      ModelAndView modelAndView = new ModelAndView("fileUpload", "command", file);
      return modelAndView;
   }

   @RequestMapping(value="/fileUploadPage", method = RequestMethod.POST)
   public String fileUpload(@Validated FileModel file, BindingResult result, ModelMap model) throws IOException {
      if (result.hasErrors()) {
         System.out.println("validation errors");
         return "fileUploadPage";
      } else {
         System.out.println("Fetching file");
         MultipartFile multipartFile = file.getFile();
         Path uploadPath = Paths.get(context.getRealPath("") + File.separator + "temp");
         File uploadedFile = null;
         if (!Files.exists(uploadPath)) {
             Files.createDirectories(uploadPath); // Create directory and any necessary parent directories
             uploadedFile = new File(uploadPath+  File.separator + file.getFile().getOriginalFilename());
         }
         //Now do something with file...
         FileCopyUtils.copy(file.getFile().getBytes(), uploadedFile);
         String fileName = multipartFile.getOriginalFilename();
         model.addAttribute("fileName", fileName);
         return "success";
      }
   }
}
Here, for the first service method fileUploadPage(), we have passed a blank FileModel object in the ModelAndView object with name "command", because the spring framework expects an object with name "command", if you are using <form:form> tags in your JSP file. So, when fileUploadPage() method is called, it returns fileUpload.jsp view.
The second service method fileUpload() will be called against a POST method on the hello/fileUploadPage URL. You will prepare the file to be uploaded based on the submitted information. Finally, a "success" view will be returned from the service method, which will result in rendering success.jsp.
hello-servlet.xml
<beans xmlns = "http://www.springframework.org/schema/beans"
   xmlns:context = "http://www.springframework.org/schema/context"
   xmlns:xsi = "http://www.w3.org/2001/XMLSchema-instance"
   xsi:schemaLocation = "
   http://www.springframework.org/schema/beans
   http://www.springframework.org/schema/beans/spring-beans-3.0.xsd
   http://www.springframework.org/schema/context
   http://www.springframework.org/schema/context/spring-context-3.0.xsd">

   <context:component-scan base-package = "com.tutorialspoint" />

   <bean class = "org.springframework.web.servlet.view.InternalResourceViewResolver">
      <property name = "prefix" value = "/WEB-INF/jsp/" />
      <property name = "suffix" value = ".jsp" />
   </bean>

   <bean id = "studentValidator" class = "com.tutorialspoint.StudentValidator" />
   <bean id = "multipartResolver"
      class = "org.springframework.web.multipart.support.StandardServletMultipartResolver" />
</beans>
web.xml
<?xml version="1.0" encoding="UTF-8"?>
<web-app
    version="4.0"
    xmlns="http://xmlns.jcp.org/xml/ns/javaee"
    xmlns:javaee="http://xmlns.jcp.org/xml/ns/javaee"
    xmlns:xml="http://www.w3.org/XML/1998/namespace"
    xmlns:xsi="http://www.w3.org/2001/XMLSchema-instance"
    xsi:schemaLocation="http://xmlns.jcp.org/xml/ns/javaee http://xmlns.jcp.org/xml/ns/javaee/web-app_4_0.xsd">
    <display-name>Spring MVC Application</display-name>

   <servlet>
      <servlet-name>hello</servlet-name>
      <servlet-class>
         org.springframework.web.servlet.DispatcherServlet
      </servlet-class>
      <load-on-startup>1</load-on-startup>
      <multipart-config>
         <max-file-size>20848820</max-file-size>
         <max-request-size>418018841</max-request-size>
         <file-size-threshold>1048576</file-size-threshold>
      </multipart-config>
   </servlet>

   <servlet-mapping>
      <servlet-name>hello</servlet-name>
      <url-pattern>/</url-pattern>
   </servlet-mapping>
</web-app>
fileUpload.jsp
<%@ page contentType="text/html; charset = UTF-8" %>
<%@ taglib prefix = "form" uri = "http://www.springframework.org/tags/form"%>
<html>
   <head>
      <title>File Upload Example</title>
   </head>

   <body>
      <form:form method = "POST" modelAttribute = "fileUpload"
         enctype = "multipart/form-data">
         Please select a file to upload :
         <input type = "file" name = "file" />
         <input type = "submit" value = "upload" />
      </form:form>
   </body>
</html>
Here, we are using modelAttribute attribute with value="fileUpload" to map the file Upload control with the server model.
success.jsp
<%@ page contentType = "text/html; charset = UTF-8" %>
<html>
   <head>
      <title>File Upload Example</title>
   </head>
   <body>
      FileName :
      lt;b> ${fileName} </b> - Uploaded Successfully.
   </body>
</html>
Output
Once you are done with creating source and configuration files, export your application. Right click on your application, use Run As → Maven Install option and save your hello.war file in Tomcat's webapps folder.
Now, start your Tomcat server and make sure you are able to access other webpages from the webapps folder using a standard browser. Try a URL http://localhost:8080/hello/addStudent and we will see the following screen if everything is fine with the Spring Web Application.
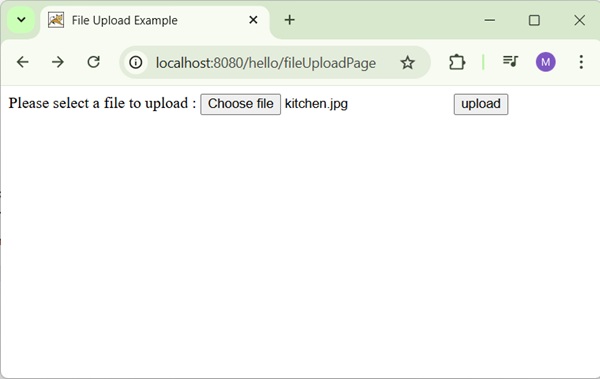
After submitting the required information, click on the upload button to submit the form. You should see the following screen, if everything is fine with the Spring Web Application.

Bean Name Url Handler Mapping Example
The following example shows how to use Bean Name URL Handler Mapping using the Spring Web MVC Framework. The BeanNameUrlHandlerMapping class is the default handler mapping class, which maps the URL request(s) to the name of the beans mentioned in the configuration.
<beans>
   <bean class = "org.springframework.web.servlet.view.InternalResourceViewResolver">
      <property name = "prefix" value = "/WEB-INF/jsp/"/>
      <property name = "suffix" value = ".jsp"/>
   </bean>

   <bean class = "org.springframework.web.servlet.handler.BeanNameUrlHandlerMapping"/>

   <bean name = "/helloWorld.htm"
      class = "com.tutorialspoint.HelloController" />

   <bean name = "/hello*"
      class = "com.tutorialspoint.HelloController" />

   <bean name = "/welcome.htm"
      class = "com.tutorialspoint.WelcomeController"/>
</beans>
For example, using the above configuration, if URI
/helloWorld.htm or /hello{any letter}.htm is requested, DispatcherServlet will forward the request to the HelloController.
/welcome.htm is requested, DispatcherServlet will forward the request to the WelcomeController.
/welcome1.htm is requested, DispatcherServlet will not find any controller and server will throw 404 status error.
To start with, let us have a working Eclipse IDE in place and consider the following steps to develop a Dynamic Form based Web Application using Spring Web Framework −
| Step | Description |
|---|---|
| 1 | Create a project with a name hello under a package com.tutorialspoint as explained in the Spring MVC - Hello World Example chapter. |
| 2 | Create Java class HelloController and WelcomeController under the com.tutorialspoint package. |
| 3 | Create view files hello.jsp and welcome.jsp under the jsp sub-folder in WEB-INF folder. |
| 4 | The final step is to create the content of the source and configuration files and export the application as explained below. |
HelloController.java
package com.tutorialspoint;

import org.springframework.web.servlet.ModelAndView;
import org.springframework.web.servlet.mvc.AbstractController;

import jakarta.servlet.http.HttpServletRequest;
import jakarta.servlet.http.HttpServletResponse;

public class HelloController extends AbstractController{

   @Override
   protected ModelAndView handleRequestInternal(HttpServletRequest request,
      HttpServletResponse response) throws Exception {
      ModelAndView model = new ModelAndView("hello");
      model.addObject("message", "Hello World!");
      return model;
   }
}
WelcomeController.java
package com.tutorialspoint;

import org.springframework.web.servlet.ModelAndView;
import org.springframework.web.servlet.mvc.AbstractController;

import jakarta.servlet.http.HttpServletRequest;
import jakarta.servlet.http.HttpServletResponse;

public class WelcomeController extends AbstractController{

   @Override
   protected ModelAndView handleRequestInternal(HttpServletRequest request,
      HttpServletResponse response) throws Exception {
      ModelAndView model = new ModelAndView("welcome");
      model.addObject("message", "Welcome!");
      return model;
   }
}
hello-servlet.xml
<beans xmlns = "http://www.springframework.org/schema/beans"
   xmlns:context = "http://www.springframework.org/schema/context"
   xmlns:xsi = "http://www.w3.org/2001/XMLSchema-instance"
   xsi:schemaLocation = "
   http://www.springframework.org/schema/beans
   http://www.springframework.org/schema/beans/spring-beans-3.0.xsd
   http://www.springframework.org/schema/context
   http://www.springframework.org/schema/context/spring-context-3.0.xsd">

   <context:component-scan base-package = "com.tutorialspoint" />

   <bean class = "org.springframework.web.servlet.view.InternalResourceViewResolver">
      <property name = "prefix" value = "/WEB-INF/jsp/" />
      <property name = "suffix" value = ".jsp" />
   </bean>

   <bean id = "studentValidator" class = "com.tutorialspoint.StudentValidator" />
   <bean id = "multipartResolver"
      class = "org.springframework.web.multipart.support.StandardServletMultipartResolver" />

   <bean class = "org.springframework.web.servlet.handler.BeanNameUrlHandlerMapping"/>

   <bean name = "/helloWorld.htm"
      class = "com.tutorialspoint.HelloController" />

   <bean name = "/hello*"
      class = "com.tutorialspoint.HelloController" />

   <bean name = "/welcome.htm"
      class = "com.tutorialspoint.WelcomeController"/>
</beans>
hello.jsp
<%@ page contentType = "text/html; charset = UTF-8" %>
<html>
   <head>
      <title>Hello World</title>
   </head>
   <body>
      <h2>${message}</h2>
   </body>
</html>
welcome.jsp
<%@ page contentType = "text/html; charset = UTF-8" %>
<html>
   <head>
      <title>Welcome</title>
   </head>
   <body>
      <h2>${message}</h2>
   </body>
</html>
Output
Once you are done with creating source and configuration files, export your application. Right click on your application, use Run As → Maven Install option and save your hello.war file in Tomcat's webapps folder.
Now, start your Tomcat server and make sure you are able to access other webpages from the webapps folder by using a standard browser. Try a URL − http://localhost:8080/hello/helloWorld.htm and we will see the following screen, if everything is fine with the Spring Web Application.
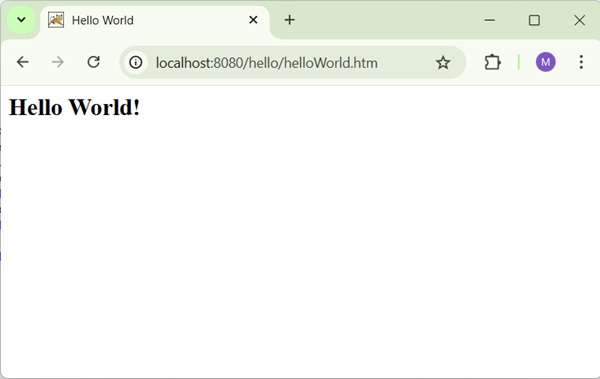
Try a URL − http://localhost:8080/hello/hello.htm and we will see the following screen, if everything is fine with the Spring Web Application.
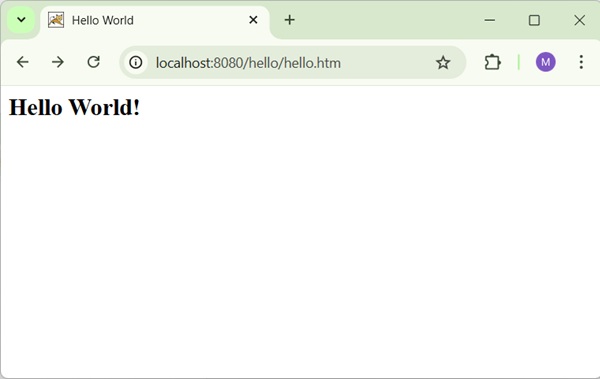
Try a URL http://localhost:8080/hello/welcome.htm and we will see the following screen, if everything is fine with the Spring Web Application.
Try a URL http://localhost:8080/hello/welcome1.htm and we will see the following screen, if everything is fine with the Spring Web Application.
Controller Class Name Handler Mapping Example
The following example shows how to use the Controller Class Name Handler Mapping using the Spring Web MVC framework. The ControllerClassNameHandlerMapping class is the convention-based handler mapping class, which maps the URL request(s) to the name of the controllers mentioned in the configuration. This class takes the Controller names and converts them to lower case with a leading "/".
Note* − ControllerClassNameHandlerMapping is not available from Spring 5.1 onwards. This example is written using earlier version of spring.
For example − HelloController maps to "/hello*" URL.
<beans>
   <bean class="org.springframework.web.servlet.view.InternalResourceViewResolver">
      <property name = "prefix" value = "/WEB-INF/jsp/"/>
      <property name = "suffix" value = ".jsp"/>
   </bean>

   <bean class = "org.springframework.web.servlet.mvc.support.ControllerClassNameHandlerMapping"/>

   <bean class = "com.tutorialspoint.HelloController" />

   <bean class = "com.tutorialspoint.WelcomeController"/>
</beans>
For example, using above configuration, if URI
/helloWorld.htm or /hello{any letter}.htm is requested, DispatcherServlet will forward the request to the HelloController.
/welcome.htm is requested, DispatcherServlet will forward the request to the WelcomeController.
/Welcome.htm is requested where W is capital cased, DispatcherServlet will not find any controller and the server will throw 404 status error.
To start with, let us have a working Eclipse IDE in place and consider the following steps to develop a Dynamic Form based Web Application using Spring Web Framework −
| Step | Description |
|---|---|
| 1 | Create a project with a name hello under a package com.tutorialspoint as explained in the Spring MVC - Hello World Example chapter. |
| 2 | Create Java class HelloController and WelcomeController under the com.tutorialspoint package. |
| 3 | Create view files hello.jsp and welcome.jsp under the jsp sub-folder in WEB-INF folder. |
| 4 | The final step is to create the content of the source and configuration files and export the application as explained below. |
HelloController.java
package com.tutorialspoint;

import org.springframework.web.servlet.ModelAndView;
import org.springframework.web.servlet.mvc.AbstractController;

import jakarta.servlet.http.HttpServletRequest;
import jakarta.servlet.http.HttpServletResponse;

public class HelloController extends AbstractController{

   @Override
   protected ModelAndView handleRequestInternal(HttpServletRequest request,
      HttpServletResponse response) throws Exception {
      ModelAndView model = new ModelAndView("hello");
      model.addObject("message", "Hello World!");
      return model;
   }
}
WelcomeController.java
package com.tutorialspoint;

import org.springframework.web.servlet.ModelAndView;
import org.springframework.web.servlet.mvc.AbstractController;

import jakarta.servlet.http.HttpServletRequest;
import jakarta.servlet.http.HttpServletResponse;

public class WelcomeController extends AbstractController{

   @Override
   protected ModelAndView handleRequestInternal(HttpServletRequest request,
      HttpServletResponse response) throws Exception {
      ModelAndView model = new ModelAndView("welcome");
      model.addObject("message", "Welcome!");
      return model;
   }
}
hello-servlet.xml
<beans xmlns = "http://www.springframework.org/schema/beans"
   xmlns:context = "http://www.springframework.org/schema/context"
   xmlns:xsi = "http://www.w3.org/2001/XMLSchema-instance"
   xsi:schemaLocation = "
   http://www.springframework.org/schema/beans
   http://www.springframework.org/schema/beans/spring-beans-3.0.xsd
   http://www.springframework.org/schema/context
   http://www.springframework.org/schema/context/spring-context-3.0.xsd">

   <context:component-scan base-package = "com.tutorialspoint" />

   <bean class = "org.springframework.web.servlet.view.InternalResourceViewResolver">
      <property name = "prefix" value = "/WEB-INF/jsp/" />
      <property name = "suffix" value = ".jsp" />
   </bean>

   <bean id = "studentValidator" class = "com.tutorialspoint.StudentValidator" />
   <bean id = "multipartResolver"
      class = "org.springframework.web.multipart.support.StandardServletMultipartResolver" />

   <bean class = "org.springframework.web.servlet.mvc.support.ControllerClassNameHandlerMapping"/>

   <bean class = "com.tutorialspoint.HelloController" />

   <bean class = "com.tutorialspoint.WelcomeController"/>
</beans>
hello.jsp
<%@ page contentType = "text/html; charset = UTF-8" %>
<html>
   <head>
      <title>Hello World</title>
   </head>
   <body>
      <h2>${message}</h2>
   </body>
</html>
welcome.jsp
<%@ page contentType = "text/html; charset = UTF-8" %>
<html>
   <head>
      <title>Welcome</title>
   </head>
   <body>
      <h2>${message}</h2>
   </body>
</html>
Output
Once you are done with creating source and configuration files, export your application. Right click on your application, use Run As → Maven Install option and save your hello.war file in Tomcat's webapps folder.
Now, start your Tomcat server and make sure you are able to access other webpages from the webapps folder by using a standard browser. Try a URL − http://localhost:8080/hello/helloWorld.htm and we will see the following screen, if everything is fine with the Spring Web Application.
Try a URL − http://localhost:8080/hello/hello.htm and we will see the following screen, if everything is fine with the Spring Web Application.
Try a URL http://localhost:8080/hello/welcome.htm and we will see the following screen, if everything is fine with the Spring Web Application.
Try a URL http://localhost:8080/hello/welcome1.htm and we will see the following screen, if everything is fine with the Spring Web Application.
Simple Url Handler Mapping Example
The following example shows how to use Simple URL Handler Mapping using the Spring Web MVC framework. The SimpleUrlHandlerMapping class helps to explicitly-map URLs with their controllers respectively.
<beans>
   <bean class = "org.springframework.web.servlet.view.InternalResourceViewResolver">
      <property name = "prefix" value = "/WEB-INF/jsp/"/>
      <property name = "suffix" value = ".jsp"/>
   </bean>

   <bean class = "org.springframework.web.servlet.handler.SimpleUrlHandlerMapping">
      <property name = "mappings">
         <props>
            <prop key = "/welcome.htm">welcomeController</prop>
            <prop key = "/helloWorld.htm">helloController</prop>
         </props>
      </property>
   </bean>

   <bean id = "helloController" class = "com.tutorialspoint.HelloController" />

   <bean id = "welcomeController" class = "com.tutorialspoint.WelcomeController"/>
</beans>
For example, using above configuration, if URI
/helloWorld.htm is requested, DispatcherServlet will forward the request to the HelloController.
/welcome.htm is requested, DispatcherServlet will forward the request to the WelcomeController.
To start with, let us have a working Eclipse IDE in place and consider the following steps to develop a Dynamic Form based Web Application using Spring Web Framework −
| Step | Description |
|---|---|
| 1 | Create a project with a name hello under a package com.tutorialspoint as explained in the Spring MVC - Hello World Example chapter. |
| 2 | Create Java class HelloController and WelcomeController under the com.tutorialspoint package. |
| 3 | Create view files hello.jsp and welcome.jsp under the jsp sub-folder in WEB-INF folder. |
| 4 | The final step is to create the content of the source and configuration files and export the application as explained below. |
HelloController.java
package com.tutorialspoint;

import org.springframework.web.servlet.ModelAndView;
import org.springframework.web.servlet.mvc.AbstractController;

import jakarta.servlet.http.HttpServletRequest;
import jakarta.servlet.http.HttpServletResponse;

public class HelloController extends AbstractController{

   @Override
   protected ModelAndView handleRequestInternal(HttpServletRequest request,
      HttpServletResponse response) throws Exception {
      ModelAndView model = new ModelAndView("hello");
      model.addObject("message", "Hello World!");
      return model;
   }
}
WelcomeController.java
package com.tutorialspoint;

import org.springframework.web.servlet.ModelAndView;
import org.springframework.web.servlet.mvc.AbstractController;

import jakarta.servlet.http.HttpServletRequest;
import jakarta.servlet.http.HttpServletResponse;

public class WelcomeController extends AbstractController{

   @Override
   protected ModelAndView handleRequestInternal(HttpServletRequest request,
      HttpServletResponse response) throws Exception {
      ModelAndView model = new ModelAndView("welcome");
      model.addObject("message", "Welcome!");
      return model;
   }
}
hello-servlet.xml
<beans xmlns = "http://www.springframework.org/schema/beans"
   xmlns:context = "http://www.springframework.org/schema/context"
   xmlns:xsi = "http://www.w3.org/2001/XMLSchema-instance"
   xsi:schemaLocation = "
   http://www.springframework.org/schema/beans
   http://www.springframework.org/schema/beans/spring-beans-3.0.xsd
   http://www.springframework.org/schema/context
   http://www.springframework.org/schema/context/spring-context-3.0.xsd">

   <context:component-scan base-package = "com.tutorialspoint" />

   <bean class = "org.springframework.web.servlet.view.InternalResourceViewResolver">
      <property name = "prefix" value = "/WEB-INF/jsp/" />
      <property name = "suffix" value = ".jsp" />
   </bean>

   <bean id = "studentValidator" class = "com.tutorialspoint.StudentValidator" />
   <bean id = "multipartResolver"
      class = "org.springframework.web.multipart.support.StandardServletMultipartResolver" />

   <bean class = "org.springframework.web.servlet.handler.SimpleUrlHandlerMapping">
      <property name = "mappings">
         <props>
            <prop key = "/welcome.htm">welcomeController</prop>
            <prop key = "/helloWorld.htm">helloController</prop>
         </props>
      </property>
   </bean>

   <bean id = "helloController" class = "com.tutorialspoint.HelloController" />

   <bean id = "welcomeController" class = "com.tutorialspoint.WelcomeController"/>
</beans>
hello.jsp
<%@ page contentType = "text/html; charset = UTF-8" %>
<html>
   <head>
      <title>Hello World</title>
   </head>
   <body>
      <h2>${message}</h2>
   </body>
</html>
welcome.jsp
<%@ page contentType = "text/html; charset = UTF-8" %>
<html>
   <head>
      <title>Welcome</title>
   </head>
   <body>
      <h2>${message}</h2>
   </body>
</html>
Output
Once you are done with creating source and configuration files, export your application. Right click on your application, use Run As → Maven Install option and save your hello.war file in Tomcat's webapps folder.
Now, start your Tomcat server and make sure you are able to access other webpages from the webapps folder by using a standard browser. Try a URL − http://localhost:8080/hello/helloWorld.htm and we will see the following screen, if everything is fine with the Spring Web Application.
Try a URL http://localhost:8080/TestWeb/welcome.htm and you should see the following result if everything is fine with your Spring Web Application.
Spring MVC - Multi Action Controller Example
The following example shows how to use the Multi Action Controller using the Spring Web MVC framework. The MultiActionController class helps to map multiple URLs with their methods in a single controller respectively.
Note* − MultiActionController is not available from Spring 5.1 onwards. This example is written using earlier version of spring.
package com.tutorialspoint;

import javax.servlet.http.HttpServletRequest;
import javax.servlet.http.HttpServletResponse;

import org.springframework.web.servlet.ModelAndView;
import org.springframework.web.servlet.mvc.multiaction.MultiActionController;

public class UserController extends MultiActionController{

   public ModelAndView home(HttpServletRequest request,
      HttpServletResponse response) throws Exception {
      ModelAndView model = new ModelAndView("home");
      model.addObject("message", "Home");
      return model;
   }

   public ModelAndView add(HttpServletRequest request,
      HttpServletResponse response) throws Exception {
      ModelAndView model = new ModelAndView("user");
      model.addObject("message", "Add");
      return model;
   }

   public ModelAndView remove(HttpServletRequest request,
      HttpServletResponse response) throws Exception {
      ModelAndView model = new ModelAndView("user");
      model.addObject("message", "Remove");
      return model;
   }
}
<bean class = "org.springframework.web.servlet.handler.BeanNameUrlHandlerMapping"/>
<bean name = "/home.htm" class = "com.tutorialspoint.UserController" />
<bean name = "/user/*.htm" class = "com.tutorialspoint.UserController" />
For example, using the above configuration, if URI −
/home.htm is requested, DispatcherServlet will forward the request to the UserController home() method.
user/add.htm is requested, DispatcherServlet will forward the request to the UserController add() method.
user/remove.htm is requested, DispatcherServlet will forward the request to the UserController remove() method.
To start with, let us have a working Eclipse IDE in place and consider the following steps to develop a Dynamic Form based Web Application using Spring Web Framework −
| Step | Description |
|---|---|
| 1 | Create a project with a name hello under a package com.tutorialspoint as explained in the Spring MVC - Hello World Example chapter. |
| 2 | Create Java class UserController under the com.tutorialspoint package. |
| 3 | Create view files home.jsp and user.jsp under the jsp sub-folder in WEB-INF folder. |
| 4 | The final step is to create the content of the source and configuration files and export the application as explained below. |
UserController.java
package com.tutorialspoint;

import javax.servlet.http.HttpServletRequest;
import javax.servlet.http.HttpServletResponse;

import org.springframework.web.servlet.ModelAndView;
import org.springframework.web.servlet.mvc.multiaction.MultiActionController;

public class UserController extends MultiActionController{

   public ModelAndView home(HttpServletRequest request,
      HttpServletResponse response) throws Exception {
      ModelAndView model = new ModelAndView("user");
      model.addObject("message", "Home");
      return model;
   }

   public ModelAndView add(HttpServletRequest request,
      HttpServletResponse response) throws Exception {
      ModelAndView model = new ModelAndView("user");
      model.addObject("message", "Add");
      return model;
   }

   public ModelAndView remove(HttpServletRequest request,
      HttpServletResponse response) throws Exception {
      ModelAndView model = new ModelAndView("user");
      model.addObject("message", "Remove");
      return model;
   }
}
hello-servlet.xml
<beans xmlns = "http://www.springframework.org/schema/beans"
   xmlns:context = "http://www.springframework.org/schema/context"
   xmlns:xsi = "http://www.w3.org/2001/XMLSchema-instance"
   xsi:schemaLocation = "
   http://www.springframework.org/schema/beans
   http://www.springframework.org/schema/beans/spring-beans-3.0.xsd
   http://www.springframework.org/schema/context
   http://www.springframework.org/schema/context/spring-context-3.0.xsd">

   <context:component-scan base-package = "com.tutorialspoint" />

   <bean class = "org.springframework.web.servlet.view.InternalResourceViewResolver">
      <property name = "prefix" value = "/WEB-INF/jsp/" />
      <property name = "suffix" value = ".jsp" />
   </bean>

   <bean id = "studentValidator" class = "com.tutorialspoint.StudentValidator" />
   <bean id = "multipartResolver"
      class = "org.springframework.web.multipart.support.StandardServletMultipartResolver" />

   <bean class = "org.springframework.web.servlet.handler.BeanNameUrlHandlerMapping"/>
   <bean name = "/home.htm"
      class = "com.tutorialspoint.UserController" />
   <bean name = "/user/*.htm"
      class = "com.tutorialspoint.UserController" />
</beans>
home.jsp
<%@ page contentType = "text/html; charset = UTF-8" %>
<html>
   <head>
      <meta http-equiv = "Content-Type" content = "text/html; charset = ISO-8859-1">
      <title>Home</title>
   </head>

   <body>
      <a href = "user/add.htm" >Add</a> <br>
      <a href = "user/remove.htm" >Remove</a>
   </body>
</html>
user.jsp
<%@ page contentType = "text/html; charset = UTF-8" %>
<html>
   <head>
      <title>Hello World</title>
   </head>
   <body>
      <h2>${message}</h2>
   </body>
</html>
Output
Once you are done with creating source and configuration files, export your application. Right click on your application, use Run As → Maven Install option and save your hello.war file in Tomcat's webapps folder.
Now, start your Tomcat server and make sure you are able to access other webpages from the webapps folder by using a standard browser. Try a URL − http://localhost:8080/hello/home.htm and we will see the following screen, if everything is fine with the Spring Web Application.
Try a URL http://localhost:8080/TestWeb/user/add.htm and we will see the following screen, if everything is fine with the Spring Web Application.
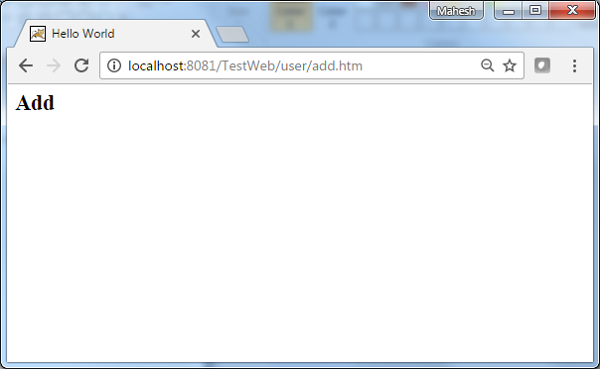
Spring MVC - Properties Method Name Resolver Example
The following example shows how to use the Properties Method Name Resolver method of a Multi Action Controller using Spring Web MVC framework. The MultiActionController class helps to map multiple URLs with their methods in a single controller respectively.
Note* − MultiActionController is not available from Spring 5.1 onwards. This example is written using earlier version of spring.
package com.tutorialspoint;

import javax.servlet.http.HttpServletRequest;
import javax.servlet.http.HttpServletResponse;

import org.springframework.web.servlet.ModelAndView;
import org.springframework.web.servlet.mvc.multiaction.MultiActionController;

public class UserController extends MultiActionController{

   public ModelAndView home(HttpServletRequest request,
      HttpServletResponse response) throws Exception {
      ModelAndView model = new ModelAndView("user");
      model.addObject("message", "Home");
      return model;
   }

   public ModelAndView add(HttpServletRequest request,
      HttpServletResponse response) throws Exception {
      ModelAndView model = new ModelAndView("user");
      model.addObject("message", "Add");
      return model;
   }

   public ModelAndView remove(HttpServletRequest request,
      HttpServletResponse response) throws Exception {
      ModelAndView model = new ModelAndView("user");
      model.addObject("message", "Remove");
      return model;
   }
}
<bean class = "com.tutorialspoint.UserController">
   <property name = "methodNameResolver">
      <bean class = "org.springframework.web.servlet.mvc.multiaction.PropertiesMethodNameResolver">
         <property name = "mappings">
            <props>
               <prop key = "/user/home.htm">home</prop>
               <prop key = "/user/add.htm">add</prop>
               <prop key = "/user/remove.htm">update</prop>
            </props>
         </property>
      </bean>
   </property>
</bean>
For example, using the above configuration, if URI −
/user/home.htm is requested, DispatcherServlet will forward the request to the UserController home() method.
/user/add.htm is requested, DispatcherServlet will forward the request to the UserController add() method.
/user/remove.htm is requested, DispatcherServlet will forward the request to the UserController remove() method.
To start with, let us have a working Eclipse IDE in place and consider the following steps to develop a Dynamic Form based Web Application using Spring Web Framework −
| Step | Description |
|---|---|
| 1 | Create a project with a name hello under a package com.tutorialspoint as explained in the Spring MVC - Hello World Example chapter. |
| 2 | Create Java class UserController under the com.tutorialspoint package. |
| 3 | Create view files home.jsp and user.jsp under the jsp sub-folder in WEB-INF folder. |
| 4 | The final step is to create the content of the source and configuration files and export the application as explained below. |
UserController.java
package com.tutorialspoint;

import javax.servlet.http.HttpServletRequest;
import javax.servlet.http.HttpServletResponse;

import org.springframework.web.servlet.ModelAndView;
import org.springframework.web.servlet.mvc.multiaction.MultiActionController;

public class UserController extends MultiActionController{

   public ModelAndView home(HttpServletRequest request,
      HttpServletResponse response) throws Exception {
      ModelAndView model = new ModelAndView("user");
      model.addObject("message", "Home");
      return model;
   }

   public ModelAndView add(HttpServletRequest request,
      HttpServletResponse response) throws Exception {
      ModelAndView model = new ModelAndView("user");
      model.addObject("message", "Add");
      return model;
   }

   public ModelAndView remove(HttpServletRequest request,
      HttpServletResponse response) throws Exception {
      ModelAndView model = new ModelAndView("user");
      model.addObject("message", "Remove");
      return model;
   }
}
hello-servlet.xml
<beans xmlns = "http://www.springframework.org/schema/beans"
   xmlns:context = "http://www.springframework.org/schema/context"
   xmlns:xsi = "http://www.w3.org/2001/XMLSchema-instance"
   xsi:schemaLocation = "
   http://www.springframework.org/schema/beans
   http://www.springframework.org/schema/beans/spring-beans-3.0.xsd
   http://www.springframework.org/schema/context
   http://www.springframework.org/schema/context/spring-context-3.0.xsd">

   <context:component-scan base-package = "com.tutorialspoint" />

   <bean class = "org.springframework.web.servlet.view.InternalResourceViewResolver">
      <property name = "prefix" value = "/WEB-INF/jsp/" />
      <property name = "suffix" value = ".jsp" />
   </bean>

   <bean class = "org.springframework.web.servlet.mvc.support.ControllerClassNameHandlerMapping">
      <property name = "caseSensitive" value = "true" />
   </bean>
   <bean class = "com.tutorialspoint.UserController">
      <property name = "methodNameResolver">
         <bean class = "org.springframework.web.servlet.mvc.multiaction.PropertiesMethodNameResolver">
            <property name = "mappings">
               <props>
                  <prop key = "/user/home.htm">home</prop>
                  <prop key = "/user/add.htm">add</prop>
                  <prop key = "/user/remove.htm">update</prop>
               </props>
            </property>
         </bean>
      </property>
   </bean>
</beans>
home.jsp
<%@ page contentType = "text/html; charset = UTF-8" %>
<html>
   <head>
      <meta http-equiv = "Content-Type" content = "text/html; charset = ISO-8859-1">
      <title>Home</title>
   </head>

   <body>
      <a href = "user/add.htm" >Add</a> <br>
      <a href = "user/remove.htm" >Remove</a>
   </body>
</html>
user.jsp
<%@ page contentType = "text/html; charset = UTF-8" %>
<html>
   <head>
      <title>Hello World</title>
   </head>
   <body>
      <h2>${message}</h2>
   </body>
</html>
Output
Once you are done with creating source and configuration files, export your application. Right click on your application, use Run As → Maven Install option and save your hello.war file in Tomcat's webapps folder.
Now, start your Tomcat server and make sure you are able to access other webpages from the webapps folder using a standard browser. Now, try a URL − http://localhost:8080/hello/user/add.htm and we will see the following screen, if everything is fine with the Spring Web Application.
Spring MVC - Parameter Method Name Resolver Example
The following example shows how to use the Parameter Method Name Resolver of a Multi Action Controller using the Spring Web MVC framework. The MultiActionController class helps to map multiple URLs with their methods in a single controller respectively.
Note* − MultiActionController is not available from Spring 5.1 onwards. This example is written using earlier version of spring.
package com.tutorialspoint;

import javax.servlet.http.HttpServletRequest;
import javax.servlet.http.HttpServletResponse;

import org.springframework.web.servlet.ModelAndView;
import org.springframework.web.servlet.mvc.multiaction.MultiActionController;

public class UserController extends MultiActionController{

   public ModelAndView home(HttpServletRequest request,
      HttpServletResponse response) throws Exception {
      ModelAndView model = new ModelAndView("user");
      model.addObject("message", "Home");
      return model;
   }

   public ModelAndView add(HttpServletRequest request,
      HttpServletResponse response) throws Exception {
      ModelAndView model = new ModelAndView("user");
      model.addObject("message", "Add");
      return model;
   }

   public ModelAndView remove(HttpServletRequest request,
      HttpServletResponse response) throws Exception {
      ModelAndView model = new ModelAndView("user");
      model.addObject("message", "Remove");
      return model;
   }
}
<bean class = "com.tutorialspoint.UserController">
   <property name = "methodNameResolver">
      <bean class = "org.springframework.web.servlet.mvc.multiaction.ParameterMethodNameResolver">
         <property name = "paramName" value = "action"/>
      </bean>
   </property>
</bean>
For example, using the above configuration, if URI −
/user/*.htm?action=home is requested, DispatcherServlet will forward the request to the UserController home() method.
/user/*.htm?action=add is requested, DispatcherServlet will forward the request to the UserController add() method.
/user/*.htm?action=remove is requested, DispatcherServlet will forward the request to the UserController remove() method.
To start with, let us have a working Eclipse IDE in place and consider the following steps to develop a Dynamic Form based Web Application using Spring Web Framework −
| Step | Description |
|---|---|
| 1 | Create a project with a name hello under a package com.tutorialspoint as explained in the Spring MVC - Hello World Example chapter. |
| 2 | Create Java class UserController under the com.tutorialspoint package. |
| 3 | Create view files home.jsp and user.jsp under the jsp sub-folder in WEB-INF folder. |
| 4 | The final step is to create the content of the source and configuration files and export the application as explained below. |
UserController.java
package com.tutorialspoint;

import javax.servlet.http.HttpServletRequest;
import javax.servlet.http.HttpServletResponse;

import org.springframework.web.servlet.ModelAndView;
import org.springframework.web.servlet.mvc.multiaction.MultiActionController;

public class UserController extends MultiActionController{

   public ModelAndView home(HttpServletRequest request,
      HttpServletResponse response) throws Exception {
      ModelAndView model = new ModelAndView("user");
      model.addObject("message", "Home");
      return model;
   }

   public ModelAndView add(HttpServletRequest request,
      HttpServletResponse response) throws Exception {
      ModelAndView model = new ModelAndView("user");
      model.addObject("message", "Add");
      return model;
   }

   public ModelAndView remove(HttpServletRequest request,
      HttpServletResponse response) throws Exception {
      ModelAndView model = new ModelAndView("user");
      model.addObject("message", "Remove");
      return model;
   }
}
hello-servlet.xml
<beans xmlns = "http://www.springframework.org/schema/beans"
   xmlns:context = "http://www.springframework.org/schema/context"
   xmlns:xsi = "http://www.w3.org/2001/XMLSchema-instance"
   xsi:schemaLocation = "
   http://www.springframework.org/schema/beans
   http://www.springframework.org/schema/beans/spring-beans-3.0.xsd
   http://www.springframework.org/schema/context
   http://www.springframework.org/schema/context/spring-context-3.0.xsd">

   <context:component-scan base-package = "com.tutorialspoint" />

   <bean class = "org.springframework.web.servlet.view.InternalResourceViewResolver">
      <property name = "prefix" value = "/WEB-INF/jsp/" />
      <property name = "suffix" value = ".jsp" />
   </bean>

   <bean class = "org.springframework.web.servlet.mvc.support.ControllerClassNameHandlerMapping">
      <property name = "caseSensitive" value = "true" />
   </bean>
   <bean class = "com.tutorialspoint.UserController">
      <property name = "methodNameResolver">
         <bean class = "org.springframework.web.servlet.mvc.multiaction.ParameterMethodNameResolver">
            <property name = "paramName" value = "action"/>
         </bean>
      </property>
   </bean>
</beans>
home.jsp
<%@ page contentType = "text/html; charset = UTF-8" %>
<html>
   <head>
      <meta http-equiv = "Content-Type" content = "text/html; charset = ISO-8859-1">
      <title>Home</title>
   </head>

   <body>
      <a href = "user/add.htm" >Add</a> <br>
      <a href = "user/remove.htm" >Remove</a>
   </body>
</html>
user.jsp
<%@ page contentType = "text/html; charset = UTF-8" %>
<html>
   <head>
      <title>Hello World</title>
   </head>
   <body>
      <h2>${message}</h2>
   </body>
</html>
Output
Once you are done with creating source and configuration files, export your application. Right click on your application, use Run As → Maven Install option and save your hello.war file in Tomcat's webapps folder.
Now, start your Tomcat server and make sure you are able to access other webpages from the webapps folder using a standard browser. Now, try a URL − http://localhost:8080/hello/user/test.htm?action=home and we will see the following screen, if everything is fine with the Spring Web Application.
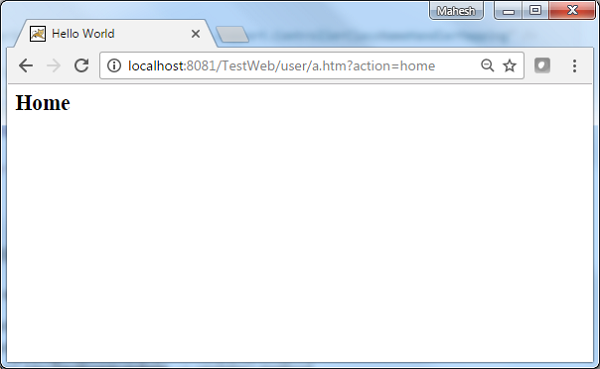
Spring MVC - Parameterizable View Controller Example
The following example shows how to use the Parameterizable View Controller method of a Multi Action Controller using the Spring Web MVC framework. The Parameterizable View allows mapping a webpage with a request.
Note* − MultiActionController is not available from Spring 5.1 onwards. This example is written using earlier version of spring.
package com.tutorialspoint;

import javax.servlet.http.HttpServletRequest;
import javax.servlet.http.HttpServletResponse;

import org.springframework.web.servlet.ModelAndView;
import org.springframework.web.servlet.mvc.multiaction.MultiActionController;

public class UserController extends MultiActionController{

   public ModelAndView home(HttpServletRequest request,
      HttpServletResponse response) throws Exception {
      ModelAndView model = new ModelAndView("user");
      model.addObject("message", "Home");
      return model;
   }
}
<bean class="org.springframework.web.servlet.handler.SimpleUrlHandlerMapping">
   <property name="mappings">
      <value>
         index.htm=userController
      </value>
   </property>
</bean>
<bean id="userController" class="org.springframework.web.servlet.mvc.ParameterizableViewController">
   <property name="viewName" value="user"/>
</bean>
For example, using the above configuration, if URI.
/index.htm is requested, DispatcherServlet will forward the request to the UserController controller with viewName set as user.jsp.
To start with, let us have a working Eclipse IDE in place and consider the following steps to develop a Dynamic Form based Web Application using Spring Web Framework −
| Step | Description |
|---|---|
| 1 | Create a project with a name hello under a package com.tutorialspoint as explained in the Spring MVC - Hello World Example chapter. |
| 2 | Create Java class UserController under the com.tutorialspoint package. |
| 3 | Create view files home.jsp and user.jsp under the jsp sub-folder in WEB-INF folder. |
| 4 | The final step is to create the content of the source and configuration files and export the application as explained below. |
UserController.java
package com.tutorialspoint;

import javax.servlet.http.HttpServletRequest;
import javax.servlet.http.HttpServletResponse;

import org.springframework.web.servlet.ModelAndView;
import org.springframework.web.servlet.mvc.multiaction.MultiActionController;

public class UserController extends MultiActionController{

   public ModelAndView home(HttpServletRequest request,
      HttpServletResponse response) throws Exception {
      ModelAndView model = new ModelAndView("user");
      model.addObject("message", "Home");
      return model;
   }
}
hello-servlet.xml
<beans xmlns = "http://www.springframework.org/schema/beans"
   xmlns:context = "http://www.springframework.org/schema/context"
   xmlns:xsi = "http://www.w3.org/2001/XMLSchema-instance"
   xsi:schemaLocation = "
   http://www.springframework.org/schema/beans
   http://www.springframework.org/schema/beans/spring-beans-3.0.xsd
   http://www.springframework.org/schema/context
   http://www.springframework.org/schema/context/spring-context-3.0.xsd">

   <context:component-scan base-package = "com.tutorialspoint" />

   <bean class = "org.springframework.web.servlet.view.InternalResourceViewResolver">
      <property name = "prefix" value = "/WEB-INF/jsp/" />
      <property name = "suffix" value = ".jsp" />
   </bean>

   <bean class = "org.springframework.web.servlet.handler.SimpleUrlHandlerMapping">
      <property name = "mappings">
         <value>
            index.htm = userController
         </value>
      </property>
   </bean>
   <bean id = "userController" class = "org.springframework.web.servlet.mvc.ParameterizableViewController">
      <property name = "viewName" value="user"/>
   </bean>
</beans>
home.jsp
<%@ page contentType = "text/html; charset = UTF-8" %>
<html>
   <head>
      <meta http-equiv = "Content-Type" content = "text/html; charset = ISO-8859-1">
      <title>Home</title>
   </head>Spring MVC - Internal Resource View Resolver Example
The InternalResourceViewResolver is used to resolve the provided URI to actual URI. The following example shows how to use the InternalResourceViewResolver using the Spring Web MVC Framework. The InternalResourceViewResolver allows mapping webpages with requests.

package com.tutorialspoint;

import org.springframework.stereotype.Controller;
import org.springframework.web.bind.annotation.RequestMapping;
import org.springframework.web.bind.annotation.RequestMethod;
import org.springframework.ui.ModelMap;

@Controller
@RequestMapping("/hello")
public class HelloController{

   @RequestMapping(method = RequestMethod.GET)
   public String printHello(ModelMap model) {
      model.addAttribute("message", "Hello Spring MVC Framework!");

      return "hello";
   }
}


<bean class = "org.springframework.web.servlet.view.InternalResourceViewResolver">
   <property name = "prefix" value = "/WEB-INF/jsp/"/>
   <property name = "suffix" value = ".jsp"/>
</bean>

For example, using the above configuration, if URI
/hello is requested, DispatcherServlet will forward the request to the prefix + viewname + suffix = /WEB-INF/jsp/hello.jsp.
To start with, let us have a working Eclipse IDE in place and consider the following steps to develop a Dynamic Form based Web Application using Spring Web Framework −
| Step | Description |
|---|---|
| 1 | Create a project with a name hello under a package com.tutorialspoint as explained in the Spring MVC - Hello World Example chapter. |
| 2 | Create Java class HelloController under the com.tutorialspoint package. |
| 3 | Create view files hello.jsp under the jsp sub-folder in WEB-INF folder. |
| 4 | The final step is to create the content of the source and configuration files and export the application as explained below. |
HelloController.java
package com.tutorialspoint;

import org.springframework.stereotype.Controller;
import org.springframework.web.bind.annotation.GetMapping;
import org.springframework.web.bind.annotation.RequestMapping;
import org.springframework.ui.ModelMap;

@Controller
@RequestMapping("/hello")
public class HelloController{

   @GetMapping
   public String printHello(ModelMap model) {
      model.addAttribute("message", "Hello Spring MVC Framework!");
      return "hello";
   }
}
hello-servlet.xml
<beans xmlns = "http://www.springframework.org/schema/beans"
   xmlns:context = "http://www.springframework.org/schema/context"
   xmlns:xsi = "http://www.w3.org/2001/XMLSchema-instance"
   xsi:schemaLocation = "
   http://www.springframework.org/schema/beans
   http://www.springframework.org/schema/beans/spring-beans-3.0.xsd
   http://www.springframework.org/schema/context
   http://www.springframework.org/schema/context/spring-context-3.0.xsd">

   <context:component-scan base-package = "com.tutorialspoint" />

   <bean class = "org.springframework.web.servlet.view.InternalResourceViewResolver">
      <property name = "prefix" value = "/WEB-INF/jsp/" />
      <property name = "suffix" value = ".jsp" />
   </bean>
</beans>
hello.jsp
<%@ page contentType = "text/html; charset = UTF-8" %>
<html>
   <head>
      <title>Hello World</title>
   </head>
   <body>
      <h2>${message}</h2>
   </body>
</html>
Output
Once you are done with creating source and configuration files, export your application. Right click on your application, use Run As → Maven Install option and save your hello.war file in Tomcat's webapps folder.
Now, start your Tomcat server and make sure you are able to access other webpages from the webapps folder using a standard browser. Try to access the URL http://localhost:8080/hello/hello and if everything is fine with the Spring Web Application, we will see the following screen.
Spring MVC - Xml View Resolver Example
The XmlViewResolver is used to resolve the view names using view beans defined in xml file. The following example shows how to use the XmlViewResolver using Spring Web MVC framework.
Note* − XmlViewResolver is deprecated from Spring 5.3 onwards. This example is written using earlier version of Spring.
hello-servlet.xml
<bean class = "org.springframework.web.servlet.view.XmlViewResolver">
   <property name = "location">
      <value>/WEB-INF/views.xml</value>
   </property>
</bean>
views.xml
<bean id = "hello"
   class = "org.springframework.web.servlet.view.JstlView">
   <property name = "url" value = "/WEB-INF/jsp/hello.jsp" />
</bean>
For example, using the above configuration, if URI −
/hello is requested, DispatcherServlet will forward the request to the hello.jsp defined by bean hello in the view.xml.
To start with, let us have a working Eclipse IDE in place and consider the following steps to develop a Dynamic Form based Web Application using Spring Web Framework −
| Step | Description |
|---|---|
| 1 | Create a project with a name hello under a package com.tutorialspoint as explained in the Spring MVC - Hello World Example chapter. |
| 2 | Create Java class HelloController under the com.tutorialspoint package. |
| 3 | Create view files hello.jsp under the jsp sub-folder in WEB-INF folder. |
| 4 | The final step is to create the content of the source and configuration files and export the application as explained below. |
HelloController.java
package com.tutorialspoint;

import org.springframework.stereotype.Controller;
import org.springframework.web.bind.annotation.GetMapping;
import org.springframework.web.bind.annotation.RequestMapping;
import org.springframework.ui.ModelMap;

@Controller
@RequestMapping("/hello")
public class HelloController{

   @GetMapping
   public String printHello(ModelMap model) {
      model.addAttribute("message", "Hello Spring MVC Framework!");
      return "hello";
   }
}
hello-servlet.xml
<beans xmlns = "http://www.springframework.org/schema/beans"
   xmlns:context = "http://www.springframework.org/schema/context"
   xmlns:xsi = "http://www.w3.org/2001/XMLSchema-instance"
   xsi:schemaLocation = "
   http://www.springframework.org/schema/beans
   http://www.springframework.org/schema/beans/spring-beans-3.0.xsd
   http://www.springframework.org/schema/context
   http://www.springframework.org/schema/context/spring-context-3.0.xsd">

   <context:component-scan base-package = "com.tutorialspoint" />

   <bean class = "org.springframework.web.servlet.view.InternalResourceViewResolver">
      <property name = "prefix" value = "/WEB-INF/jsp/" />
      <property name = "suffix" value = ".jsp" />
   </bean>
</beans>
hello.jsp
<%@ page contentType = "text/html; charset = UTF-8" %>
<html>
   <head>
      <title>Hello World</title>
   </head>
   <body>
      <h2>${message}</h2>
   </body>
</html>
Output
Once you are done with creating source and configuration files, export your application. Right click on your application, use Run As → Maven Install option and save your hello.war file in Tomcat's webapps folder.
Now, start your Tomcat server and make sure you are able to access other webpages from the webapps folder using a standard browser. Try to access the URL http://localhost:8080/hello/hello and if everything is fine with the Spring Web Application, we will see the following screen.
Spring MVC - Resource Bundle View Resolver Example
The ResourceBundleViewResolver is used to resolve the view names using view beans defined in the properties file. The following example shows how to use the ResourceBundleViewResolver using the Spring Web MVC Framework.
Note* − ResourceBundleViewResolver is deprecated from Spring 5.3 onwards. This example is written using earlier version of Spring.
hello-servlet.xml
<bean class = "org.springframework.web.servlet.view.ResourceBundleViewResolver">
   <property name = "basename" value = "views" />
</bean>
Here, the basename refers to name of the resource bundle, which carries the views. The default name of the resource bundle is views.properties, which can be overridden using the basename property.
views.properties
hello.(class) = org.springframework.web.servlet.view.JstlView
hello.url = /WEB-INF/jsp/hello.jsp
For example, using the above configuration, if URI −
/hello is requested, DispatcherServlet will forward the request to the hello.jsp defined by bean hello in the views.properties.
Here, "hello" is the view name to be matched. Whereas, class refers to the view type and URL is the view's location.
To start with, let us have a working Eclipse IDE in place and consider the following steps to develop a Dynamic Form based Web Application using Spring Web Framework −
| Step | Description |
|---|---|
| 1 | Create a project with a name hello under a package com.tutorialspoint as explained in the Spring MVC - Hello World Example chapter. |
| 2 | Create Java class HelloController under the com.tutorialspoint package. |
| 3 | Create view files hello.jsp under the jsp sub-folder in WEB-INF folder. |
| 4 | Create properties file views.properties under the src > main > resources folder. |
| 5 | The final step is to create the content of the source and configuration files and export the application as explained below. |
HelloController.java
package com.tutorialspoint;

import org.springframework.stereotype.Controller;
import org.springframework.web.bind.annotation.GetMapping;
import org.springframework.web.bind.annotation.RequestMapping;
import org.springframework.ui.ModelMap;

@Controller
@RequestMapping("/hello")
public class HelloController{

   @GetMapping
   public String printHello(ModelMap model) {
      model.addAttribute("message", "Hello Spring MVC Framework!");
      return "hello";
   }
}
hello-servlet.xml
<beans xmlns = "http://www.springframework.org/schema/beans"
   xmlns:context = "http://www.springframework.org/schema/context"
   xmlns:xsi = "http://www.w3.org/2001/XMLSchema-instance"
   xsi:schemaLocation = "
   http://www.springframework.org/schema/beans
   http://www.springframework.org/schema/beans/spring-beans-3.0.xsd
   http://www.springframework.org/schema/context
   http://www.springframework.org/schema/context/spring-context-3.0.xsd">

   <context:component-scan base-package = "com.tutorialspoint" />

   <bean class = "org.springframework.web.servlet.view.ResourceBundleViewResolver">
      <property name = "basename" value = "views" />
   </bean>
</beans>
views.properties
hello.(class) = org.springframework.web.servlet.view.JstlView
hello.url = /WEB-INF/jsp/hello.jsp
hello.jsp
<%@ page contentType = "text/html; charset = UTF-8" %>
<html>
   <head>
      <title>Hello World</title>
   </head>
   <body>
      <h2>${message}</h2>
   </body>
</html>
Output
Once you are done with creating source and configuration files, export your application. Right click on your application, use Run As → Maven Install option and save your hello.war file in Tomcat's webapps folder.
Now, start your Tomcat server and make sure you are able to access other webpages from the webapps folder using a standard browser. Try to access the URL http://localhost:8080/hello/hello and if everything is fine with the Spring Web Application, we will see the following screen.
Spring MVC - Multiple Resolver Mapping Example
In case you want to use a Multiple View Resolver in a Spring MVC application then priority order can be set using the order property. The following example shows how to use the ResourceBundleViewResolver and the InternalResourceViewResolver in the Spring Web MVC Framework.
Note* − ResourceBundleViewResolver is deprecated from Spring 5.3 onwards. This example is written using earlier version of Spring.
hello-servlet.xml
<bean class = "org.springframework.web.servlet.view.ResourceBundleViewResolver">
   <property name = "basename" value = "views" />
   <property name = "order" value = "0" />
</bean>
<bean class = "org.springframework.web.servlet.view.InternalResourceViewResolver">
   <property name = "prefix" value = "/WEB-INF/jsp/" />
   <property name = "suffix" value = ".jsp" />
   <property name = "order" value = "1" />
</bean>
Here, the order property defines the ranking of a view resolver. In this, 0 is the first resolver and 1 is the next resolver and so on.
views.properties
hello.(class) = org.springframework.web.servlet.view.JstlView
hello.url = /WEB-INF/jsp/hello.jsp
For example, using the above configuration, if URI −
/hello is requested, DispatcherServlet will forward the request to the hello.jsp defined by bean hello in views.properties.
To start with, let us have a working Eclipse IDE in place and consider the following steps to develop a Dynamic Form based Web Application using Spring Web Framework −
| Step | Description |
|---|---|
| 1 | Create a project with a name hello under a package com.tutorialspoint as explained in the Spring MVC - Hello World Example chapter. |
| 2 | Create Java class HelloController under the com.tutorialspoint package. |
| 3 | Create view files hello.jsp under the jsp sub-folder in WEB-INF folder. |
| 4 | Create properties file views.properties under the src > main > resources folder. |
| 5 | The final step is to create the content of the source and configuration files and export the application as explained below. |
HelloController.java
package com.tutorialspoint;

import org.springframework.stereotype.Controller;
import org.springframework.web.bind.annotation.GetMapping;
import org.springframework.web.bind.annotation.RequestMapping;
import org.springframework.ui.ModelMap;

@Controller
@RequestMapping("/hello")
public class HelloController{

   @GetMapping
   public String printHello(ModelMap model) {
      model.addAttribute("message", "Hello Spring MVC Framework!");
      return "hello";
   }
}
hello-servlet.xml
<beans xmlns = "http://www.springframework.org/schema/beans"
   xmlns:context = "http://www.springframework.org/schema/context"
   xmlns:xsi = "http://www.w3.org/2001/XMLSchema-instance"
   xsi:schemaLocation = "
   http://www.springframework.org/schema/beans
   http://www.springframework.org/schema/beans/spring-beans-3.0.xsd
   http://www.springframework.org/schema/context
   http://www.springframework.org/schema/context/spring-context-3.0.xsd">

   <context:component-scan base-package = "com.tutorialspoint" />
   <bean class = "org.springframework.web.servlet.view.ResourceBundleViewResolver">
      <property name = "basename" value = "views" />
      <property name = "order" value = "0" />
   </bean>
   <bean class = "org.springframework.web.servlet.view.InternalResourceViewResolver">
      <property name = "prefix" value = "/WEB-INF/jsp/" />
      <property name = "suffix" value = ".jsp" />
      <property name = "order" value = "1" />
</beans>
views.properties
hello.(class) = org.springframework.web.servlet.view.JstlView
hello.url = /WEB-INF/jsp/hello.jsp
hello.jsp
<%@ page contentType = "text/html; charset = UTF-8" %>
<html>
   <head>
      <title>Hello World</title>
   </head>
   <body>
      <h2>${message}</h2>
   </body>
</html>
Output
Once you are done with creating source and configuration files, export your application. Right click on your application, use Run As → Maven Install option and save your hello.war file in Tomcat's webapps folder.
Now, start your Tomcat server and make sure you are able to access other webpages from the webapps folder using a standard browser. Try to access the URL http://localhost:8080/hello/hello and if everything is fine with the Spring Web Application, we will see the following screen.
<body>
<a href = "user/add.htm" >Add</a> <br>
<a href = "user/remove.htm" >Remove</a>
</body>
</html>
user.jsp
<%@ page contentType = "text/html; charset = UTF-8" %>
<html>
   <head>
      <title>Hello World</title>
   </head>
   <body>
      <h2>${message}</h2>
   </body>
</html>
Output
Once you are done with creating source and configuration files, export your application. Right click on your application, use Run As → Maven Install option and save your hello.war file in Tomcat's webapps folder.
Now, start your Tomcat server and make sure you are able to access other webpages from webapps folder using a standard browser. Now, try a URL http://localhost:8080/hello/index.htm and you will see the following screen, if everything is fine with the Spring Web Application.
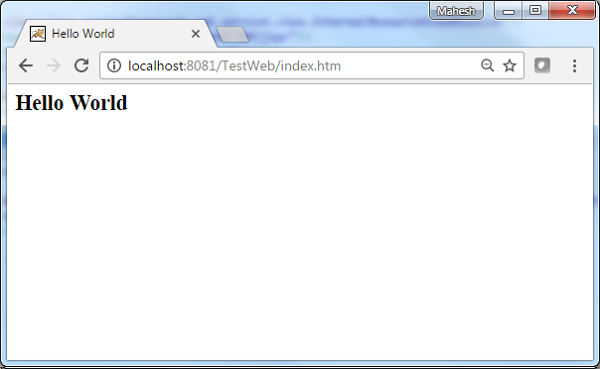
Spring MVC - Hibernate Validator Example
The following example shows how to use Hibernate Validators in forms using the Spring Web MVC framework.
To start with, let us have a working Eclipse IDE in place and consider the following steps to develop a Dynamic Form based Web Application using Spring Web Framework −
| Step | Description |
|---|---|
| 1 | Create a project with a name hello under a package com.tutorialspoint as explained in the Spring MVC - Hello World Example chapter. |
| 2 | Create Java class Student and StudentController under the com.tutorialspoint package. |
| 3 | Create view files addStudent.jsp and result.jsp under the jsp sub-folder in WEB-INF folder. |
| 4 | Create messages.properties under src > main > resources folder. |
| 5 | Add dependency for Hibernate Validator in POM.xml. |
| 5 | The final step is to create the content of the source and configuration files and export the application as explained below. |
pom.xml
<?xml version="1.0" encoding="UTF-8"?>
<project xmlns="http://maven.apache.org/POM/4.0.0" xmlns:xsi="http://www.w3.org/2001/XMLSchema-instance"
   xsi:schemaLocation="http://maven.apache.org/POM/4.0.0 http://maven.apache.org/xsd/maven-4.0.0.xsd">
   <modelVersion>4.0.0</modelVersion>
   <groupId>com.tutorialspoint</groupId>
   <artifactId>hello</artifactId>
   <version>0.0.1-SNAPSHOT</version>
   <packaging>war</packaging>
   <name>hello Maven Webapp</name>
   <url>http://www.tutorialspoint.com</url>
   <properties>
      <project.build.sourceEncoding>UTF-8</project.build.sourceEncoding>
      <maven.compiler.source>24</maven.compiler.source>
      <maven.compiler.target>24</maven.compiler.target>
      <org.springframework.version>7.0.0-M9</org.springframework.version>
   </properties>
   <dependencies>
      <dependency>
         <groupId>junit</groupId>
         <artifactId>junit</artifactId>
         <version>4.13.1</version>
         <scope>test</scope>
      </dependency>
      <dependency>
         <groupId>jakarta.servlet</groupId>
         <artifactId>jakarta.servlet-api</artifactId>
         <version>6.0.0</version>
         <scope>provided</scope>
      </dependency>
      <dependency>
         <groupId>org.springframework</groupId>
         <artifactId>spring-context</artifactId>
         <version>${org.springframework.version}</version>
         <scope>compile</scope>
      </dependency>
      <dependency>
         <groupId>org.springframework</groupId>
         <artifactId>spring-webmvc</artifactId>
         <version>${org.springframework.version}</version>
         <scope>compile</scope>
      </dependency>
      <dependency>
         <groupId>org.hibernate.validator</groupId>
         <artifactId>hibernate-validator</artifactId>
         <version>9.1.0.Alpha2</version>
      </dependency>
   </dependencies>
   <build>
      <finalName>hello</finalName>
      <pluginManagement>
         <plugins>
            <plugin>
               <artifactId>maven-clean-plugin</artifactId>
               <version>3.4.0</version>
            </plugin>
            <plugin>
               <artifactId>maven-resources-plugin</artifactId>
               <version>3.3.1</version>
            </plugin>
            <plugin>
               <artifactId>maven-compiler-plugin</artifactId>
               <version>3.13.0</version>
            </plugin>
            <plugin>
               <artifactId>maven-surefire-plugin</artifactId>
               <version>3.3.0</version>
            </plugin>
            <plugin>
               <artifactId>maven-war-plugin</artifactId>
               <version>3.4.0</version>
            </plugin>
            <plugin>
            <artifactId>maven-install-plugin</artifactId>
               <version>3.1.2</version>
            </plugin>
            <plugin>
               <artifactId>maven-deploy-plugin</artifactId>
               <version>3.1.2</version>
            </plugin>
         </plugins>
      </pluginManagement>
   </build>
</project>
Student.java
package com.tutorialspoint;

import org.hibernate.validator.constraints.Length;
import org.hibernate.validator.constraints.Range;

public class Student {

   @Range(min = 1, max = 100)
   private Integer age;
   @Length(min = 1, max = 150)
   private String name;
   private Integer id;

   public void setAge(Integer age) {
      this.age = age;
   }
   public Integer getAge() {
      return age;
   }

   public void setName(String name) {
      this.name = name;
   }
   public String getName() {
      return name;
   }

   public void setId(Integer id) {
      this.id = id;
   }
   public Integer getId() {
      return id;
   }
}
StudentController.java
package com.tutorialspoint;

import org.springframework.stereotype.Controller;
import org.springframework.ui.Model;
import org.springframework.validation.BindingResult;
import org.springframework.validation.annotation.Validated;
import org.springframework.web.bind.annotation.GetMapping;
import org.springframework.web.bind.annotation.ModelAttribute;
import org.springframework.web.bind.annotation.PostMapping;
import org.springframework.web.servlet.ModelAndView;

@Controller
public class StudentController {

   @GetMapping(value = "/addStudent")
   public ModelAndView student() {
      return new ModelAndView("addStudent", "command", new Student());
   }

   @ModelAttribute("student")
   public Student createStudentModel() {
      return new Student();
   }

   @PostMapping(value = "/addStudent")
   public String addStudent(@ModelAttribute("student") @Validated Student student,
      BindingResult bindingResult, Model model) {
      if (bindingResult.hasErrors()) {
         return "addStudent";
      }
      model.addAttribute("name", student.getName());
      model.addAttribute("age", student.getAge());
      model.addAttribute("id", student.getId());

      return "result";
   }
}
Here, for the first service method student(), we have passed a blank Studentobject in the ModelAndView object with name "command", because the spring framework expects an object with name "command", if you are using <form:form> tags in your JSP file. So, when student() method is called, it returns addStudent.jsp view.
The second service method addStudent() will be called against a POST method on the HelloWeb/addStudent URL. You will prepare your model object based on the submitted information. Finally, a "result" view will be returned from the service method, which will result in rendering the result.jsp. In case there are errors generated using validator then same view "addStudent" is returned, Spring automatically injects error messages from BindingResult in view.
messages.properties
Length.student.name = Name length must be between 1 and 150!
Range.student.age = Age must be between 1 and 100!
hello-servlet.xml
<beans xmlns = "http://www.springframework.org/schema/beans"
   xmlns:context = "http://www.springframework.org/schema/context"
   xmlns:mvc = "http://www.springframework.org/schema/mvc"
   xmlns:xsi = "http://www.w3.org/2001/XMLSchema-instance"
   xsi:schemaLocation = "
   http://www.springframework.org/schema/beans
   http://www.springframework.org/schema/beans/spring-beans-3.0.xsd
   http://www.springframework.org/schema/context
   http://www.springframework.org/schema/context/spring-context-3.0.xsd
   http://www.springframework.org/schema/mvc
   http://www.springframework.org/schema/mvc/spring-mvc-3.0.xsd">

   <context:component-scan base-package = "com.tutorialspoint" />
   <mvc:annotation-driven />
   <bean class = "org.springframework.context.support.ResourceBundleMessageSource"
      id = "messageSource">
      <property name = "basename" value = "messages" />
   </bean>
   <bean class = "org.springframework.web.servlet.view.InternalResourceViewResolver">
      <property name = "prefix" value = "/WEB-INF/jsp/" />
      <property name = "suffix" value = ".jsp" />
   </bean>
</beans>
addStudent.jsp
<%@taglib uri = "http://www.springframework.org/tags/form" prefix = "form"%>
<html>
   <head>
      <title>Spring MVC Form Handling</title>
   </head>
   <style>
      .error {
         color: #ff0000;
      }

      .errorblock {
         color: #000;
         background-color: #ffEEEE;
         border: 3px solid #ff0000;
         padding: 8px;
         margin: 16px;
      }
   </style>

   <body>
      <h2>Student Information</h2>
      <form:form method = "POST" action = "/hello/addStudent" modelAttribute="student" commandName = "student">
      <form:errors path = "*" cssClass = "errorblock" element = "div" />
         <table>
            <tr>
               <td><form:label path = "name">Name</form:label></td>
               <td><form:input path = "name" /></td>
               <td><form:errors path = "name" cssClass = "error" /></td>
            </tr>
            <tr>
               <td><form:label path = "age">Age</form:label></td>
               <td><form:input path = "age" /></td>
            </tr>
            <tr>
               <td><form:label path = "id">id</form:label></td>
               <td><form:input path = "id" /></td>
            </tr>
            <tr>
               <td colspan = "2">
               <input type = "submit" value = "Submit"/>
               </td>
            </tr>
         </table>
      </form:form>
   </body>
</html>
Here we are using <form:errors /> tag with path="*" to render error messages. For example −
<form:errors path = "*" cssClass = "errorblock" element = "div" />
It will render the error messages for all input validations.
We are using <form:errors /> tag with path="name" to render error message for name field. For example −
<form:errors path = "name" cssClass = "error" />
It will render error messages for the name field validations.
result.jsp
<%@taglib uri = "http://www.springframework.org/tags/form" prefix = "form"%>
<html>
   <head>
      <title>Spring MVC Form Handling</title>
   </head>
   <body>

      <h2>Submitted Student Information</h2>
      <table>
         <tr>
            <td>Name</td>
            <td>${name}</td>
         </tr>
         <tr>
            <td>Age</td>
            <td>${age}</td>
         </tr>
         <tr>
            <td>ID</td>
            <td>${id}</td>
         </tr>
      </table>
   </body>
</html>
Output
Once you are done with creating source and configuration files, export your application. Right click on your application, use Run As → Maven Install option and save your hello.war file in Tomcat's webapps folder.
Now, start the Tomcat server and make sure you are able to access other webpages from the webapps folder using a standard browser. Try a URL − http://localhost:8080/hello/addStudent and we will see the following screen, if you have entered invalid values.
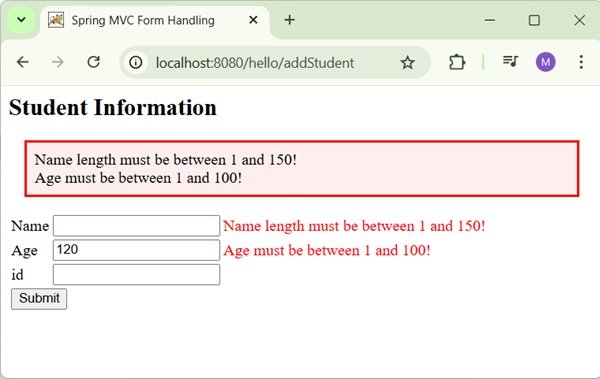
Spring MVC - Hibernate Validator Example
The following example shows how to generate RSS Feed using the Spring Web MVC Framework.
To start with, let us have a working Eclipse IDE in place and consider the following steps to develop a Dynamic Form based Web Application using Spring Web Framework −
| Step | Description |
|---|---|
| 1 | Create a project with a name hello under a package com.tutorialspoint as explained in the Spring MVC - Hello World Example chapter. |
| 2 | Create Java class RSSMessage, RSSFeedViewer and RSSController under the com.tutorialspoint package. |
| 3 | Add dependency for Rome library in POM.xml. |
| 5 | The final step is to create the content of the source and configuration files and export the application as explained below. |
pom.xml
<?xml version="1.0" encoding="UTF-8"?>
<project xmlns="http://maven.apache.org/POM/4.0.0" xmlns:xsi="http://www.w3.org/2001/XMLSchema-instance"
   xsi:schemaLocation="http://maven.apache.org/POM/4.0.0 http://maven.apache.org/xsd/maven-4.0.0.xsd">
   <modelVersion>4.0.0</modelVersion>
   <groupId>com.tutorialspoint</groupId>
   <artifactId>hello</artifactId>
   <version>0.0.1-SNAPSHOT</version>
   <packaging>war</packaging>
   <name>hello Maven Webapp</name>
   <url>http://www.tutorialspoint.com</url>
   <properties>
      <project.build.sourceEncoding>UTF-8</project.build.sourceEncoding>
      <maven.compiler.source>24</maven.compiler.source>
      <maven.compiler.target>24</maven.compiler.target>
      <org.springframework.version>7.0.0-M9</org.springframework.version>
   </properties>
   <dependencies>
      <dependency>
         <groupId>junit</groupId>
         <artifactId>junit</artifactId>
         <version>4.13.1</version>
         <scope>test</scope>
      </dependency>
      <dependency>
         <groupId>jakarta.servlet</groupId>
         <artifactId>jakarta.servlet-api</artifactId>
         <version>6.0.0</version>
         <scope>provided</scope>
      </dependency>
      <dependency>
         <groupId>org.springframework</groupId>
         <artifactId>spring-context</artifactId>
         <version>${org.springframework.version}</version>
         <scope>compile</scope>
      </dependency>
      <dependency>
         <groupId>org.springframework</groupId>
         <artifactId>spring-webmvc</artifactId>
         <version>${org.springframework.version}</version>
         <scope>compile</scope>
      </dependency>
      <dependency>
         <groupId>com.rometools</groupId>
         <artifactId>rome</artifactId>
         <version>2.1.0</version>
      </dependency>
   </dependencies>
   <build>
      <finalName>hello</finalName>
      <pluginManagement>
         <plugins>
            <plugin>
               <artifactId>maven-clean-plugin</artifactId>
               <version>3.4.0</version>
            </plugin>
            <plugin>
               <artifactId>maven-resources-plugin</artifactId>
               <version>3.3.1</version>
            </plugin>
            <plugin>
               <artifactId>maven-compiler-plugin</artifactId>
               <version>3.13.0</version>
            </plugin>
            <plugin>
               <artifactId>maven-surefire-plugin</artifactId>
               <version>3.3.0</version>
            </plugin>
            <plugin>
               <artifactId>maven-war-plugin</artifactId>
               <version>3.4.0</version>
            </plugin>
            <plugin>
            <artifactId>maven-install-plugin</artifactId>
               <version>3.1.2</version>
            </plugin>
            <plugin>
               <artifactId>maven-deploy-plugin</artifactId>
               <version>3.1.2</version>
            </plugin>
         </plugins>
      </pluginManagement>
   </build>
</project>
RSSMessage.java
package com.tutorialspoint;

import java.util.Date;

public class RSSMessage {
   String title;
   String url;
   String summary;
   Date createdDate;
   public String getTitle() {
      return title;
   }
   public void setTitle(String title) {
      this.title = title;
   }
   public String getUrl() {
      return url;
   }
   public void setUrl(String url) {
      this.url = url;
   }
   public String getSummary() {
      return summary;
   }
   public void setSummary(String summary) {
      this.summary = summary;
   }
   public Date getCreatedDate() {
      return createdDate;
   }
   public void setCreatedDate(Date createdDate) {
      this.createdDate = createdDate;
   }
}
RSSFeedViewer.java
package com.tutorialspoint;

import java.util.ArrayList;
import java.util.List;
import java.util.Map;

import jakarta.servlet.http.HttpServletRequest;
import jakarta.servlet.http.HttpServletResponse;

import org.springframework.web.servlet.view.feed.AbstractRssFeedView;

import com.rometools.rome.feed.rss.Channel;
import com.rometools.rome.feed.rss.Content;
import com.rometools.rome.feed.rss.Item;

public class RSSFeedViewer extends AbstractRssFeedView {

   @Override
   protected void buildFeedMetadata(Map<String, Object> model, Channel feed,
      HttpServletRequest request) {

      feed.setTitle("TutorialsPoint Dot Com");
      feed.setDescription("Java Tutorials and Examples");
      feed.setLink("http://www.tutorialspoint.com");

      super.buildFeedMetadata(model, feed, request);
   }

   @Override
   protected List<Item> buildFeedItems(Map<String, Object> model,
      HttpServletRequest request, HttpServletResponse response) throws Exception {

      List<RSSMessage> listContent = (List<RSSMessage>) model.get("feedContent");
      List<Item> items = new ArrayList<Item>(listContent.size());

      for(RSSMessage tempContent : listContent ){

         Item item = new Item();

         Content content = new Content();
         content.setValue(tempContent.getSummary());
         item.setContent(content);

         item.setTitle(tempContent.getTitle());
         item.setLink(tempContent.getUrl());
         item.setPubDate(tempContent.getCreatedDate());

         items.add(item);
      }

      return items;
   }
}
RSSController.java
package com.tutorialspoint;

import java.util.ArrayList;
import java.util.Date;
import java.util.List;

import org.springframework.stereotype.Controller;
import org.springframework.web.bind.annotation.GetMapping;
import org.springframework.web.servlet.ModelAndView;

@Controller
public class RSSController {
   @GetMapping(value="/rssfeed")
   public ModelAndView getFeedInRss() {

      List<RSSMessage> items = new ArrayList<RSSMessage>();

      RSSMessage content  = new RSSMessage();
      content.setTitle("Spring Tutorial");
      content.setUrl("http://www.tutorialspoint/spring");
      content.setSummary("Spring tutorial summary...");
      content.setCreatedDate(new Date());
      items.add(content);

      RSSMessage content2  = new RSSMessage();
      content2.setTitle("Spring MVC");
      content2.setUrl("http://www.tutorialspoint/springmvc");
      content2.setSummary("Spring MVC tutorial summary...");
      content2.setCreatedDate(new Date());
      items.add(content2);

      ModelAndView mav = new ModelAndView();
      mav.setViewName("rssViewer");
      mav.addObject("feedContent", items);

      return mav;
   }
}
Here, we have created a RSS feed POJO RSSMessage and a RSS Message Viewer, which extends the AbstractRssFeedView and overrides its method. In RSSController, we have generated a sample RSS Feed.
hello-servlet.xml
<beans xmlns = "http://www.springframework.org/schema/beans" xmlns:context = "http://www.springframework.org/schema/context" xmlns:mvc = "http://www.springframework.org/schema/mvc" xmlns:xsi = "http://www.w3.org/2001/XMLSchema-instance" xsi:schemaLocation = " http://www.springframework.org/schema/beans http://www.springframework.org/schema/beans/spring-beans-3.0.xsd http://www.springframework.org/schema/context http://www.springframework.org/schema/context/spring-context-3.0.xsd http://www.springframework.org/schema/mvc http://www.springframework.org/schema/mvc/spring-mvc-3.0.xsd"> <context:component-scanSpring MVC - Generate XML Example
The following example shows how to generate XML using the Spring Web MVC Framework.
To start with, let us have a working Eclipse IDE in place and consider the following steps to develop a Dynamic Form based Web Application using Spring Web Framework −
Step Description 1 Create a project with a name hello under a package com.tutorialspoint as explained in the Spring MVC - Hello World Example chapter. 2 Create Java class User and UserController under the com.tutorialspoint package. 3 Add dependency for jakarta xml bind library in POM.xml. 5 The final step is to create the content of the source and configuration files and export the application as explained below. pom.xml
<?xml version="1.0" encoding="UTF-8"?>
<project xmlns="http://maven.apache.org/POM/4.0.0" xmlns:xsi="http://www.w3.org/2001/XMLSchema-instance"
   xsi:schemaLocation="http://maven.apache.org/POM/4.0.0 http://maven.apache.org/xsd/maven-4.0.0.xsd">
   <modelVersion>4.0.0</modelVersion>
   <groupId>com.tutorialspoint</groupId>
   <artifactId>hello</artifactId>
   <version>0.0.1-SNAPSHOT</version>
   <packaging>war</packaging>
   <name>hello Maven Webapp</name>
   <url>http://www.tutorialspoint.com</url>
   <properties>
      <project.build.sourceEncoding>UTF-8</project.build.sourceEncoding>
      <maven.compiler.source>24</maven.compiler.source>
      <maven.compiler.target>24</maven.compiler.target>
      <org.springframework.version>7.0.0-M9</org.springframework.version>
   </properties>
   <dependencies>
      <dependency>
         <groupId>junit</groupId>
         <artifactId>junit</artifactId>
         <version>4.13.1</version>
         <scope>test</scope>
      </dependency>
      <dependency>
         <groupId>jakarta.servlet</groupId>
         <artifactId>jakarta.servlet-api</artifactId>
         <version>6.0.0</version>
         <scope>provided</scope>
      </dependency>
      <dependency>
         <groupId>org.springframework</groupId>
         <artifactId>spring-context</artifactId>
         <version>${org.springframework.version}</version>
         <scope>compile</scope>
      </dependency>
      <dependency>
         <groupId>org.springframework</groupId>
         <artifactId>spring-webmvc</artifactId>
         <version>${org.springframework.version}</version>
         <scope>compile</scope>
      </dependency>
      <dependency>
         <groupId>com.rometools</groupId>
         <artifactId>rome</artifactId>
         <version>2.1.0</version>
      </dependency>
      <dependency>
         <groupId>jakarta.xml.bind</groupId>
         <artifactId>jakarta.xml.bind-api</artifactId>
         <version>4.0.4</version>
      </dependency>
      <dependency>
         <groupId>org.glassfish.jaxb</groupId>
         <artifactId>jaxb-runtime</artifactId>
         <version>4.0.6</version>
         <scope>runtime</scope>
      </dependency>
   </dependencies>
   <build>
      <finalName>hello</finalName>
      <pluginManagement>
         <plugins>
            <plugin>
               <artifactId>maven-clean-plugin</artifactId>
               <version>3.4.0</version>
            </plugin>
            <plugin>
               <artifactId>maven-resources-plugin</artifactId>
               <version>3.3.1</version>
            </plugin>
            <plugin>
               <artifactId>maven-compiler-plugin</artifactId>
               <version>3.13.0</version>
            </plugin>
            <plugin>
               <artifactId>maven-surefire-plugin</artifactId>
               <version>3.3.0</version>
            </plugin>
            <plugin>
               <artifactId>maven-war-plugin</artifactId>
               <version>3.4.0</version>
            </plugin>
            <plugin>
            <artifactId>maven-install-plugin</artifactId>
               <version>3.1.2</version>
            </plugin>
            <plugin>
               <artifactId>maven-deploy-plugin</artifactId>
               <version>3.1.2</version>
            </plugin>
         </plugins>
      </pluginManagement>
   </build>
</project>
User.java
package com.tutorialspoint;

import jakarta.xml.bind.annotation.XmlElement;
import jakarta.xml.bind.annotation.XmlRootElement;

@XmlRootElement(name = "user")
public class User {
   private String name;
   private int id;
   public String getName() {
      return name;
   }
   @XmlElement
   public void setName(String name) {
      this.name = name;
   }
   public int getId() {
      return id;
   }
   @XmlElement
   public void setId(int id) {
      this.id = id;
   }
}
UserController.java
package com.tutorialspoint;

import org.springframework.stereotype.Controller;
import org.springframework.web.bind.annotation.GetMapping;
import org.springframework.web.bind.annotation.PathVariable;
import org.springframework.web.bind.annotation.ResponseBody;

@Controller
public class UserController {

   @GetMapping("/user/{name}")
   public @ResponseBody User getUser(@PathVariable("name") String name) {

      User user = new User();

      user.setName(name);
      user.setId(1);
      return user;
   }
}
Here, we have created an XML Mapped POJO User and in the UserController, we have returned the User. Spring automatically handles the XML conversion based on RequestMapping.
hello-servlet.xml
<beans xmlns = "http://www.springframework.org/schema/beans"
   xmlns:context = "http://www.springframework.org/schema/context"
   xmlns:mvc = "http://www.springframework.org/schema/mvc"
   xmlns:xsi = "http://www.w3.org/2001/XMLSchema-instance"
   xsi:schemaLocation = "
   http://www.springframework.org/schema/beans
   http://www.springframework.org/schema/beans/spring-beans-3.0.xsd
   http://www.springframework.org/schema/context
   http://www.springframework.org/schema/context/spring-context-3.0.xsd
   http://www.springframework.org/schema/mvc
   http://www.springframework.org/schema/mvc/spring-mvc-3.0.xsd">

   <context:component-scan base-package = "com.tutorialspoint" />
   <mvc:annotation-driven />
</beans>
Output
Once you are done with creating source and configuration files, export your application. Right click on your application, use Run As → Maven Install option and save your hello.war file in Tomcat's webapps folder.
Now, start the Tomcat server and make sure you are able to access other webpages from the webapps folder using a standard browser. Try a URL http://localhost:8080/hello/user/mahesh and we will see the following screen.
e = "com.tutorialspoint" /> <bean class = "org.springframework.web.servlet.view.BeanNameViewResolver" /> <bean id = "rssViewer" class = "com.tutorialspoint.RSSFeedViewer" /> </beans>
Output
Once you are done with creating source and configuration files, export your application. Right click on your application, use Run As → Maven Install option and save your hello.war file in Tomcat's webapps folder.
Now, start the Tomcat server and make sure you are able to access other webpages from the webapps folder using a standard browser. Try a URL − http://localhost:8080/hello/rssfeed and we will see the following screen.
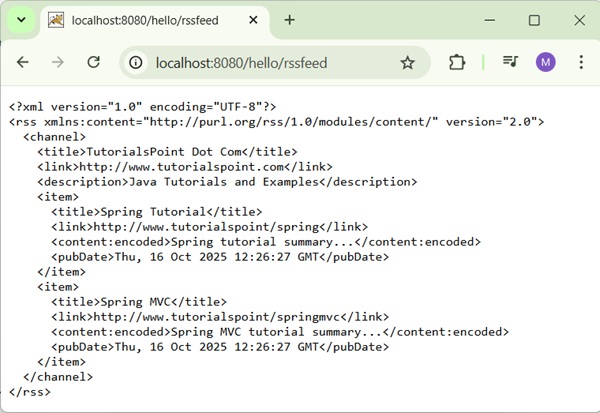
Spring MVC - Generate XML Example
The following example shows how to generate XML using the Spring Web MVC Framework.
To start with, let us have a working Eclipse IDE in place and consider the following steps to develop a Dynamic Form based Web Application using Spring Web Framework −
| Step | Description |
|---|---|
| 1 | Create a project with a name hello under a package com.tutorialspoint as explained in the Spring MVC - Hello World Example chapter. |
| 2 | Create Java class User and UserController under the com.tutorialspoint package. |
| 3 | Add dependency for jakarta xml bind library in POM.xml. |
| 5 | The final step is to create the content of the source and configuration files and export the application as explained below. |
pom.xml
<?xml version="1.0" encoding="UTF-8"?>
<project xmlns="http://maven.apache.org/POM/4.0.0" xmlns:xsi="http://www.w3.org/2001/XMLSchema-instance"
xsi:schemaLocation="http://maven.apache.org/POM/4.0.0 http://maven.apache.org/xsd/maven-4.0.0.xsd">
<modelVersion>4.0.0</modelVersion>
<groupId>com.tutorialspoint</groupId>
<artifactId>hello</artifactId>
<version>0.0.1-SNAPSHOT</version>
<packaging>war</packaging>
<name>hello Maven Webapp</name>
<url>http://www.tutorialspoint.com</url>
<properties>
<project.build.sourceEncoding>UTF-8</project.build.sourceEncoding>
<maven.compiler.source>24</maven.compiler.source>
<maven.compiler.target>24</maven.compiler.target>
<org.springframework.version>7.0.0-M9</org.springframework.version>
</properties>
<dependencies>
<dependency>
<groupId>junit</groupId>
<artifactId>junit</artifactId>
<version>4.13.1</version>
<scope>test</scope>
</dependency>
<dependency>
<groupId>jakarta.servlet</groupId>
<artifactId>jakarta.servlet-api</artifactId>
<version>6.0.0</version>
<scope>provided</scope>
</dependency>
<dependency>
<groupId>org.springframework</groupId>
<artifactId>spring-context</artifactId>
<version>${org.springframework.version}</version>
<scope>compile</scope>
</dependency>
<dependency>
<groupId>org.springframework</groupId>
<artifactId>spring-webmvc</artifactId>
<version>${org.springframework.version}</version>
<scope>compile</scope>
</dependency>
<dependency>
<groupId>com.rometools</groupId>
<artifactId>rome</artifactId>
<version>2.1.0</version>
</dependency>
<dependency>
<groupId>jakarta.xml.bind</groupId>
<artifactId>jakarta.xml.bind-api</artifactId>
<version>4.0.4</version>
</dependency>
<dependency>
<groupId>org.glassfish.jaxb</groupId>
<artifactId>jaxb-runtime</artifactId>
<version>4.0.6</version>
<scope>runtime</scope>
</dependency>
</dependencies>
<build>
<finalName>hello</finalName>
<pluginManagement>
<plugins>
<plugin>
<artifactId>maven-clean-plugin</artifactId>
<version>3.4.0</version>
</plugin>
<plugin>
<artifactId>maven-resources-plugin</artifactId>
<version>3.3.1</version>
</plugin>
<plugin>
<artifactId>maven-compiler-plugin</artifactId>
<version>3.13.0</version>
</plugin>
<plugin>
<artifactId>maven-surefire-plugin</artifactId>
<version>3.3.0</version>
</plugin>
<plugin>
<artifactId>maven-war-plugin</artifactId>
<version>3.4.0</version>
</plugin>
<plugin>
<artifactId>maven-install-plugin</artifactId>
<version>3.1.2</version>
</plugin>
<plugin>
<artifactId>maven-deploy-plugin</artifactId>
<version>3.1.2</version>
</plugin>
</plugins>
</pluginManagement>
</build>
</project>
User.java
package com.tutorialspoint;
import jakarta.xml.bind.annotation.XmlElement;
import jakarta.xml.bind.annotation.XmlRootElement;
@XmlRootElement(name = "user")
public class User {
private String name;
private int id;
public String getName() {
return name;
}
@XmlElement
public void setName(String name) {
this.name = name;
}
public int getId() {
return id;
}
@XmlElement
public void setId(int id) {
this.id = id;
}
}
UserController.java
package com.tutorialspoint;
import org.springframework.stereotype.Controller;
import org.springframework.web.bind.annotation.GetMapping;
import org.springframework.web.bind.annotation.PathVariable;
import org.springframework.web.bind.annotation.ResponseBody;
@Controller
public class UserController {
@GetMapping("/user/{name}")
public @ResponseBody User getUser(@PathVariable("name") String name) {
User user = new User();
user.setName(name);
user.setId(1);
return user;
}
}
Here, we have created an XML Mapped POJO User and in the UserController, we have returned the User. Spring automatically handles the XML conversion based on RequestMapping.
hello-servlet.xml
<beans xmlns = "http://www.springframework.org/schema/beans" xmlns:context = "http://www.springframework.org/schema/context" xmlns:mvc = "http://www.springframework.org/schema/mvc" xmlns:xsi = "http://www.w3.org/2001/XMLSchema-instance" xsi:schemaLocation = " http://www.springframework.org/schema/beans http://www.springframework.org/schema/beans/spring-beans-3.0.xsd http://www.springframework.org/schema/context http://www.springframework.org/schema/context/spring-context-3.0.xsd http://www.springframework.org/schema/mvc http://www.springframework.org/schema/mvc/spring-mvc-3.0.xsd"> <context:component-scan base-package = "com.tutorialspoint" /> <mvc:annotation-driven /> </beans>
Output
Once you are done with creating source and configuration files, export your application. Right click on your application, use Run As → Maven Install option and save your hello.war file in Tomcat's webapps folder.
Now, start the Tomcat server and make sure you are able to access other webpages from the webapps folder using a standard browser. Try a URL http://localhost:8080/hello/user/mahesh and we will see the following screen.
Spring MVC - Generate JSON Example
The following example shows how to generate JSON using the Spring Web MVC Framework.
To start with, let us have a working Eclipse IDE in place and consider the following steps to develop a Dynamic Form based Web Application using Spring Web Framework −
| Step | Description |
|---|---|
| 1 | Create a project with a name hello under a package com.tutorialspoint as explained in the Spring MVC - Hello World Example chapter. |
| 2 | Create Java class User and UserController under the com.tutorialspoint package. |
| 3 | Add dependency for jackson libraries in POM.xml. |
| 5 | The final step is to create the content of the source and configuration files and export the application as explained below. |
pom.xml
<?xml version="1.0" encoding="UTF-8"?>
<project xmlns="http://maven.apache.org/POM/4.0.0" xmlns:xsi="http://www.w3.org/2001/XMLSchema-instance"
   xsi:schemaLocation="http://maven.apache.org/POM/4.0.0 http://maven.apache.org/xsd/maven-4.0.0.xsd">
   <modelVersion>4.0.0</modelVersion>
   <groupId>com.tutorialspoint</groupId>
   <artifactId>hello</artifactId>
   <version>0.0.1-SNAPSHOT</version>
   <packaging>war</packaging>
   <name>hello Maven Webapp</name>
   <url>http://www.tutorialspoint.com</url>
   <properties>
      <project.build.sourceEncoding>UTF-8</project.build.sourceEncoding>
      <maven.compiler.source>24</maven.compiler.source>
      <maven.compiler.target>24</maven.compiler.target>
      <org.springframework.version>7.0.0-M9</org.springframework.version>
   </properties>
   <dependencies>
      <dependency>
         <groupId>junit</groupId>
         <artifactId>junit</artifactId>
         <version>4.13.1</version>
         <scope>test</scope>
      </dependency>
      <dependency>
         <groupId>jakarta.servlet</groupId>
         <artifactId>jakarta.servlet-api</artifactId>
         <version>6.0.0</version>
         <scope>provided</scope>
      </dependency>
      <dependency>
         <groupId>org.springframework</groupId>
         <artifactId>spring-context</artifactId>
         <version>${org.springframework.version}</version>
         <scope>compile</scope>
      </dependency>
      <dependency>
         <groupId>org.springframework</groupId>
         <artifactId>spring-webmvc</artifactId>
         <version>${org.springframework.version}</version>
         <scope>compile</scope>
      </dependency>
      <dependency>
         <groupId>com.rometools</groupId>
         <artifactId>rome</artifactId>
         <version>2.1.0</version>
      </dependency>
      <dependency>
         <groupId>tools.jackson.core</groupId>
         <artifactId>jackson-core</artifactId>
         <version>3.0.0</version>
      </dependency>
      <dependency>
         <groupId>tools.jackson.core</groupId>
         <artifactId>jackson-databind</artifactId>
         <version>3.0.0</version>
      </dependency>
      <dependency>
         <groupId>com.fasterxml.jackson.core</groupId>
         <artifactId>jackson-annotations</artifactId>
         <version>3.0-rc5</version>
      </dependency>
   </dependencies>
   <build>
      <finalName>hello</finalName>
      <pluginManagement>
         <plugins>
            <plugin>
               <artifactId>maven-clean-plugin</artifactId>
               <version>3.4.0</version>
            </plugin>
            <plugin>
               <artifactId>maven-resources-plugin</artifactId>
               <version>3.3.1</version>
            </plugin>
            <plugin>
               <artifactId>maven-compiler-plugin</artifactId>
               <version>3.13.0</version>
            </plugin>
            <plugin>
               <artifactId>maven-surefire-plugin</artifactId>
               <version>3.3.0</version>
            </plugin>
            <plugin>
               <artifactId>maven-war-plugin</artifactId>
               <version>3.4.0</version>
            </plugin>
            <plugin>
            <artifactId>maven-install-plugin</artifactId>
               <version>3.1.2</version>
            </plugin>
            <plugin>
               <artifactId>maven-deploy-plugin</artifactId>
               <version>3.1.2</version>
            </plugin>
         </plugins>
      </pluginManagement>
   </build>
</project>
User.java
package com.tutorialspoint;

public class User {
   private String name;
   private int id;
   public String getName() {
      return name;
   }
   public void setName(String name) {
      this.name = name;
   }
   public int getId() {
      return id;
   }
   public void setId(int id) {
      this.id = id;
   }
}
UserController.java
package com.tutorialspoint;

import org.springframework.stereotype.Controller;
import org.springframework.web.bind.annotation.GetMapping;
import org.springframework.web.bind.annotation.PathVariable;
import org.springframework.web.bind.annotation.ResponseBody;

@Controller
public class UserController {

   @GetMapping("/user/{name}")
   public @ResponseBody User getUser(@PathVariable("name") String name) {

      User user = new User();

      user.setName(name);
      user.setId(1);
      return user;
   }
}
Here, we have created a Simple POJO User and in UserController we have returned the User. Spring automatically handles the JSON conversion based on RequestMapping and Jackson jar present in the classpath.
hello-servlet.xml
<beans xmlns = "http://www.springframework.org/schema/beans"
   xmlns:context = "http://www.springframework.org/schema/context"
   xmlns:mvc = "http://www.springframework.org/schema/mvc"
   xmlns:xsi = "http://www.w3.org/2001/XMLSchema-instance"
   xsi:schemaLocation = "
   http://www.springframework.org/schema/beans
   http://www.springframework.org/schema/beans/spring-beans-3.0.xsd
   http://www.springframework.org/schema/context
   http://www.springframework.org/schema/context/spring-context-3.0.xsd
   http://www.springframework.org/schema/mvc
   http://www.springframework.org/schema/mvc/spring-mvc-3.0.xsd">

   <context:component-scan base-package = "com.tutorialspoint" />
   <mvc:annotation-driven />
</beans>
Output
Once you are done with creating source and configuration files, export your application. Right click on your application, use Run As → Maven Install option and save your hello.war file in Tomcat's webapps folder.
Now, start the Tomcat server and make sure you are able to access other webpages from the webapps folder using a standard browser. Try a URL http://localhost:8080/hello/user/mahesh and we will see the following screen.
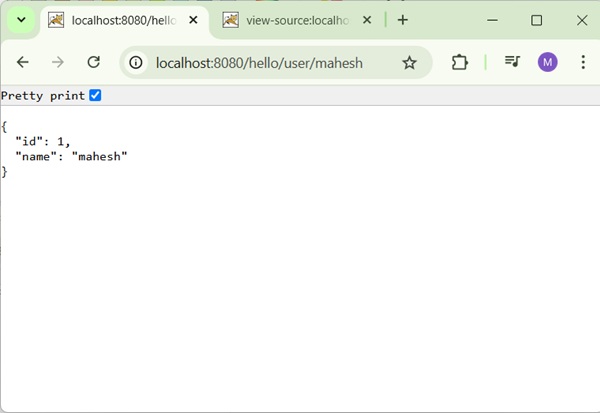
Spring MVC - Generate Excel Example
The following example shows how to generate Excel using the Spring Web MVC Framework.
To start with, let us have a working Eclipse IDE in place and consider the following steps to develop a Dynamic Form based Web Application using Spring Web Framework −
| Step | Description |
|---|---|
| 1 | Create a project with a name hello under a package com.tutorialspoint as explained in the Spring MVC - Hello World Example chapter. |
| 2 | Create Java class UserExcelView and ExcelController under the com.tutorialspoint package. |
| 3 | Add dependency for Apache POI libraries in POM.xml. |
| 5 | The final step is to create the content of the source and configuration files and export the application as explained below. |
pom.xml
<?xml version="1.0" encoding="UTF-8"?>
<project xmlns="http://maven.apache.org/POM/4.0.0" xmlns:xsi="http://www.w3.org/2001/XMLSchema-instance"
   xsi:schemaLocation="http://maven.apache.org/POM/4.0.0 http://maven.apache.org/xsd/maven-4.0.0.xsd">
   <modelVersion>4.0.0</modelVersion>
   <groupId>com.tutorialspoint</groupId>
   <artifactId>hello</artifactId>
   <version>0.0.1-SNAPSHOT</version>
   <packaging>war</packaging>
   <name>hello Maven Webapp</name>
   <url>http://www.tutorialspoint.com</url>
   <properties>
      <project.build.sourceEncoding>UTF-8</project.build.sourceEncoding>
      <maven.compiler.source>24</maven.compiler.source>
      <maven.compiler.target>24</maven.compiler.target>
      <org.springframework.version>7.0.0-M9</org.springframework.version>
   </properties>
   <dependencies>
      <dependency>
         <groupId>junit</groupId>
         <artifactId>junit</artifactId>
         <version>4.13.1</version>
         <scope>test</scope>
      </dependency>
      <dependency>
         <groupId>jakarta.servlet</groupId>
         <artifactId>jakarta.servlet-api</artifactId>
         <version>6.0.0</version>
         <scope>provided</scope>
      </dependency>
      <dependency>
         <groupId>org.springframework</groupId>
         <artifactId>spring-context</artifactId>
         <version>${org.springframework.version}</version>
         <scope>compile</scope>
      </dependency>
      <dependency>
         <groupId>org.springframework</groupId>
         <artifactId>spring-webmvc</artifactId>
         <version>${org.springframework.version}</version>
         <scope>compile</scope>
      </dependency>
      <dependency>
         <groupId>com.rometools</groupId>
         <artifactId>rome</artifactId>
         <version>2.1.0</version>
      </dependency>
      <dependency>
         <groupId>org.apache.poi</groupId>
         <artifactId>poi</artifactId>
         <version>5.4.1</version>
      </dependency>
      <dependency>
         <groupId>org.apache.poi</groupId>
         <artifactId>poi-ooxml</artifactId>
         <version>5.4.1</version>
      </dependency>
   </dependencies>
   <build>
      <finalName>hello</finalName>
      <pluginManagement>
         <plugins>
            <plugin>
               <artifactId>maven-clean-plugin</artifactId>
               <version>3.4.0</version>
            </plugin>
            <plugin>
               <artifactId>maven-resources-plugin</artifactId>
               <version>3.3.1</version>
            </plugin>
            <plugin>
               <artifactId>maven-compiler-plugin</artifactId>
               <version>3.13.0</version>
            </plugin>
            <plugin>
               <artifactId>maven-surefire-plugin</artifactId>
               <version>3.3.0</version>
            </plugin>
            <plugin>
               <artifactId>maven-war-plugin</artifactId>
               <version>3.4.0</version>
            </plugin>
            <plugin>
            <artifactId>maven-install-plugin</artifactId>
               <version>3.1.2</version>
            </plugin>
            <plugin>
               <artifactId>maven-deploy-plugin</artifactId>
               <version>3.1.2</version>
            </plugin>
         </plugins>
      </pluginManagement>
   </build>
</project>
ExcelController.java
package com.tutorialspoint;

import java.util.HashMap;
import java.util.Map;

import org.springframework.stereotype.Controller;
import org.springframework.web.bind.annotation.GetMapping;
import org.springframework.web.servlet.ModelAndView;

@Controller
public class ExcelController {

   @GetMapping("/excel")
   protected ModelAndView getExcel() throws Exception {
      //user data
      Map<String,String> userData = new HashMap<String,String>();
      userData.put("1", "Mahesh");
      userData.put("2", "Suresh");
      userData.put("3", "Ramesh");
      userData.put("4", "Naresh");
      return new ModelAndView(new UserExcelView(),"userData",userData);
   }
}
UserExcelView.java
package com.tutorialspoint;

import java.util.Map;

import org.apache.poi.ss.usermodel.Row;
import org.apache.poi.ss.usermodel.Sheet;
import org.apache.poi.ss.usermodel.Workbook;
import org.springframework.web.servlet.view.document.AbstractXlsxView;

import jakarta.servlet.http.HttpServletRequest;
import jakarta.servlet.http.HttpServletResponse;

public class UserExcelView extends AbstractXlsxView {
   @Override
   protected void buildExcelDocument(Map<String, Object> model, Workbook workbook, HttpServletRequest request,
      HttpServletResponse response) throws Exception {
      Map<String,String> userData = (Map<String,String>) model.get("userData");
      //create a wordsheet
      Sheet sheet = workbook.createSheet("User Report");

      Row header = sheet.createRow(0);
      header.createCell(0).setCellValue("Roll No");
      header.createCell(1).setCellValue("Name");

      int rowNum = 1;
      for (Map.Entry<String, String> entry : userData.entrySet()) {
         //create the row data
         Row row = sheet.createRow(rowNum++);
         row.createCell(0).setCellValue(entry.getKey());
         row.createCell(1).setCellValue(entry.getValue());
      }
   }
}
Here, we have created an ExcelController and an ExcelView. Apache POI library deals with Microsoft Office file formats and will convert the data to an excel document.
hello-servlet.xml
<beans xmlns = "http://www.springframework.org/schema/beans"
   xmlns:context = "http://www.springframework.org/schema/context"
   xmlns:mvc = "http://www.springframework.org/schema/mvc"
   xmlns:xsi = "http://www.w3.org/2001/XMLSchema-instance"
   xsi:schemaLocation = "
   http://www.springframework.org/schema/beans
   http://www.springframework.org/schema/beans/spring-beans-3.0.xsd
   http://www.springframework.org/schema/context
   http://www.springframework.org/schema/context/spring-context-3.0.xsd
   http://www.springframework.org/schema/mvc
   http://www.springframework.org/schema/mvc/spring-mvc-3.0.xsd">

   <context:component-scan base-package = "com.tutorialspoint" />
   <mvc:annotation-driven />
</beans>
Output
Once you are done with creating source and configuration files, export your application. Right click on your application, use Run As → Maven Install option and save your hello.war file in Tomcat's webapps folder.
Now, start the Tomcat server and make sure you are able to access other webpages from the webapps folder using a standard browser. Try a URL http://localhost:8080/hello/excel and we will see the following screen.
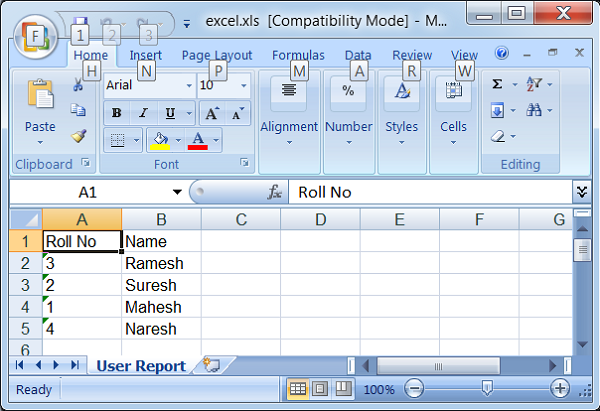
Spring MVC - Generate PDF Example
The following example shows how to generate PDF using the Spring Web MVC Framework.
To start with, let us have a working Eclipse IDE in place and consider the following steps to develop a Dynamic Form based Web Application using Spring Web Framework −
| Step | Description |
|---|---|
| 1 | Create a project with a name hello under a package com.tutorialspoint as explained in the Spring MVC - Hello World Example chapter. |
| 2 | Create Java class UserPDFView and PDFController under the com.tutorialspoint package. |
| 3 | Add dependency for iText libraries in POM.xml. |
| 5 | The final step is to create the content of the source and configuration files and export the application as explained below. |
pom.xml
<?xml version="1.0" encoding="UTF-8"?>
<project xmlns="http://maven.apache.org/POM/4.0.0" xmlns:xsi="http://www.w3.org/2001/XMLSchema-instance"
   xsi:schemaLocation="http://maven.apache.org/POM/4.0.0 http://maven.apache.org/xsd/maven-4.0.0.xsd">
   <modelVersion>4.0.0</modelVersion>
   <groupId>com.tutorialspoint</groupId>
   <artifactId>hello</artifactId>
   <version>0.0.1-SNAPSHOT</version>
   <packaging>war</packaging>
   <name>hello Maven Webapp</name>
   <url>http://www.tutorialspoint.com</url>
   <properties>
      <project.build.sourceEncoding>UTF-8</project.build.sourceEncoding>
      <maven.compiler.source>24</maven.compiler.source>
      <maven.compiler.target>24</maven.compiler.target>
      <org.springframework.version>7.0.0-M9</org.springframework.version>
   </properties>
   <dependencies>
      <dependency>
         <groupId>junit</groupId>
         <artifactId>junit</artifactId>
         <version>4.13.1</version>
         <scope>test</scope>
      </dependency>
      <dependency>
         <groupId>jakarta.servlet</groupId>
         <artifactId>jakarta.servlet-api</artifactId>
         <version>6.0.0</version>
         <scope>provided</scope>
      </dependency>
      <dependency>
         <groupId>org.springframework</groupId>
         <artifactId>spring-context</artifactId>
         <version>${org.springframework.version}</version>
         <scope>compile</scope>
      </dependency>
      <dependency>
         <groupId>org.springframework</groupId>
         <artifactId>spring-webmvc</artifactId>
         <version>${org.springframework.version}</version>
         <scope>compile</scope>
      </dependency>
      <dependency>
         <groupId>com.rometools</groupId>
         <artifactId>rome</artifactId>
         <version>2.1.0</version>
      </dependency>
      <dependency>
         <groupId>org.apache.poi</groupId>
         <artifactId>poi</artifactId>
         <version>5.4.1</version>
      </dependency>
      <dependency>
         <groupId>org.apache.poi</groupId>
         <artifactId>poi-ooxml</artifactId>
         <version>5.4.1</version>
      </dependency>
      <dependency>
         <groupId>com.lowagie</groupId>
         <artifactId>itext</artifactId>
         <version>2.1.7</version>
      </dependency>
   </dependencies>
   <build>
      <finalName>hello</finalName>
      <pluginManagement>
         <plugins>
            <plugin>
               <artifactId>maven-clean-plugin</artifactId>
               <version>3.4.0</version>
            </plugin>
            <plugin>
               <artifactId>maven-resources-plugin</artifactId>
               <version>3.3.1</version>
            </plugin>
            <plugin>
               <artifactId>maven-compiler-plugin</artifactId>
               <version>3.13.0</version>
            </plugin>
            <plugin>
               <artifactId>maven-surefire-plugin</artifactId>
               <version>3.3.0</version>
            </plugin>
            <plugin>
               <artifactId>maven-war-plugin</artifactId>
               <version>3.4.0</version>
            </plugin>
            <plugin>
            <artifactId>maven-install-plugin</artifactId>
               <version>3.1.2</version>
            </plugin>
            <plugin>
               <artifactId>maven-deploy-plugin</artifactId>
               <version>3.1.2</version>
            </plugin>
         </plugins>
      </pluginManagement>
   </build>
</project>
PDFController.java
package com.tutorialspoint;

import java.util.HashMap;
import java.util.Map;

import org.springframework.stereotype.Controller;
import org.springframework.web.bind.annotation.GetMapping;
import org.springframework.web.servlet.ModelAndView;

@Controller
public class PDFController {

   @GetMapping("/pdf")
   protected ModelAndView getExcel() throws Exception {
      //user data
      Map<String,String> userData = new HashMap<String,String>();
      userData.put("1", "Mahesh");
      userData.put("2", "Suresh");
      userData.put("3", "Ramesh");
      userData.put("4", "Naresh");
      return new ModelAndView(new UserPDFView(),"userData",userData);
   }
}
UserPDFView.java
package com.tutorialspoint;

import java.util.Map;

import jakarta.servlet.http.HttpServletRequest;
import jakarta.servlet.http.HttpServletResponse;

import org.springframework.web.servlet.view.document.AbstractPdfView;

import com.lowagie.text.Document;
import com.lowagie.text.Table;
import com.lowagie.text.pdf.PdfWriter;

public class UserPDFView extends AbstractPdfView {

   protected void buildPdfDocument(Map<String, Object> model, Document document,
      PdfWriter pdfWriter, HttpServletRequest request, HttpServletResponse response)
      throws Exception {
      Map<String,String> userData = (Map<String,String>) model.get("userData");

      Table table = new Table(2);
      table.addCell("Roll No");
      table.addCell("Name");

      for (Map.Entry<String, String> entry : userData.entrySet()) {
         table.addCell(entry.getKey());
         table.addCell(entry.getValue());
      }
      document.add(table);
   }
}
Here, we have created an PDFController and a PDFView. iText library deals with PDF file formats and will convert the data to a PDF document.
hello-servlet.xml
<beans xmlns = "http://www.springframework.org/schema/beans"
   xmlns:context = "http://www.springframework.org/schema/context"
   xmlns:mvc = "http://www.springframework.org/schema/mvc"
   xmlns:xsi = "http://www.w3.org/2001/XMLSchema-instance"
   xsi:schemaLocation = "
   http://www.springframework.org/schema/beans
   http://www.springframework.org/schema/beans/spring-beans-3.0.xsd
   http://www.springframework.org/schema/context
   http://www.springframework.org/schema/context/spring-context-3.0.xsd
   http://www.springframework.org/schema/mvc
   http://www.springframework.org/schema/mvc/spring-mvc-3.0.xsd">

   <context:component-scan base-package = "com.tutorialspoint" />
   <mvc:annotation-driven />
</beans>
Output
Once you are done with creating source and configuration files, export your application. Right click on your application, use Run As → Maven Install option and save your hello.war file in Tomcat's webapps folder.
Now, start the Tomcat server and make sure you are able to access other webpages from the webapps folder using a standard browser. Try a URL http://localhost:8080/hello/pdf and we will see the following screen.
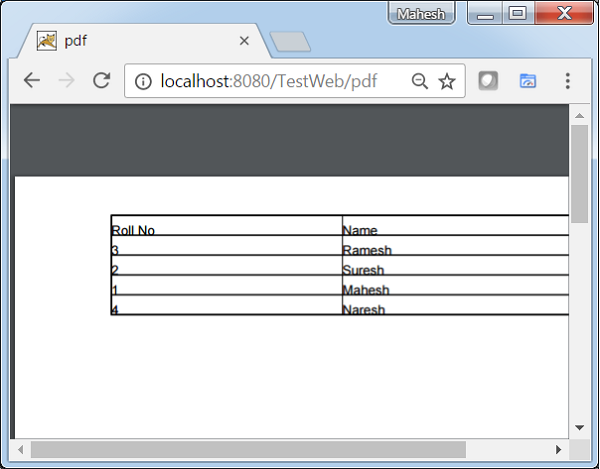
Spring MVC - Using log4j
The following example shows how to integrate LOG4J with the Spring Web MVC Framework.
To start with, let us have a working Eclipse IDE in place and consider the following steps to develop a Dynamic Form based Web Application using Spring Web Framework −
| Step | Description |
|---|---|
| 1 | Create a project with a name hello under a package com.tutorialspoint as explained in the Spring MVC - Hello World Example chapter. |
| 2 | Create Java class HelloController under the com.tutorialspoint package. |
| 3 | Add dependency for log4j libraries in POM.xml and add log4j2.properties under src > main > resources folder. |
| 5 | The final step is to create the content of the source and configuration files and export the application as explained below. |
pom.xml
<?xml version="1.0" encoding="UTF-8"?>
<project xmlns="http://maven.apache.org/POM/4.0.0" xmlns:xsi="http://www.w3.org/2001/XMLSchema-instance"
   xsi:schemaLocation="http://maven.apache.org/POM/4.0.0 http://maven.apache.org/xsd/maven-4.0.0.xsd">
   <modelVersion>4.0.0</modelVersion>
   <groupId>com.tutorialspoint</groupId>
   <artifactId>hello</artifactId>
   <version>0.0.1-SNAPSHOT</version>
   <packaging>war</packaging>
   <name>hello Maven Webapp</name>
   <url>http://www.tutorialspoint.com</url>
   <properties>
      <project.build.sourceEncoding>UTF-8</project.build.sourceEncoding>
      <maven.compiler.source>24</maven.compiler.source>
      <maven.compiler.target>24</maven.compiler.target>
      <org.springframework.version>7.0.0-M9</org.springframework.version>
   </properties>
   <dependencies>
      <dependency>
         <groupId>junit</groupId>
         <artifactId>junit</artifactId>
         <version>4.13.1</version>
         <scope>test</scope>
      </dependency>
      <dependency>
         <groupId>jakarta.servlet</groupId>
         <artifactId>jakarta.servlet-api</artifactId>
         <version>6.0.0</version>
         <scope>provided</scope>
      </dependency>
      <dependency>
         <groupId>org.springframework</groupId>
         <artifactId>spring-context</artifactId>
         <version>${org.springframework.version}</version>
         <scope>compile</scope>
      </dependency>
      <dependency>
         <groupId>org.springframework</groupId>
         <artifactId>spring-webmvc</artifactId>
         <version>${org.springframework.version}</version>
         <scope>compile</scope>
      </dependency>
      <dependency>
         <groupId>com.rometools</groupId>
         <artifactId>rome</artifactId>
         <version>2.1.0</version>
      </dependency>
      <dependency>
         <groupId>org.apache.poi</groupId>
         <artifactId>poi</artifactId>
         <version>5.4.1</version>
      </dependency>
      <dependency>
         <groupId>org.apache.poi</groupId>
         <artifactId>poi-ooxml</artifactId>
         <version>5.4.1</version>
      </dependency>
      <dependency>
         <groupId>com.lowagie</groupId>
         <artifactId>itext</artifactId>
         <version>2.1.7</version>
      </dependency>
      <dependency>
        <groupId>log4j</groupId>
        <artifactId>log4j</artifactId>
        <version>1.2.17</version>
        <scope>runtime</scope>
      </dependency>
   </dependencies>
   <build>
      <finalName>hello</finalName>
      <pluginManagement>
         <plugins>
            <plugin>
               <artifactId>maven-clean-plugin</artifactId>
               <version>3.4.0</version>
            </plugin>
            <plugin>
               <artifactId>maven-resources-plugin</artifactId>
               <version>3.3.1</version>
            </plugin>
            <plugin>
               <artifactId>maven-compiler-plugin</artifactId>
               <version>3.13.0</version>
            </plugin>
            <plugin>
               <artifactId>maven-surefire-plugin</artifactId>
               <version>3.3.0</version>
            </plugin>
            <plugin>
               <artifactId>maven-war-plugin</artifactId>
               <version>3.4.0</version>
            </plugin>
            <plugin>
            <artifactId>maven-install-plugin</artifactId>
               <version>3.1.2</version>
            </plugin>
            <plugin>
               <artifactId>maven-deploy-plugin</artifactId>
               <version>3.1.2</version>
            </plugin>
         </plugins>
      </pluginManagement>
   </build>
</project>
HelloController.java
package com.tutorialspoint;

import org.apache.logging.log4j.LogManager;
import org.apache.logging.log4j.Logger;
import org.springframework.stereotype.Controller;
import org.springframework.ui.ModelMap;
import org.springframework.web.bind.annotation.RequestMapping;
import org.springframework.web.bind.annotation.RequestMethod;

@Controller
@RequestMapping("/hello")
public class HelloController{
   private static final Logger LOGGER = LogManager.getLogger(HelloController.class);
   @RequestMapping(method = RequestMethod.GET)
   public String printHello(ModelMap model) {
      LOGGER.info("printHello started.");

      //logs debug message
      if(LOGGER.isDebugEnabled()){
         LOGGER.debug("Inside:  printHello");
      }
      //logs exception
      LOGGER.error("Logging a sample exception", new Exception("Testing"));

      model.addAttribute("message", "Hello Spring MVC Framework!");
      LOGGER.info("printHello ended.");
      return "hello";
   }
}
log4j.properties
# Root logger option
log4j.rootLogger = DEBUG, stdout, file

# Redirect log messages to console
log4j.appender.stdout = org.apache.log4j.ConsoleAppender
log4j.appender.stdout.Target = System.out
log4j.appender.stdout.layout = org.apache.log4j.PatternLayout
log4j.appender.stdout.layout.ConversionPattern = %d{yyyy-MM-dd HH:mm:ss} %-5p %c{1}:%L - %m%n

# Redirect log messages to a log file
log4j.appender.file = org.apache.log4j.RollingFileAppender
#outputs to Tomcat home
log4j.appender.file.File = ${catalina.home}/logs/myapp.log
log4j.appender.file.MaxFileSize = 5MB
log4j.appender.file.MaxBackupIndex = 10
log4j.appender.file.layout = org.apache.log4j.PatternLayout
log4j.appender.file.layout.ConversionPattern = %d{yyyy-MM-dd HH:mm:ss} %-5p %c{1}:%L - %m%n
hello-servlet.xml
<beans xmlns = "http://www.springframework.org/schema/beans"
   xmlns:context = "http://www.springframework.org/schema/context"
   xmlns:xsi = "http://www.w3.org/2001/XMLSchema-instance"
   xmlns:mvc = "http://www.springframework.org/schema/mvc"
   xsi:schemaLocation = "
   http://www.springframework.org/schema/beans
   http://www.springframework.org/schema/beans/spring-beans-3.0.xsd
   http://www.springframework.org/schema/context
   http://www.springframework.org/schema/context/spring-context-3.0.xsd
   http://www.springframework.org/schema/mvc
   http://www.springframework.org/schema/mvc/spring-mvc-3.0.xsd">
   <context:component-scan base-package = "com.tutorialspoint" />

   <bean class = "org.springframework.web.servlet.view.InternalResourceViewResolver">
      <property name = "prefix" value = "/WEB-INF/jsp/" />
      <property name = "suffix" value = ".jsp" />
   </bean>
</beans>
hello.jsp
<%@ page contentType = "text/html; charset = UTF-8" %>
<html>
   <head>
      <title>Hello World</title>
   </head>
   <body>
      <h2>${message}</h2>
   </body>
</html>
Here, we have configured the LOG4J to log details on the Tomcat console and in the file present in > tomcat home → logs as myapp.log.
Output
Once you are done with creating source and configuration files, export your application. Right click on your application, use Run As → Maven Install option and save your hello.war file in Tomcat's webapps folder.
Now, start the Tomcat server and make sure you are able to access other webpages from the webapps folder using a standard browser. Try a URL http://localhost:8080/hello/hello and we will see the following screen in tomcat logs.